
Home
Account setting
Staff
Lists
Forms
Templates (HTML emails/SMS messages)
Sending messages by SMS and email
Classes, events, attendance and Zoom
Automation
Create a birthday invitation and automation
Communication
Microsite
E-Commerce
Networks, Federations and Franchises
How to guides
Personal information and electronic message laws in Canada and the USA
Get support
Terms and conditions
RL-24
https://activitymessenger.com/
10410 Waverly, Montréal, H3L 2W4
Terms and conditions

Admin: set up federation affiliations
Prepare the federation hierarchy, season, affiliations, fees, required forms and club access before inviting clubs to submit members. Setup determines what clubs can request, who can manage those requests and what processing can create.
# Understand the hierarchy and responsibilities
The main federation manages shared seasons and affiliation definitions. Participating federation organizations configure their own attached fees and requirements. Club representatives can use the federation’s client portal; some clubs instead use their own Activity Messenger administration workspace.
Your organization must have federation access and the appropriate administration permissions. Seeing a branch in the overview does not grant unrestricted editing or billing access to that branch.

An affiliation connects a member to a club for a season. A billing item defines an organization’s fee, taxes and optional linked membership. An affiliation request is submitted information awaiting processing or review. The resulting affiliation, membership, invoice and payment are related records with separate statuses.
# 1. Create the season
- In the main federation, open Federation → Seasons and choose New.
- Enter a recognizable season name and the applicable start and end dates. The end cannot precede the start.
- Save and open the season. Review its Affiliations, Clubs and Configuration tabs as available to your organization.
Participating organizations work with this shared season and save their own configuration. Season dates also influence the initial activation and expiry of linked memberships during processing; non-expiring memberships are handled separately.
# 2. Define the affiliations offered
- Open the season’s Affiliations tab in the main federation and choose Add.
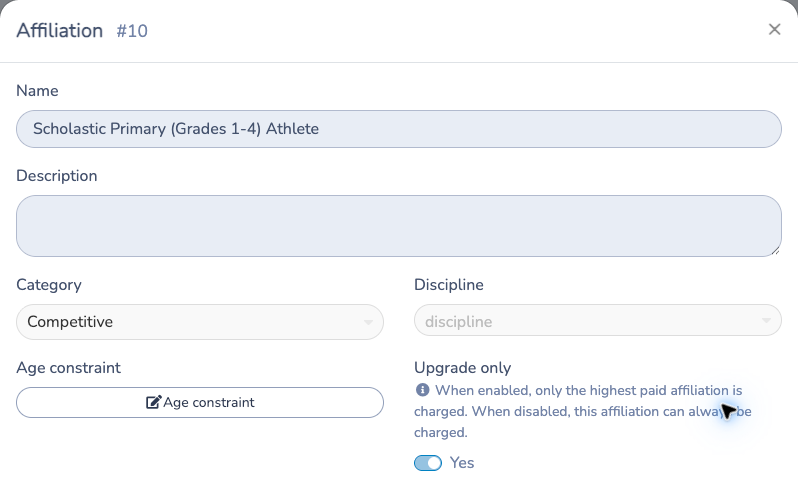
- Set the affiliation’s name, category, sport where applicable and display order. Provide the English and French labels used by your federation.
- Configure applicable age conditions and the Upgrade only billing rule. When enabled, only the highest paid affiliation is charged; when disabled, this affiliation can always be charged.
- Save, then review the affiliation’s fees and requirements in each participating organization.
Use clear names such as recreational and competitive. Shared names and categories belong to the main federation; participating organizations attach their own fees and form requirements. Changing a definition is not a substitute for adjusting a member’s existing affiliation or invoice.
The example below shows a participating federation: shared identity fields are read-only here. Edit those fields in the main federation.
# 3. Prepare billing items and linked memberships
In the federation billing-item editor, create each organization’s fees:
- Enter a name and optional description.
- Set the default price; a zero-price item is allowed.
- Select an existing membership if processing should grant one. Prepare that membership first if needed.
- Select the accounting code and taxes belonging to the issuing organization.
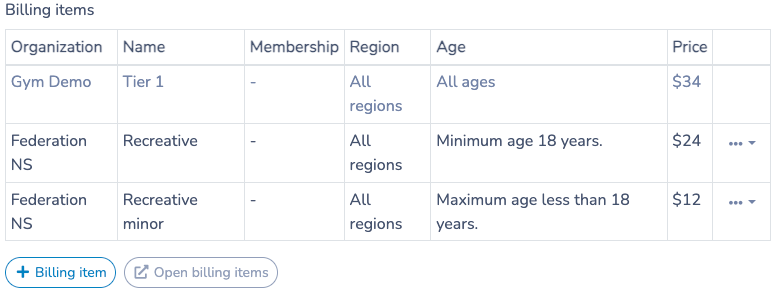
- Save the item, then attach it to the appropriate season affiliation.
When attaching an item, review its price override, age conditions and region where available. A blank override uses the billing item’s default price. Check which organization owns each fee: fees at different hierarchy levels can result in different invoices.
A member may hold the same affiliation in several clubs while sharing a linked membership. A membership granted once does not mean every fee is charged only once. Review the actual fee configuration and processing results.
For upgrades, check the starting affiliation, the added affiliation and any dependent discounts. Later cancellation of the starting affiliation can remove a discount and change the net credit; administrators must review the invoice-impact preview.
# 4. Configure required forms and approvals
- Open the affiliation’s configuration for your organization.
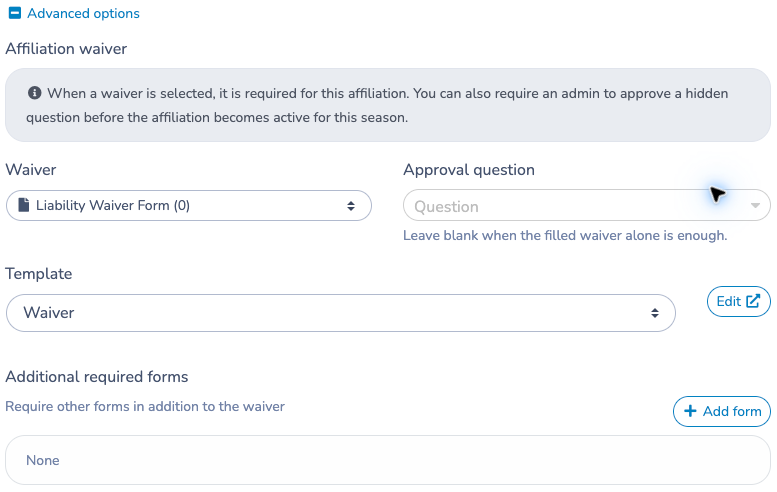
- Select its required waiver and any additional required forms.
- Configure the approval question and invitation template where applicable.
- Save and verify that the intended form can be completed by a member.
Normal activation depends on satisfying the configured requirements. Submitting a form and satisfying its approval condition are not always the same thing. Processing or paying an invoice does not prove that a missing form has been completed.
# 5. Give clubs access to the season
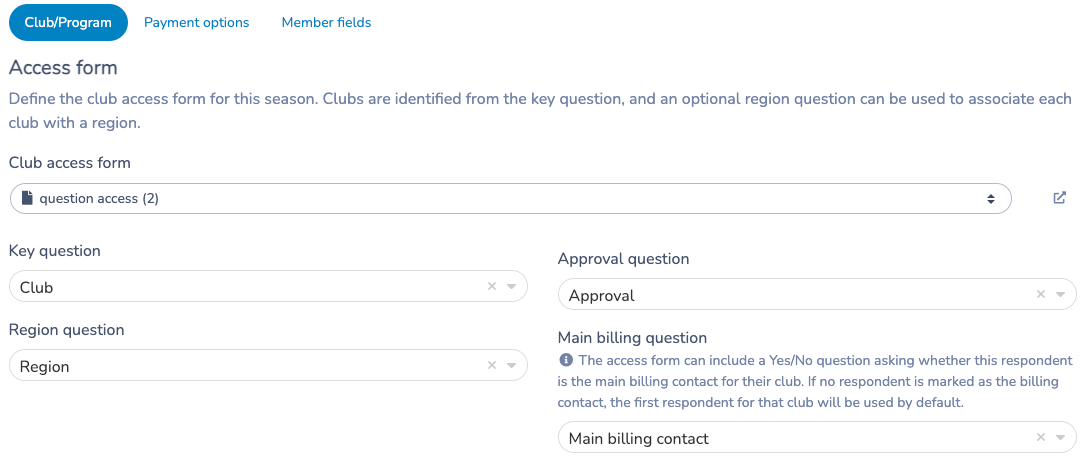
In the season’s Configuration → Club/Program area:
- Select the Club access form used to identify club representatives.
- Map the Key question that identifies the club.
- Map the Approval question controlling approved access.
- Map the Region question if clubs are grouped by region.
- Configure the Main billing question where available to identify the billing contact. If no respondent is marked as the billing contact, the first respondent for the club is used by default.
- Save and verify an approved representative’s access to the correct club and season.
The client portal access path requires the access form, club key and approval mapping. A representative’s matching access submission must be approved. If a club cannot see the season, check these mappings and the representative’s approved response before changing unrelated member data.
# 6. Configure the club’s portal and permissions
In the same configuration area, select Forms available to clubs for import. Eligible forms contain an affiliation question connected to this season. Enable import where required; payment forms cannot be imported through the client portal.
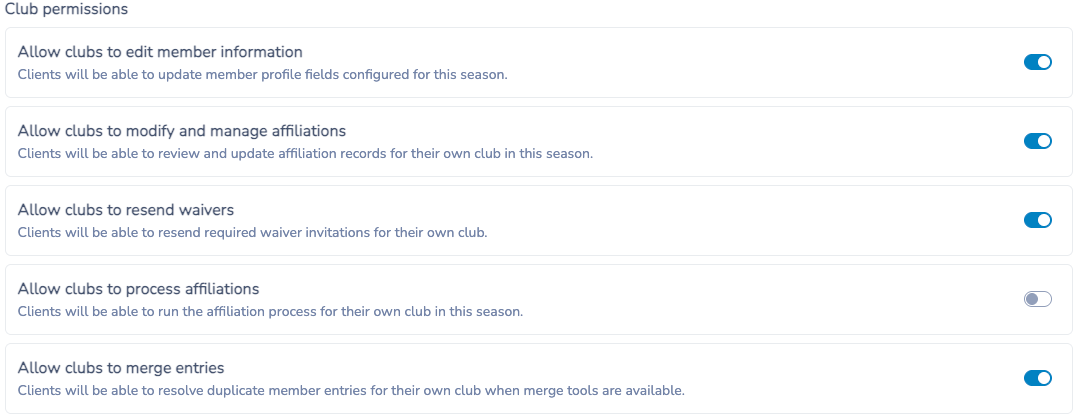
Add season instructions in both languages. Explain which form to use and whom to contact. Then choose which club actions to allow:
- Edit member information.
- Manage affiliations.
- Resend waiver invitations.
- Process affiliations.
- Merge duplicate entries.
Grant these according to the club’s role. A club that can import forms does not necessarily have permission to process affiliations or merge records. Verify the resulting portal rather than assuming every administrative control will appear there.
# 7. Review payment options and member fields
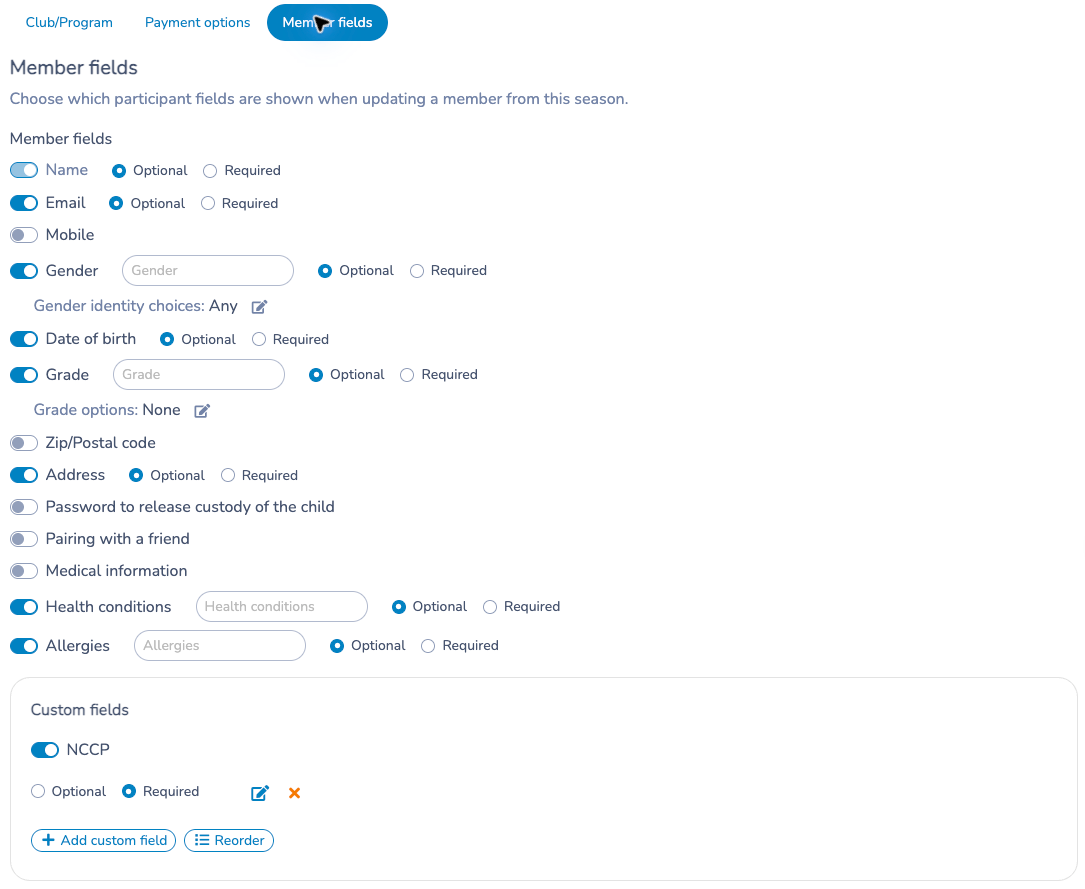
Under Configuration, review Payment options and Member fields where available. Select the permitted invoice payment methods, confirmation template, administrator notifications and the profile fields used when updating members. Ensure the billing contact and organization issuing each fee are appropriate.
The form-import dialog states that imported respondents do not receive a confirmation email. Do not confuse import notifications with the separate invoice confirmation settings.
# 8. Check the setup before opening the season
Walk through one approved demo club and member: correct season access, available form, affiliation choices, age/region eligibility, fees and taxes, linked memberships, required forms and billing contact. Review both languages and each organization’s fee ownership.
Keep four outcomes separate: a submitted request, a processed affiliation, completed requirements and a paid invoice. Use the member record and invoice to verify each outcome.
# Prepare the next season
Review season dates, affiliations, fee prices, form mappings, portal permissions and payment settings for the next period. The main federation has season lifecycle controls, including archived-season access and restoration. Review any duplicated setup before clubs use it; do not assume old dates, forms or prices are still correct.