
Home
Account setting
Staff
Lists
Forms
Templates (HTML emails/SMS messages)
Sending messages by SMS and email
Classes, events, attendance and Zoom
Automation
Create a birthday invitation and automation
Communication
Microsite
E-Commerce
Networks, Federations and Franchises
How to guides
Personal information and electronic message laws in Canada and the USA
Get support
Terms and conditions
RL-24
https://activitymessenger.com/
10410 Waverly, Montréal, H3L 2W4
Terms and conditions

Selling classes and events
The Class/Event question allows you to capture registration to a class, a summer camp or any activity with a schedule. For example for 3 tennis lessons taking place at 6PM on Sept 6, 7 and 8. An Attendance list will be automatically created for the class.
# Create a new form
Go to the top menu and click on Form, then select Create.
You can start from a template or from scratch by clicking on Create from scratch.
Choose a registration form. You can select a form with or without a ticket.

To sell classes or events, click on Edit.

Select the class of your choice. If you don't have any classes in your account, click on Create to add the name, price, number of spots, location, schedule, etc.

After selecting a class, the window will display the class sale settings on the left. On the right, you will have a summary of the question based on the chosen settings.

Configure Registration Rules
Registration Options:
- Register for all events at a fixed price.
- Choose a single event with a price for each date.
- Choose multiple events with billing per event.

Display Calendar and Day Limit Options:
- Show a calendar for multiple events.
- Hide daily times if necessary.
- Limit the number of future events a customer can register for.

Add Additional Questions and Options
- Include promotional codes, waiting lists, etc.

- Integrate waitlists and automate the entire process to simplify management.

- If the registration involves children, enable the separate participant option. Also, activate the multiple option to allow registering several children on the same form or for the same class if the parent can enroll multiple children. This ensures that each child is correctly associated with the appropriate course and its corresponding attendance list.
- Select the information you wish to collect about the participant.

Class Sale Settings:
- Sell the class by session or as a package.
- Adjust the sale price. For example, a class sold at $50 per session can be sold at $20 as a package.
- Modify the number of spots available. For example, allow only 5 spots for the package.
- If a location is set, you can display a Google Maps view.

# Selling a class either as a session or as drop-ins
Payment forms provide you with great flexibility when selling your classes. You can set up multiple forms for the sale of the same class, each tailored for different contexts. This allows you to customize the registration process, pricing, and options based on your specific needs or target audiences.
For example, a class can be offered as a session while reserving a few spots for registrations. Thus, the same class can appear on two separate forms, each with its own registration rules, while still respecting the class's maximum capacity.


# Save and test the form
Save the form once all options have been added.
Test the form by clicking on "Visit or Fill."

# Configuring payment options
Go to the payment options and log in to Stripe if you haven’t done so already.
Choose the accepted payment methods (online, credit card, gift card, multiple payments, etc.).

# Share the form
Once the form is created and connected to Stripe, share it via a unique link.
You can integrate the link into a website, use a QR code, or send it via text/SMS.


Configure registration rules and booking windows
Registration rules belong to the Class/Event question in the form. This means the same class can use different rules in different forms. For example, one form can register a participant for a complete five-occurrence session while another form offers one or more drop-in dates.
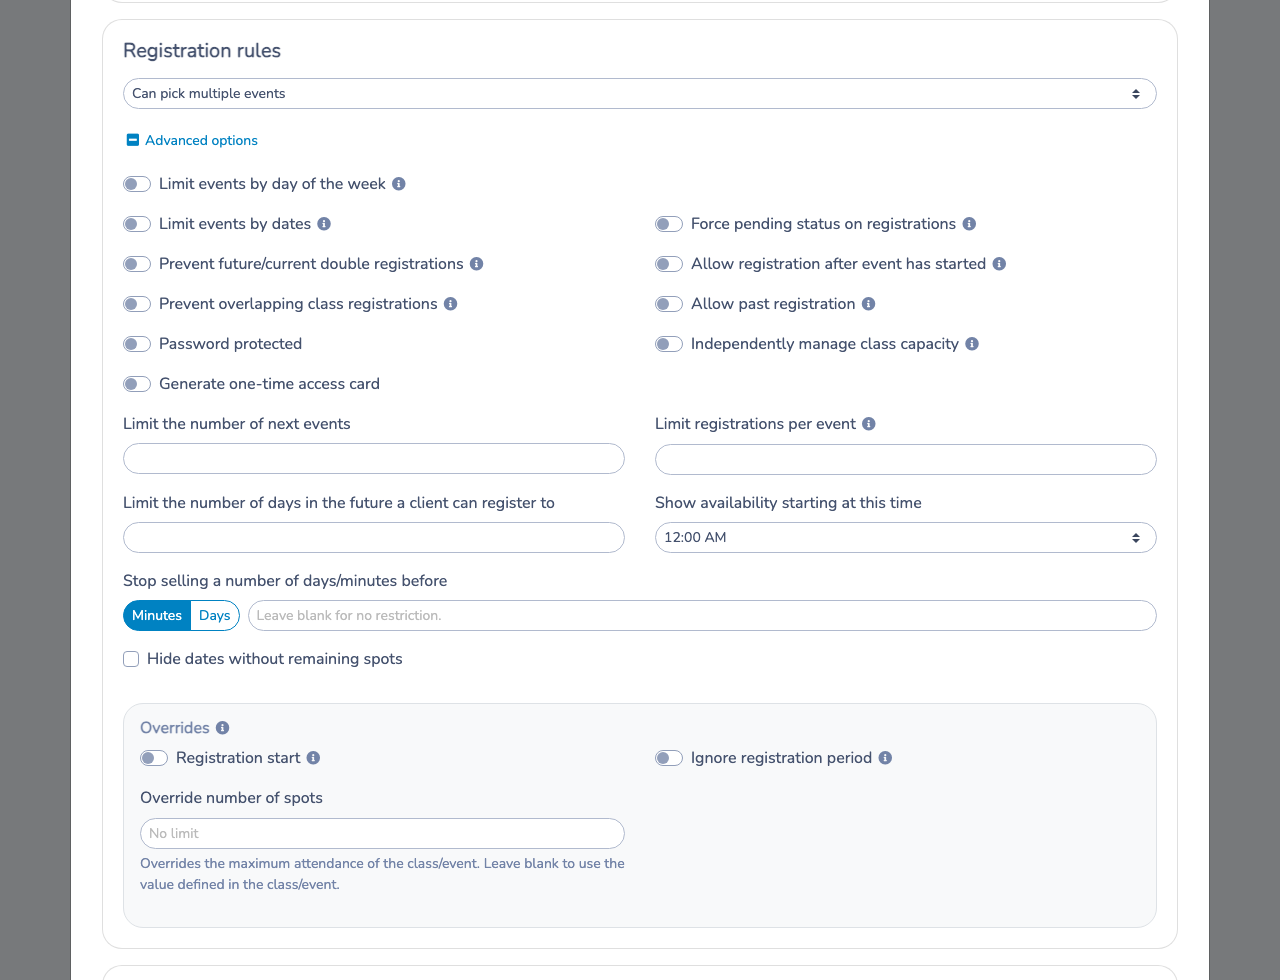
Open the payment form, select the Form tab, edit the Class/Event question, and expand Advanced options under Registration rules.
Before you begin
- Use a payment form that contains a Class/Event question and a class with more than one scheduled occurrence.
- To sell a complete session and drop-ins separately, add the same class to one Class/Event question in each form. Configure the registration rule independently in each question.
Let clients cancel their own class registration
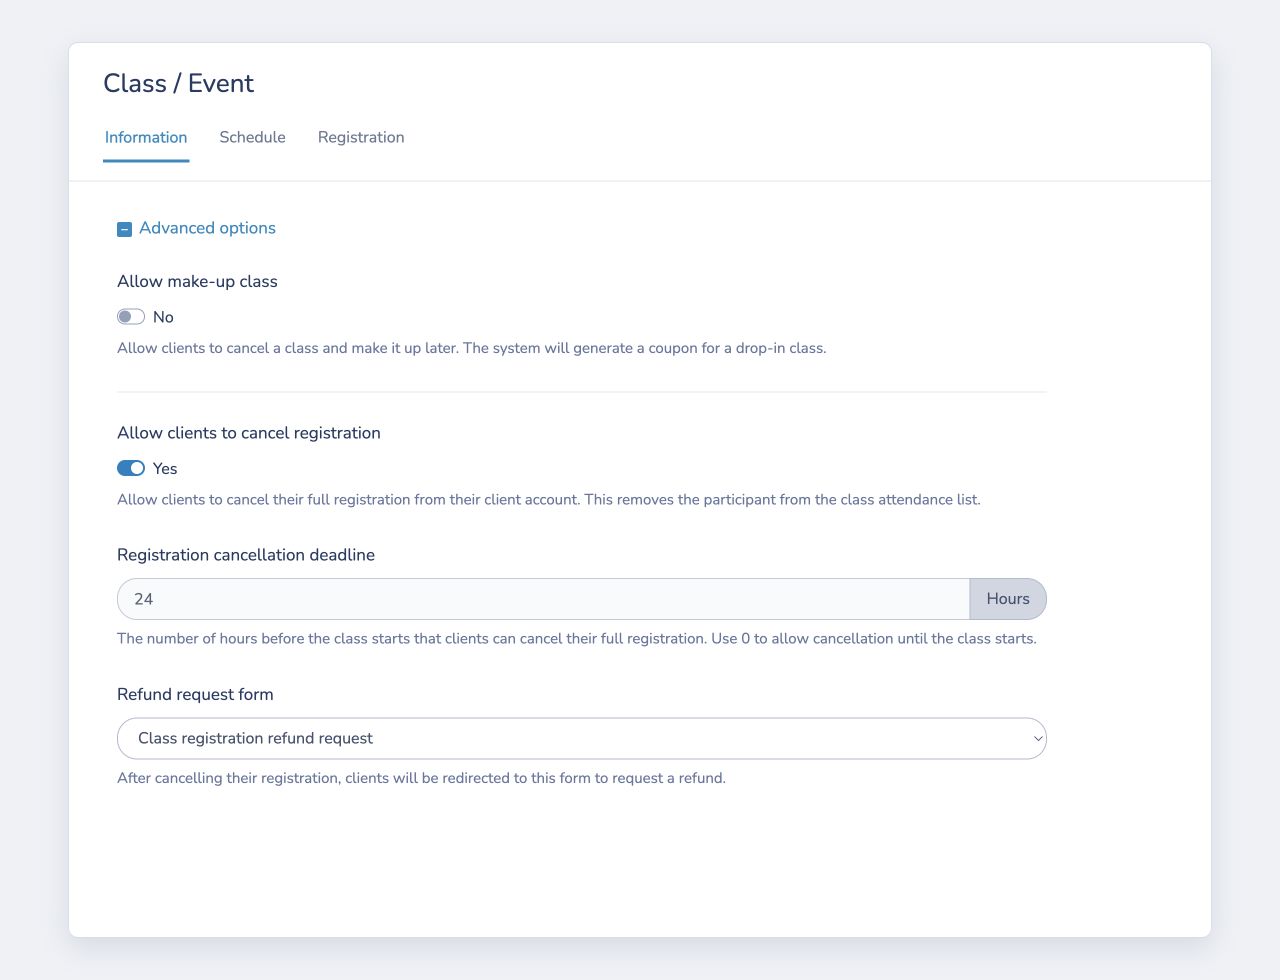
Client self-cancellation is a setting on the class, not an advanced registration rule on the form question. Enable it when a client should be able to cancel an eligible registration from My Account without first contacting an administrator.
- Go to Classes > All classes and events.
- Open the class, select the Information tab, and expand Advanced options.
- Turn on Allow clients to cancel registration.
- Enter the Registration cancellation deadline in hours. Enter
0to allow cancellation until the relevant class starts. - Optional: select a Refund request form. After cancelling, the client is redirected to this form to request a refund.
- Select Save.
The client signs in to My Account, opens Classes/events, finds the registration, opens Action, and selects Cancel registration. The confirmation shows the deadline and explains that no payment refund is issued automatically.
Important behavior:
- For a full-session registration, the deadline is calculated from the participant's next upcoming occurrence. Cancelling removes the participant from the remaining class registration while keeping past attendance.
- For a drop-in registration, the deadline is calculated from the selected occurrence and cancellation applies to that occurrence.
- If there is no upcoming occurrence, or the deadline has passed, the action remains unavailable and tells the client to contact the organization.
- Cancelling an invoiced registration creates the applicable cancellation or credit on the invoice. It does not return money automatically to the original payment method; an administrator must handle any refund separately.
- A selected refund request form collects the client's request after cancellation. It does not issue the refund.
- Allow make-up class is a separate option. It cancels one occurrence and can issue a coupon for a drop-in class; use Allow clients to cancel registration when clients must cancel the registration itself.
For example, to accept cancellations until 24 hours before the next class, enter 24 as the deadline. Select a refund request form if clients should provide a reason or the information your team needs to review a refund.
See Client account for more information about how clients access My Account.
Register multiple children or participants in one submission
Use the participant settings in the existing Class/Event question. Do not add one Class/Event question for every child.
- Edit the Class/Event question.
- Under Participant rules, enable Different participant. This separates the participant from the respondent or account owner.
- Enable Multiple directly below it.
- Choose the participant fields the form should collect, then save the question.
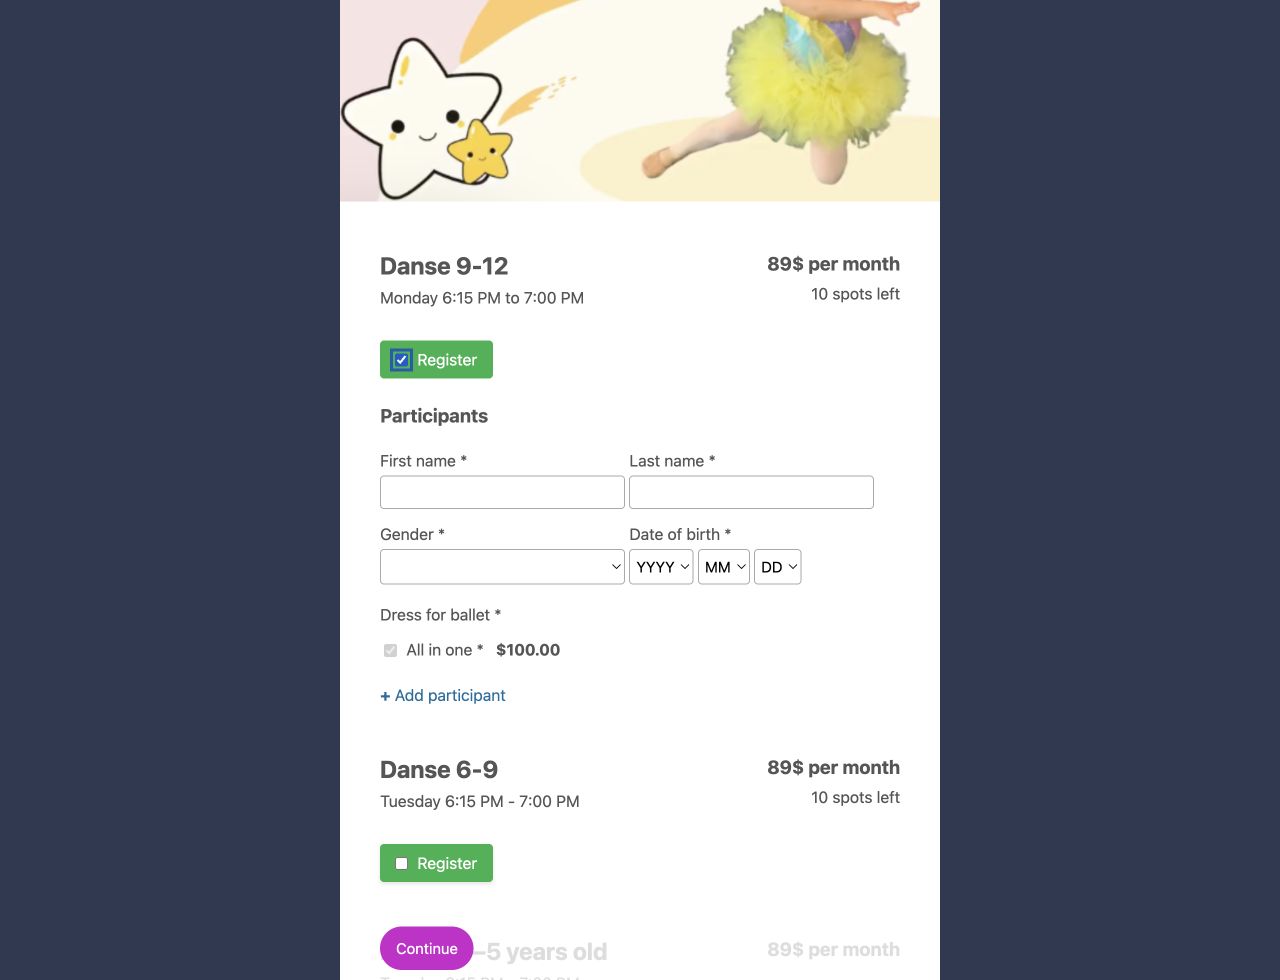
On the public form, the client can use Add participant to enter each additional child or participant. The submission creates the registrations for the people entered in that Class/Event block. Capacity, eligibility, duplicate-registration, and schedule-conflict rules still apply to each participant and selected occurrence.
Can pick multiple events is a different setting. It lets a participant choose more than one occurrence of the class; it does not allow the client to add multiple participants.
If the form contains several Class/Event questions and the same participant information should be reused between them, add a Participant/member/student question and enable its Multiple option instead. When that separate participant question is present, leave Different participant off in the Class/Event questions.
Choose how clients register
- Register to all events: one registration includes every occurrence in the class schedule. Use this for a complete session.
- Must pick only one event: the person chooses one occurrence. Use this for a single drop-in purchase.
- Can pick multiple events: the person chooses one or more occurrences and can purchase several drop-ins in one submission.
- Can pick 1st block, 2nd block or both blocks: splits a day into two schedule blocks and lets the person choose the first block, the second block, or both. Every class covered by a multi-class rule must have a compatible two-block schedule.
- Must pick only one day of the week (recurring): the person chooses one weekday and is registered for the future occurrences on that weekday.
- Can pick multiple days of the week (recurring): the person chooses several weekdays and is registered for the future occurrences on those weekdays.
Some advanced options are shown only for compatible rules. Date-selection and booking-window controls generally require Must pick only one event or Can pick multiple events.
Control which occurrences are offered
- Limit events by day of the week: display only occurrences on the selected weekdays. Merge into a single selection combines the matching displayed dates into one checkbox so the person selects them together.
- Limit events by dates: display only occurrences inside the selected inclusive date range.
- Limit the number of next events: display only the specified number of earliest upcoming occurrences. Leave it blank to avoid this limit.
- Limit the number of days in the future a client can register to: define how many calendar days ahead can be selected. Enter
1to make tomorrow the furthest eligible date. - Show availability starting at this time: use this with the future-day limit to choose the daily release time. At that time, the next eligible calendar date becomes selectable. Release times are offered in 30-minute increments.
- Stop selling a number of days/minutes before: close each occurrence when it enters the specified lead time before its start. Choose days or minutes, then enter the amount.
- Hide dates without remaining spots: remove full occurrences instead of leaving them visible as unavailable.
Control who can register and how registrations are handled
- Force pending status on registrations: keep the participant pending after submission. An administrator must officially register the participant from the attendance list or respondents table.
- Prevent future/current double registrations: prevent the same participant from being registered for the same class or occurrence again, including twice in the current transaction.
- Prevent overlapping class registrations: reject a registration when the participant is already registered for another class whose date and time overlap.
- Allow registration after event has started: keep an occurrence available after it starts, until it ends. This option does not calculate a pro-rata price.
- Allow past registration: allow selection of occurrences that have already ended. Use it only when backdated registration is intentional.
- Password protected: require the question password before the person can register. If an expiration is added, the password protection ends at that time; registration does not close automatically.
- Generate one-time access card: include an occurrence-specific barcode access card for an eligible drop-in registration. The card is delivered with the participant's registration documents by email.
- Offer a spot: for a session sold for one price, start the registration at a future occurrence that has room. If the participant should pay only for the remaining portion, also configure pro rata.
Understand capacity and purchase limits
- Independently manage class capacity: count only participants registered through this Class/Event question. Enter a value under Override number of spots to define that independent pool. Leave this off to count all participants in the class, including people registered through another form.
- Limit registrations per event: limit how many times the same client or participant can purchase a particular occurrence. For example,
1prevents a second purchase for that occurrence. This is not the event's attendance capacity. - Override number of spots: replace the class maximum for this form question. When independent capacity is off, existing participants from the class still count against this ceiling. When independent capacity is on, only registrations made through this question count.
Class settings can also define a Maximum attendance per session and a Maximum attendance per event. Those values create separate, additive pools. Their sum is the possible combined attendance; unused places do not move automatically between the pools.
Override the class registration period
- Registration start: set a registration opening date for this form question instead of using the class opening date.
- Ignore registration period: allow registration despite the registration start and end configured on the class.
The form's own opening and closing window still applies. Ignoring the class registration period does not reopen a form that is closed to submissions.
Example: open drop-ins 24 hours before a fixed-time occurrence
Suppose the same Wednesday 6:00 p.m. class is used in two forms:
- In the session form, choose Register to all events.
- In the drop-in form, choose Must pick only one event or Can pick multiple events.
- In the drop-in rule's advanced options, enter
1under Limit the number of days in the future a client can register to. - Select
6:00 p.m.under Show availability starting at this time. - Leave Independently manage class capacity off and leave Override number of spots blank when drop-ins should use only the places remaining in the shared class capacity.
The Wednesday occurrence becomes selectable in the drop-in form on Tuesday at 6:00 p.m. The session form is unaffected, and participants already registered for the full session continue to occupy a place in every occurrence.
This is a calendar-day window with one daily release time, not a separate rolling offset calculated from every occurrence. It is exactly 24 hours when the occurrences start at the same selected release time. If occurrences start at different times, configure separate class rules when possible; one rule cannot release each varying start time exactly 24 hours beforehand.