
Home
Account setting
Staff
Lists
Forms
Templates (HTML emails/SMS messages)
Sending messages by SMS and email
Classes, events, attendance and Zoom
Automation
Create a birthday invitation and automation
Communication
Microsite
E-Commerce
Networks, Federations and Franchises
How to guides
Personal information and electronic message laws in Canada and the USA
Get support
Terms and conditions
RL-24
https://activitymessenger.com/
10410 Waverly, Montréal, H3L 2W4
Terms and conditions

Set up client account tabs
Create your own tabs in My Account to group form submissions, choose what clients can change, and display useful answers as columns. Add collaboration when several clients need to work on the same group's submissions.
# Before you start
- Your organization must have client account tabs enabled, and your administrator account needs permission to configure the microsite.
- Prepare the forms you want to include. You also need the appropriate form permissions to edit their questions or review and approve responses.
- Clients use their own client account to view the tabs. Creating a tab does not give them access to the administration interface.
The built-in Forms tab provides access to clients' submitted forms. Open its settings when you want to configure actions on those forms. Create an additional tab when you want a named group of forms, introductory content, or collaboration. The built-in tab cannot be renamed from this editor and does not offer collaboration settings.
# Create a tab from the administration interface
- Open Microsite → Client account tabs.
- Click + to create a tab. To change an existing tab, click its row.
- In Information, enter a clear Name, such as Project documents.
- Use Header to explain what clients should do. You can include formatted text and links to forms or documents.
- Set Hide tab by default:
- Leave it off to show a standard, non-collaborative tab even before the client submits one of its forms.
- Turn it on to show that standard tab only after the client has submitted a form included in it.
- Collaborative tabs require approved access, as explained below. Turning this switch off does not open a collaborative tab to everyone.
- Configure Forms, Columns, and any optional settings described below.
- Click Create, or Save when editing.
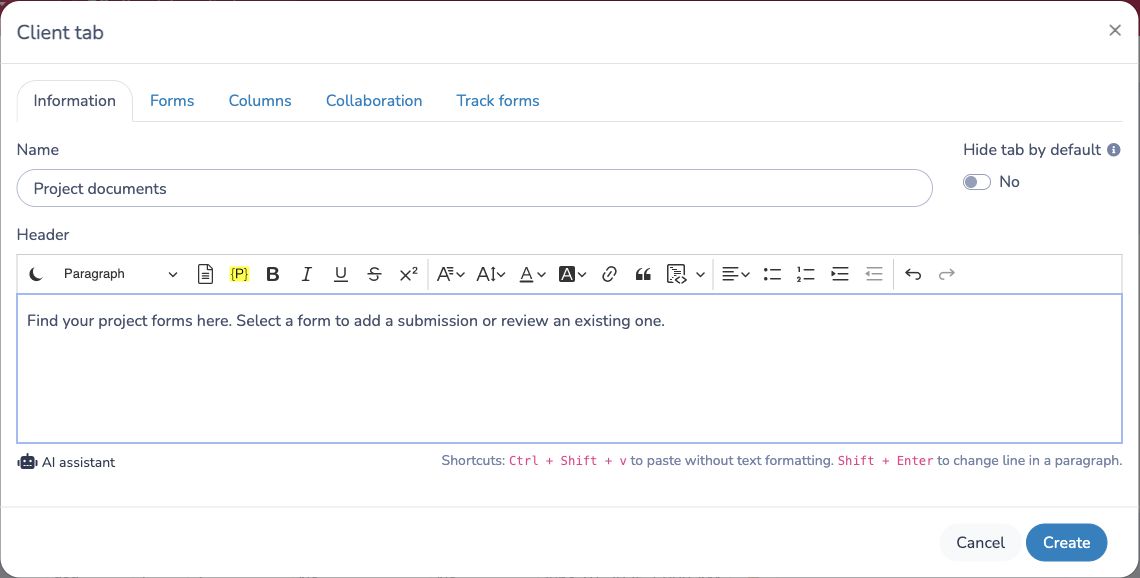
From the tab list, use Reorder items to change the order. Archive removes a tab from the active list; use the archived filter to find and restore it. Archiving a tab is separate from archiving a client's form submission.
# Choose forms and client permissions
In the tab editor, open Forms. Select a form and click Add. Repeat for each form you want to include, then set its permissions individually. Newly added forms have these switches off.
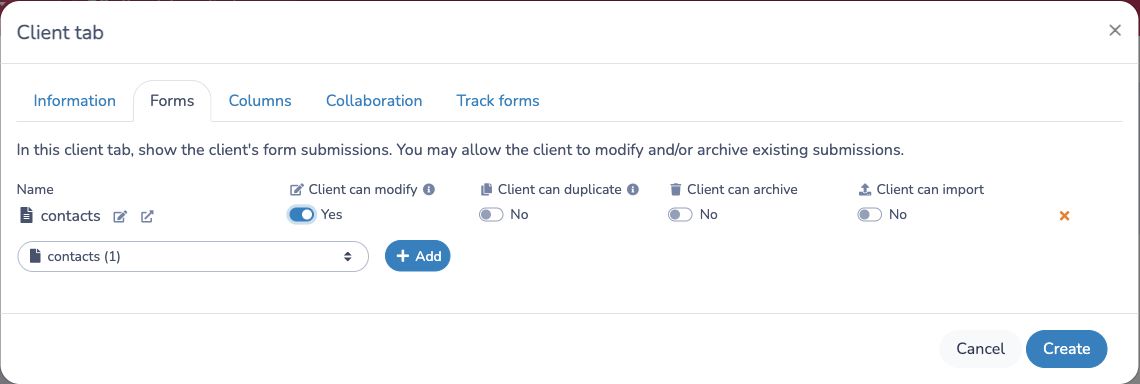
- Client can modify lets the client change an existing submission. Saving changes replaces its previous answers. Some forms with purchases or registration blocks restrict full-form changes; this switch does not remove those restrictions.
- Client can duplicate starts a new submission using the previous answers. The original submission remains unchanged. Use this when clients need a new copy rather than corrections to the existing record.
- Client can archive lets the client archive an existing submission. Enable it only when clients should be able to remove submissions from the active view.
- Client can import lets the client import new submissions for the selected form, using the sample Excel file and pasting rows into the import window. Payment-form imports are currently unavailable from client tabs.
The configuration button beside Client can import controls optional prefill data from selected source forms. This additional feature requires collaboration: it prefills the sample file with existing responses whose key question matches the connected client's approved access. It is separate from importing new rows.
Click the × beside a form to remove it from this tab's configuration, then save the tab.
These settings apply to submissions the client can access. Adding a form to a tab does not share all of its respondents with every client. Without collaboration, clients see their own accessible submissions. With collaboration, matching shared submissions are also available, and the same per-form action switches apply to them.
In My Account, clients select the tab and use the form filter to choose a form. They can review submitted forms and use the available actions. Selecting a form also exposes Add to open a new submission, subject to the form's own availability and access rules. Leaving the modification switch off does not prevent clients from filling a new form.
# Display answers as columns
Columns make important answers visible directly in the submitted-forms table.
- Open the form designer and edit the question whose answer should appear.
- Give the question a Placeholder, such as
Project codeorContact name, and save your form changes. - Return to Microsite → Client account tabs and open your tab.
- In Columns, select the required placeholder names and save.
- Open the tab in My Account and check the values in the submitted-forms table.
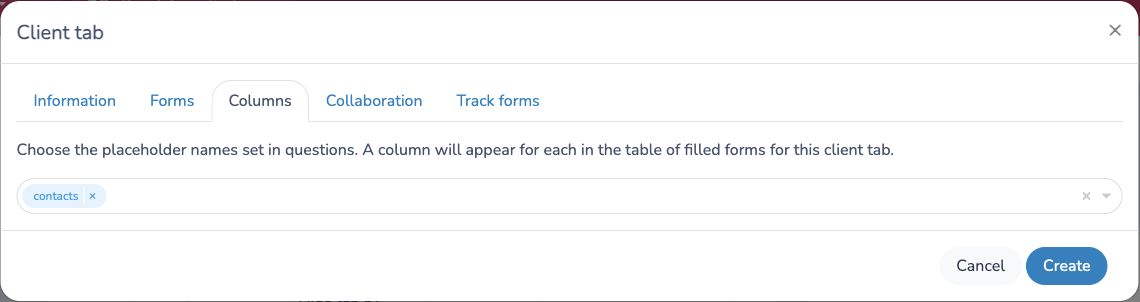
The placeholder connects the column to the answer; the question's visible label alone is not enough. If several forms should populate the same column, use the same placeholder for the equivalent question on each form. A submission without a corresponding answer will not supply a value for that column.
Allow editing an individual answer
For supported questions, clients can update an answer directly from the table without reopening the full form:
- Turn on Client can modify for the form in the tab's Forms settings.
- In the question settings, turn on Allow update in the client account.
- Assign the question a Placeholder and select it in the tab's Columns settings.
- Save both the form and the tab, then check the client view.
This is available for supported text, single-choice, and person questions where the question setting is offered. Showing a column alone does not make it editable.
# Collaboration
Collaboration lets several clients work on submissions associated with the same group or project. Each person signs in to their own account. An access form records the group they are requesting, and an administrator's approval grants access to that group.
For example, two project coordinators may need to review the same contact forms. Both request access to project P-100. Once approved, both can see contact-form submissions carrying that project code and perform the actions enabled for those forms. A coordinator approved only for P-200 does not gain access to P-100 submissions through that approval.
1. Prepare the access form and matching questions
- Create a form for access requests. Include the account owner's identifying information so each request belongs to the correct client account.
- Add a Key question, such as Project code. A controlled choice list helps keep values consistent.
- Add an Approve and notify question for the administrator's decision. Use a positive choice beginning with Yes or Oui for approved requests, such as Yes — approved. A label such as Approved alone is not recognized as a positive access decision.
- Keep approval manual when requests should be reviewed. If the approval question has an automatic positive value, every person who submits the access form gains the corresponding access. Review the question's email configuration if you want notifications; a notification is not implied simply by creating a collaboration tab.
- In every form that will contain shared submissions, add the matching key question and give it the same Placeholder, for example
Project code. Use the same group values as the access form.
The access form decides who may collaborate. The other forms contain what they collaborate on. Selecting an access form does not automatically add it to the list of shared forms. Avoid allowing clients to change their access key or approval after review through the permissions you configure.
2. Connect the tab to the access form
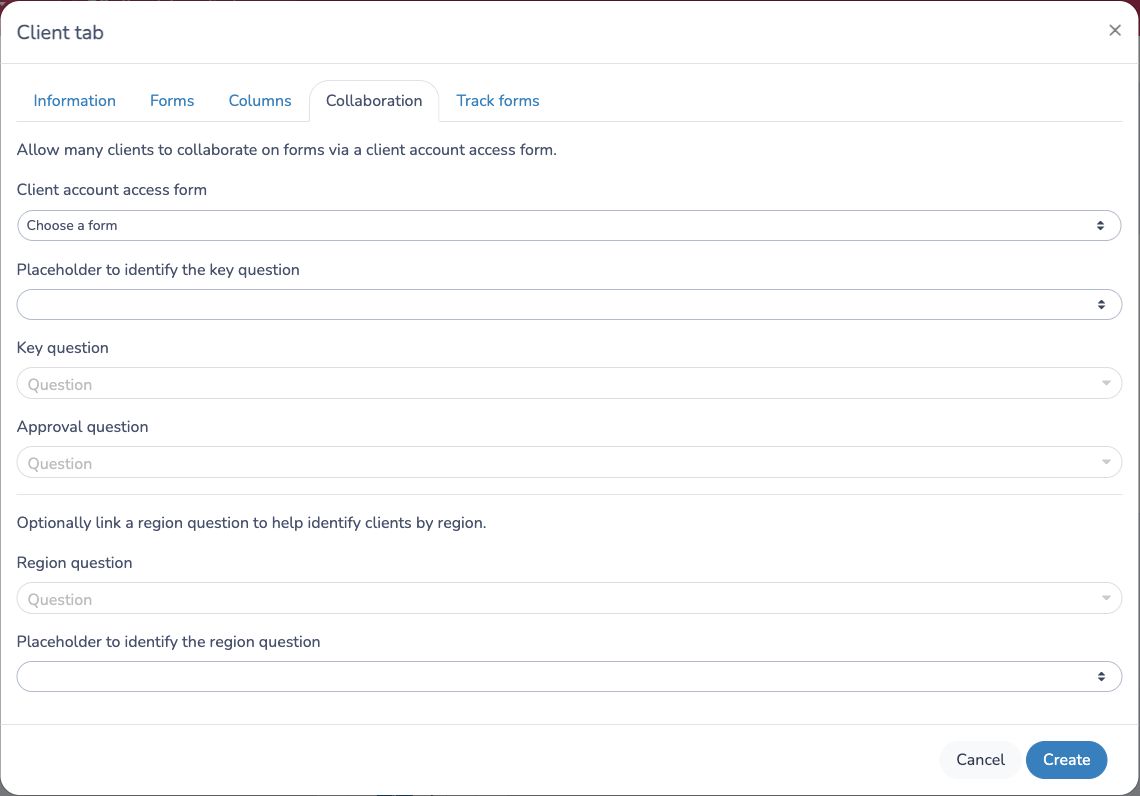
Open the additional client tab, then select Collaboration:
- Client account access form: choose the access-request form.
- Placeholder to identify the key question: choose the placeholder used by the matching questions on the shared forms.
- Key question: choose the question on the access form that identifies the group or project.
- Approval question: choose that access form's Approve and notify question.
- Optionally select a Region question and its placeholder if you also need to identify clients by region. Leave these empty for a simple project-based workflow; they do not replace the key and approval configuration.
- In Forms, add the forms the collaborators should work on, set their action permissions, and configure Columns.
- Save the tab.
3. Collect requests and approve access
- Share the access form's link with prospective collaborators, for example from a microsite page or an invitation.
- Each collaborator submits it using the identity associated with their own client account and selects the appropriate group or project.
- From Forms, open the access form's respondents, review the request, and record the positive decision in the configured approval question.
- Ask the collaborator to open or refresh My Account. The collaborative tab becomes available when their account has a matching approved access request.
Clients must be able to reach the access form before they have access to the tab. Do not put the only access-request link inside that tab.
4. Work together and maintain access
Inside the tab, the Access to submitted forms panel identifies the client's approved key values. The submitted-forms table includes accessible submissions from the configured forms whose key matches those values, including submissions made by other people. Existing access to the client's own submissions can also apply.
Collaborators select a form, review its submissions, and use the permitted actions. Modify updates the shared submission, so other collaborators will see the changed answers when they refresh. Duplicate creates a separate submission. Coordinate edits when several people work on the same record.
To remove an approval, return to the access form and change the decision to a non-positive value, or archive the access request. Check for other approved requests for that client: another approval may still grant access. Refresh the client account to check the resulting visibility. Removing collaborative access does not erase submissions or remove ownership-based access to the client's own records.
If the tab or submissions are missing
- Tab missing: check the signed-in client identity, the submitted access request, the selected key and approval questions, and a positive approval value. Also confirm that the tab is not archived.
- Tab visible but shared forms missing: confirm the form is included under Forms, the relevant question has the configured placeholder, and the submitted key value matches the approved group. An empty or inconsistent key cannot provide the intended group match.
- Edit action missing: check Client can modify, form-specific restrictions, and—for direct answer editing—the question's update setting and selected column.
Before inviting a group, review the result with an approved account and an account without that approval, using sample submissions with different key values.
# Tracked forms
If form tracking is enabled for your organization, open Track forms in the tab editor. Turn on Client can track for the forms to include in the client's Tracked forms list.
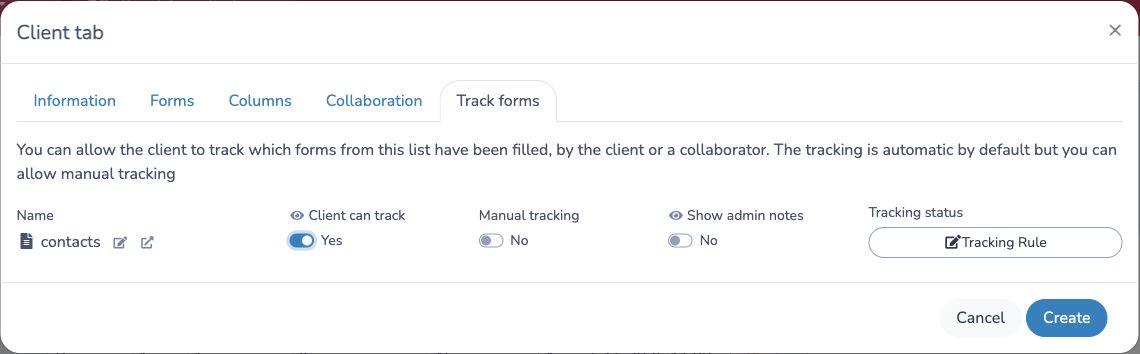
Tracking automatically shows whether a form has been submitted by the client or a matching collaborator. Manual tracking lets clients mark completion themselves; it does not submit a form. Show admin notes makes the relevant administrative notes visible to clients. Under Tracking status, use Tracking Rule to customize filled/not-filled labels or configure a status based on a supported date question. Save the tab after adjusting these settings.
Clients can expand a tracked form to review its submissions and any exposed notes, or use Visit to open the form. Tracking helps follow progress; it does not itself require a form to be submitted or grant additional access.