
Home
Account setting
Staff
Lists
Forms
Templates (HTML emails/SMS messages)
Sending messages by SMS and email
Classes, events, attendance and Zoom
Automation
Create a birthday invitation and automation
Communication
Microsite
E-Commerce
Networks, Federations and Franchises
How to guides
Personal information and electronic message laws in Canada and the USA
Get support
Terms and conditions
RL-24
https://activitymessenger.com/
10410 Waverly, Montréal, H3L 2W4
Terms and conditions

How promo codes work
Promo codes let you offer a fixed-amount or percentage discount on eligible classes, products, memberships, packages, or resources. You choose who can use the code, when it is valid, how often it can be redeemed, and which items qualify.
This guide covers standard promo codes. If the discount depends on buying a second or additional item in the same transaction, see Promo codes for multiple purchases (multi-items).
# Before you begin
You need to be an administrator or account owner with permission to manage promo codes.
The payment or registration form must also accept promo codes for the item being sold. Creating a promo code does not automatically add a promo-code field to every form.
# Create a promo code
- Go to E-Commerce → Promo codes.
- Click +, then choose Promo code. Do not choose Promo code on multi items for a standard code.
- Enter a Promo code name (for internal tracking).
- Enter the customer-facing Code. For example,
SUMMER10. - Choose Amount or Percentage, then enter the discount.
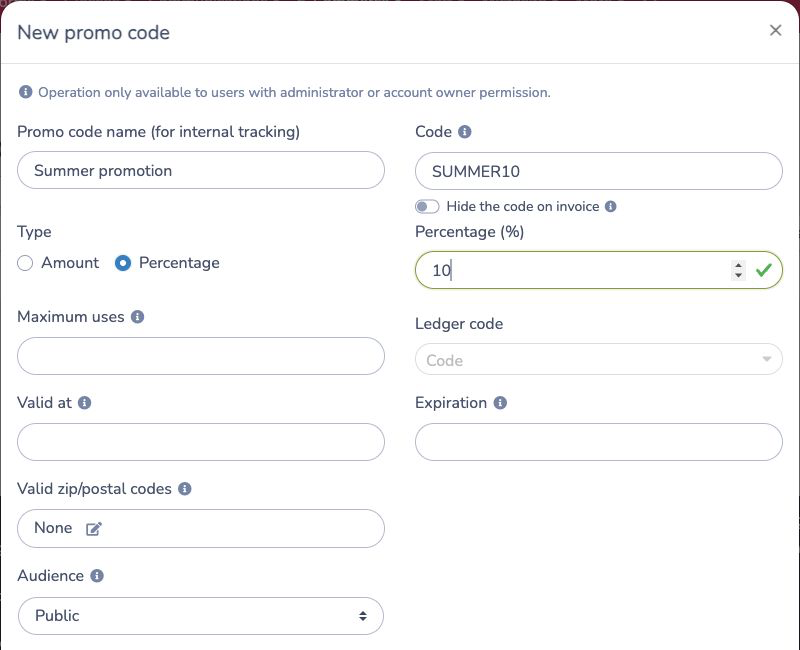
The internal name helps administrators identify the promotion. Customers enter the code itself. Once a client has used a code, the code cannot be changed.
# Import many promo codes
Use the bulk importer when you already have a list of unique codes and want them all to use the same discount and eligibility settings.
- Go to E-Commerce → Promo codes.
- Click +, then choose Import promo codes.
- Under Promo codes to import, choose a CSV or TXT file or paste the codes directly. You can enter one code per line or separate values with commas, semicolons, or tabs.
- Enter the shared internal name, discount, dates, maximum uses, audience, eligible items, and advanced rules.
- Review the unique-code count, click Import [number] promo code(s), and confirm the import.
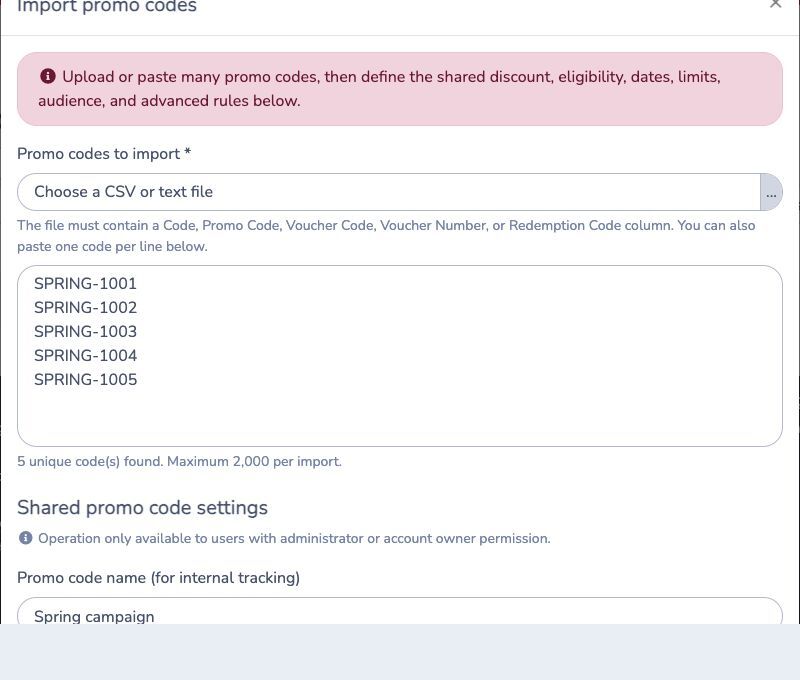
For a multi-column file, use a recognized heading such as Code, Promo Code, Voucher Code, Voucher Number, or Redemption Code. Rename the code column to Promo Code when the source file uses another heading.
Activity Messenger trims spaces and converts codes to uppercase. A single import can contain up to 2,000 codes. Every imported value becomes an independent promo code; it is not a coupon and is not assigned to a customer.
The import is all-or-nothing. If the list contains a duplicate or any value already exists as an active or archived promo code or coupon, no new code is kept. Correct the list and import it again.
The shared Maximum uses setting applies separately to every imported code. For example, importing 500 codes with Maximum uses = 1 creates 500 promo codes that can each be used once.
# Set dates, usage limits, and audience
The following settings are optional:
- Valid at sets the first date on which the code can be used.
- Expiration sets the end of the promotion.
- Maximum uses limits the total number of clients who can redeem the code. Leave it empty for no overall limit.
- Ledger code assigns the discount for accounting and reporting.
- Hide the code on invoice prevents the code itself from appearing on the client's invoice.
- Valid zip/postal codes limits redemption to the postal codes you enter.
Under Audience, choose how the code is distributed:
- Leave the audience as Public when any eligible client may enter the code.
- Select a recipient list to restrict the code to clients in that list.
- With a restricted audience, leave automatic application off when eligible clients should enter the code themselves.
- Turn on automatic application when eligible clients should receive the discount automatically. An automatically applied audience code cannot also be entered manually.
# Control how often a client can use the code
By default, the discount applies to the eligible items on one invoice and the same client cannot redeem it again on another completed invoice.
Use the settings under Limitation when you need different behavior:
- Turn on Limit the client to use the promo code on only the first eligible item of the invoice to discount only one eligible item.
- Turn on Allow the client to use the promo code multiple times when the same client may redeem it on more than one invoice.
These client limits are separate from Maximum uses, which controls overall redemptions across all clients.
# Choose eligible items
Under Applies to, choose Any item of a type or select only the specific items that qualify. Depending on the features enabled for your organization, you can configure:
- Classes and events, including class tags and session or drop-in eligibility.
- Packages.
- Products and product variants.
- Memberships.
- Resources.
- Eligible add-ons.
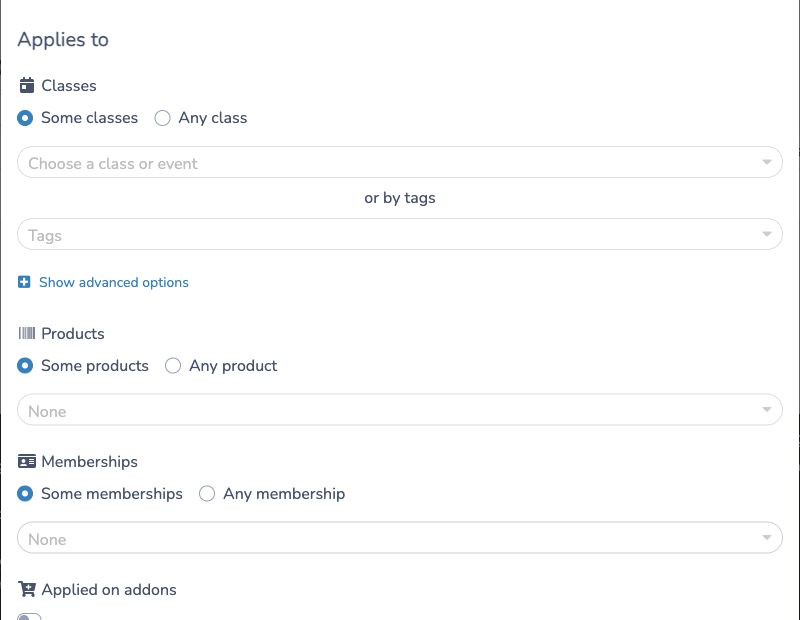
A code is rejected when the client tries to apply it to an item that is not eligible.
# Allow the code in a form
Open the payment or registration form that sells the eligible item, then edit the relevant E-Commerce question:
- For a class, event, product, membership, or ticket question, enable the option to accept a coupon or promo code.
- For an Invoice items or resource question, select the promo codes that the question accepts.
Save the question and test the form before sharing the promotion.
# What happens when a client enters a code
At registration or checkout, the client opens the promo-code field, enters the code, and applies it. Activity Messenger verifies:
- The start and expiration dates.
- The overall and per-client usage limits.
- Audience eligibility.
- Postal-code eligibility, when configured.
- Whether the item accepts the code and is included under Applies to.
If every condition is met, the discount is applied to the eligible invoice item or items. Otherwise, the client sees a message explaining why the code cannot be used.
# Example
Create a public code named Summer promotion with the customer code
SUMMER10:
- Set the type to Percentage and the value to 10%.
- Set an expiration date at the end of the registration period.
- Choose the eligible summer classes under Applies to.
- Enable promo codes in the class question of the registration form.
A client who enters SUMMER10 before the expiration date receives 10% off the
eligible class. Unlisted classes and other item types keep their regular price.
# Track and manage promo codes
The Promo codes table shows each code's audience, discount, eligible item types, uses, maximum uses, expiration, and last update.
- Click a code in the table to copy it.
- Open a row and select Usage to review completed invoices where the code was applied.
- Use the table filters to find public, audience-restricted, amount, percentage, or archived codes.
- Archive a code when it should no longer be offered. Archived codes can be viewed with the archived filter and restored when needed.
# Standard promo codes compared with multi-item promo codes
A standard promo code answers: “Which eligible items receive this discount?”
A multi-item promo code adds purchase-count rules such as:
- Apply a discount only when at least two items are purchased.
- Discount the second or another specific item.
- Apply the discount to pairs of items.
- Require the same participant or distinct participants.
For those rules, use Promo codes for multiple purchases (multi-items).