
Home
Account setting
Staff
Lists
Forms
Templates (HTML emails/SMS messages)
Sending messages by SMS and email
Classes, events, attendance and Zoom
Automation
Create a birthday invitation and automation
Communication
Microsite
E-Commerce
Networks, Federations and Franchises
How to guides
Personal information and electronic message laws in Canada and the USA
Get support
Terms and conditions
RL-24
https://activitymessenger.com/
10410 Waverly, Montréal, H3L 2W4
Terms and conditions

Configuring Outlook or Gmail to forward Interac e-Transfer emails
You can forward Interac e-Transfer confirmation emails to interac@am.lol. Activity Messenger will parse the email and settle the payment against the outstanding invoice automatically. If you use Microsoft Outlook or Gmail, you can create a rule to make that automatic.
# Forwarding with Microsoft Outlook
In Outlook, click on File and then choose Manage Rules & Alerts.

Click on New Rule. A pop-up appears. Choose Apply rule on messages | receive. Click on Next.

Another popup appears with two steps. We will be adding 2 parts to this rule.
In Step 1 click on the first checkbox from people or public group. In Step 2 click on people or public group.

Another popup appears. In the From input box, type in the email address you receive Interac e-Transfer deposit confirmations from. Usually that is catch@payments.interac.ca. It could also be notify@payments.interac.ca. Please add both. Click on Ok to save the first part of the rule.

Let's create the second part of the rule. In Step 1 click on the checkbox with specific words in the body. In Step 2 click on specific words.

Another popup appears. Type in AmInUmId and click on Add. Be sure to type in exactly. The words are case sensitive. Any typo will prevent the rule from working. Click on Ok to save the the second part of the rule.

Now click on Next to specify what to do with those emails. In Step 1 click on forward it to people or public group. In Step 2 click on people or public group.

Another popup appears. In the To input box, type in interac@am.lol. Click on Ok to save.

Finally, click on Finish and Apply to save the rule.
# Forwarding rules in Gmail
How to set up a rule in gmail to auto-forward messages from a certain address.
Think of Gmail like a mailroom. Every email that arrives is a letter. A filter is like giving the mailroom worker instructions:
"Whenever you see a letter from this person, send a copy to my friend."
# Step 1: Tell Gmail where to send the emails
Before Gmail can forward emails, it needs to know the forwarding address
- Open Gmail.
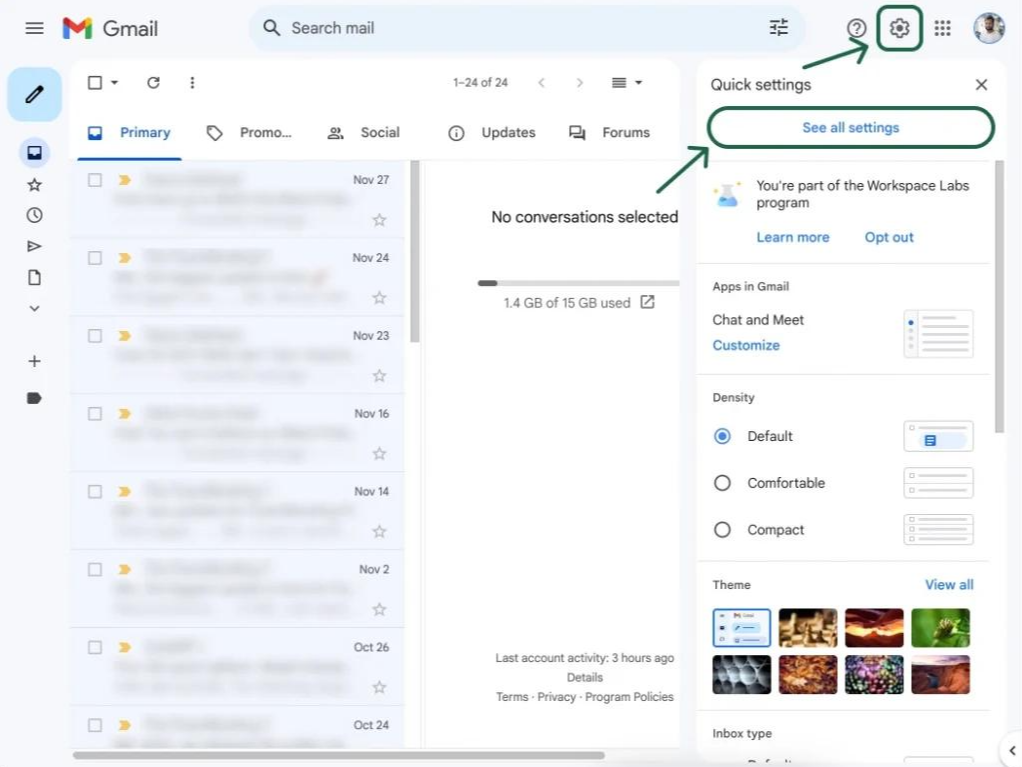
- Click the ⚙️ Settings icon in the top-right corner.
- Click See all settings.
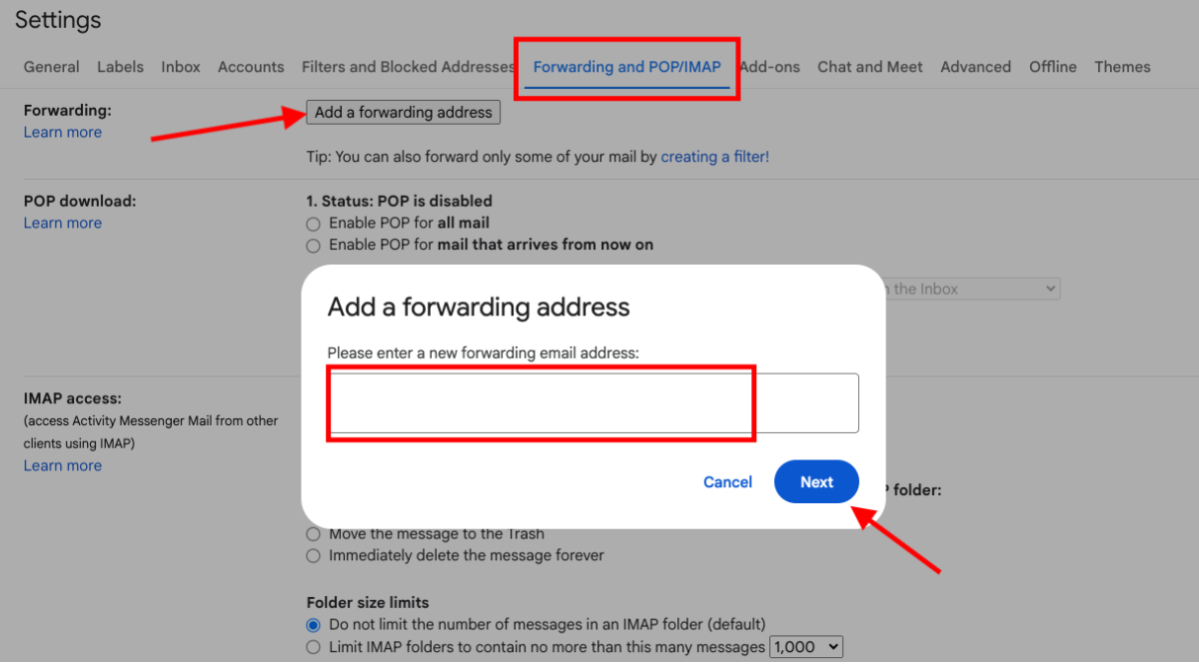
- Select the Forwarding and POP/IMAP tab.
- Click Add a forwarding address.
- Enter the email address you want Gmail to forward messages to.
- Click Next, then Proceed.
- Gmail will send a confirmation email to that address.
- Open the confirmation email and click the confirmation link.
NOTE: Important: You can't forward emails until the forwarding address has been confirmed.
# Step 2: Create a rule (filter)
Now you'll tell Gmail which emails to forward.
- In Gmail, click the Show search options icon (it looks like sliders) in the search bar.
- Fill in the information you want Gmail to look for. For example:
- From: person@example.com
- Subject: Registration
- Or use any other criteria you need.
- Click Create filter.
- Check the box for Forward it to.
- Choose the forwarding email address you added earlier.
- Click Create filter again.
NOTE: Before creating the filter, send yourself a test email that matches the rule. If it gets forwarded automatically, you know everything is working correctly.