
Home
Account setting
Staff
Lists
Forms
Templates (HTML emails/SMS messages)
Sending messages by SMS and email
Classes, events, attendance and Zoom
Automation
Create a birthday invitation and automation
Communication
Microsite
E-Commerce
Networks, Federations and Franchises
How to guides
Personal information and electronic message laws in Canada and the USA
Get support
Terms and conditions
RL-24
https://activitymessenger.com/
10410 Waverly, Montréal, H3L 2W4
Terms and conditions

Bookings: resources, packages and daily operations
Use bookings to let clients reserve a location, a member of staff or equipment for a specific time. Set up the resources, organize reservations with booking types, and offer a booking package on your Microsite. Staff can then monitor the schedule on Today and make a booking for a client from Availability.
This guide follows Book a mat, a golf practice package: one available mat for one hour, priced at $20 early in the morning or $25 later in the day, with optional buckets of golf balls. The example uses three resources named Mat 1, Mat 2 and Mat 3, and the booking type Golf.
# Before you start
Bookings must be enabled for your organization. Use an administrator account with permission to access resources, configure bookings and create bookings. Access to invoices is also needed for the relevant billing operations. If a menu or action is missing, have your organization administrator check your permissions and enabled features.
The navigation below follows the E-Commerce menu. Depending on your navigation layout, Resources, Booking packages and Today may also appear directly in the booking navigation.
# 1. Create the resources
A resource is the actual place, person or item whose time must be reserved. A package is the offer a client purchases. Keep these separate: three independently bookable mats should be three resources, even when clients buy the same package.
- Open E-Commerce → Resources (staff, locations & equipment).
- Click + to add a resource, or click an existing resource to edit it.
- Choose its type: location, staff or equipment. Give it a clear name. In this example, the mats are location resources named Mat 1, Mat 2 and Mat 3.
- Configure a parent location or blocking relationships when resources share space. A parent/overlap relationship prevents conflicting reservations; Block locations identifies other resources that become unavailable when this resource is used.
- Save the resource. In the resource list, use the tag controls to assign Golf to all three mats.
Tags help staff work with a useful group of resources. The Golf resource tag filters the Today page; the Golf booking type introduced below classifies bookings. They serve different purposes even though their names match.
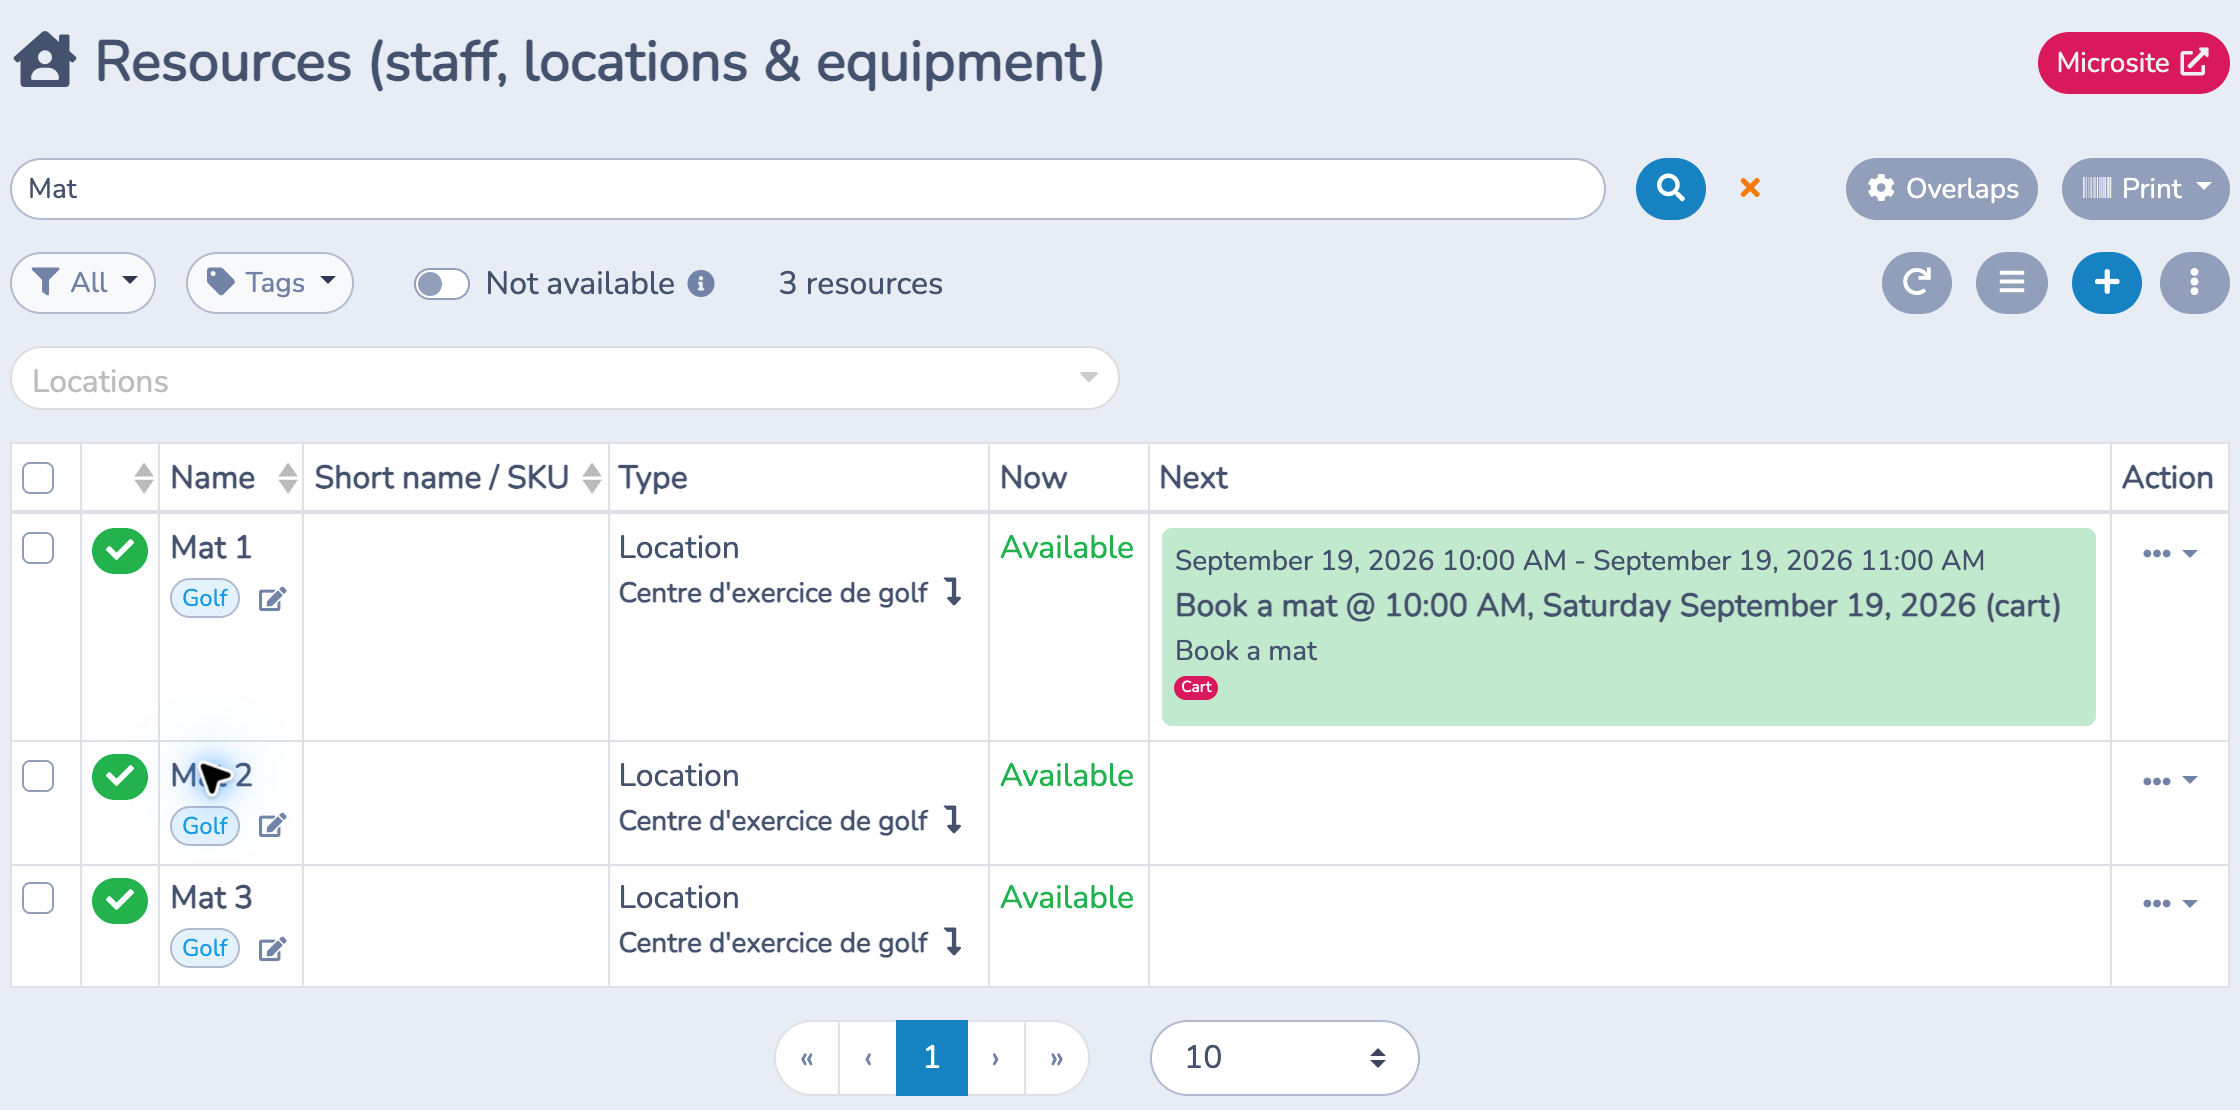
The resource list shows Now and Next, helping staff identify current use and the next reservation. Resource setup alone does not create an online offer or define its selling price: those belong to the package.
# 2. Configure a booking type
A booking type gives reservations a category and a calendar color. For this example, use Golf.
- Open the organization settings gear beside the organization logo and choose Booking types.
- Click +, or open an existing type.
- Enter a Name, choose a Color, and optionally add a Description.
- Review the availability options, then create or save the type.
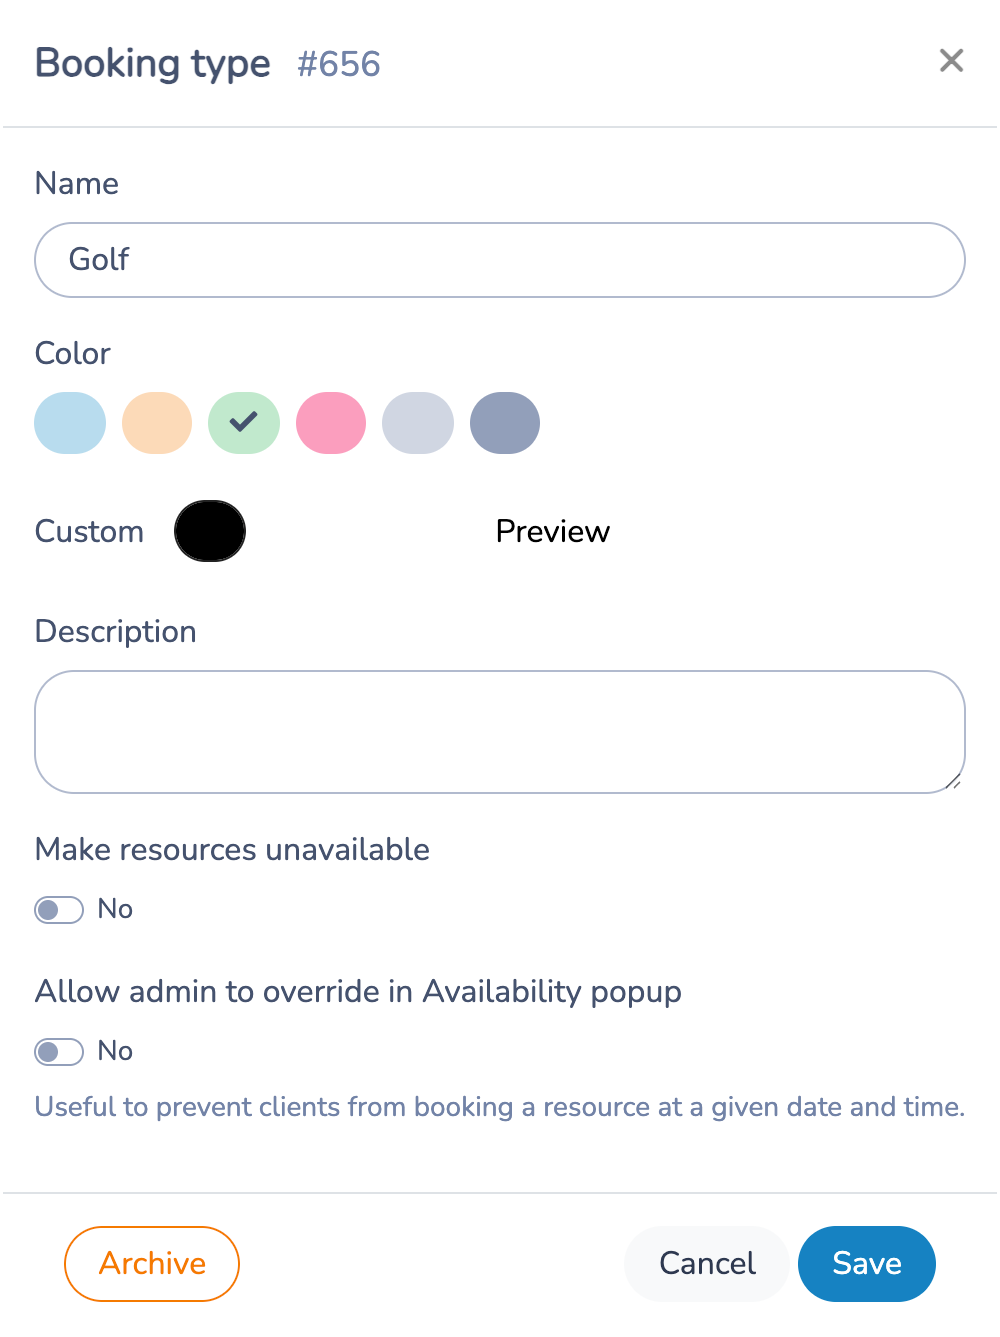
When available, Make resources unavailable is intended for bookings that make resources unavailable and hide them from calendars. Allow admin to override in Availability popup lets an administrator override bookings of this type through Availability, for example when a slot is blocked from client booking but staff may make an exception. Leave these options off for the ordinary Golf reservations in this example.
A booking type does not define the package's price or selling hours. Select it in the package's Bookings tab to apply it to that offer.
# 3. Build the Book a mat package
Open E-Commerce → Booking packages, then click + or open Book a mat.
Information
In Information, enter the package name, category and short description. In this example, the category is Rentals and the offer is one hour at a golf practice mat.
Set Visible to Yes to show the package to clients in the Microsite. A hidden package can still appear in orange to administrators, so check the public view in a private browser window. Disabled prevents booking; leave it off when the offer should be available. Choose whether the default page opens the description or calendar.
Description
Explain what the booking includes in the long description shown on the Microsite. For Book a mat, describe the one-hour practice session and explain that buckets of balls are optional extras. Choose whether to show the description on the calendar. Use the details field for additional instructions and choose whether those details appear before the invoice.
Images
Add up to three images to illustrate the offer. A photo of the mats helps clients recognize what they are reserving. If your organization has a site plan, use the site-plan option to help clients locate the resource.
Bookings
In Bookings:
- Add Mat 1, Mat 2 and Mat 3 to the same resource row.
- Set Duration to 1h. The example has no buffer before or after.
- Leave Do not reserve off: the selected mat must actually be reserved.
- Leave Allow choosing off to assign an available mat automatically. Enable it when clients should choose a particular resource.
- Enable Show to client to display the assigned mat.
- Select the Golf booking type.
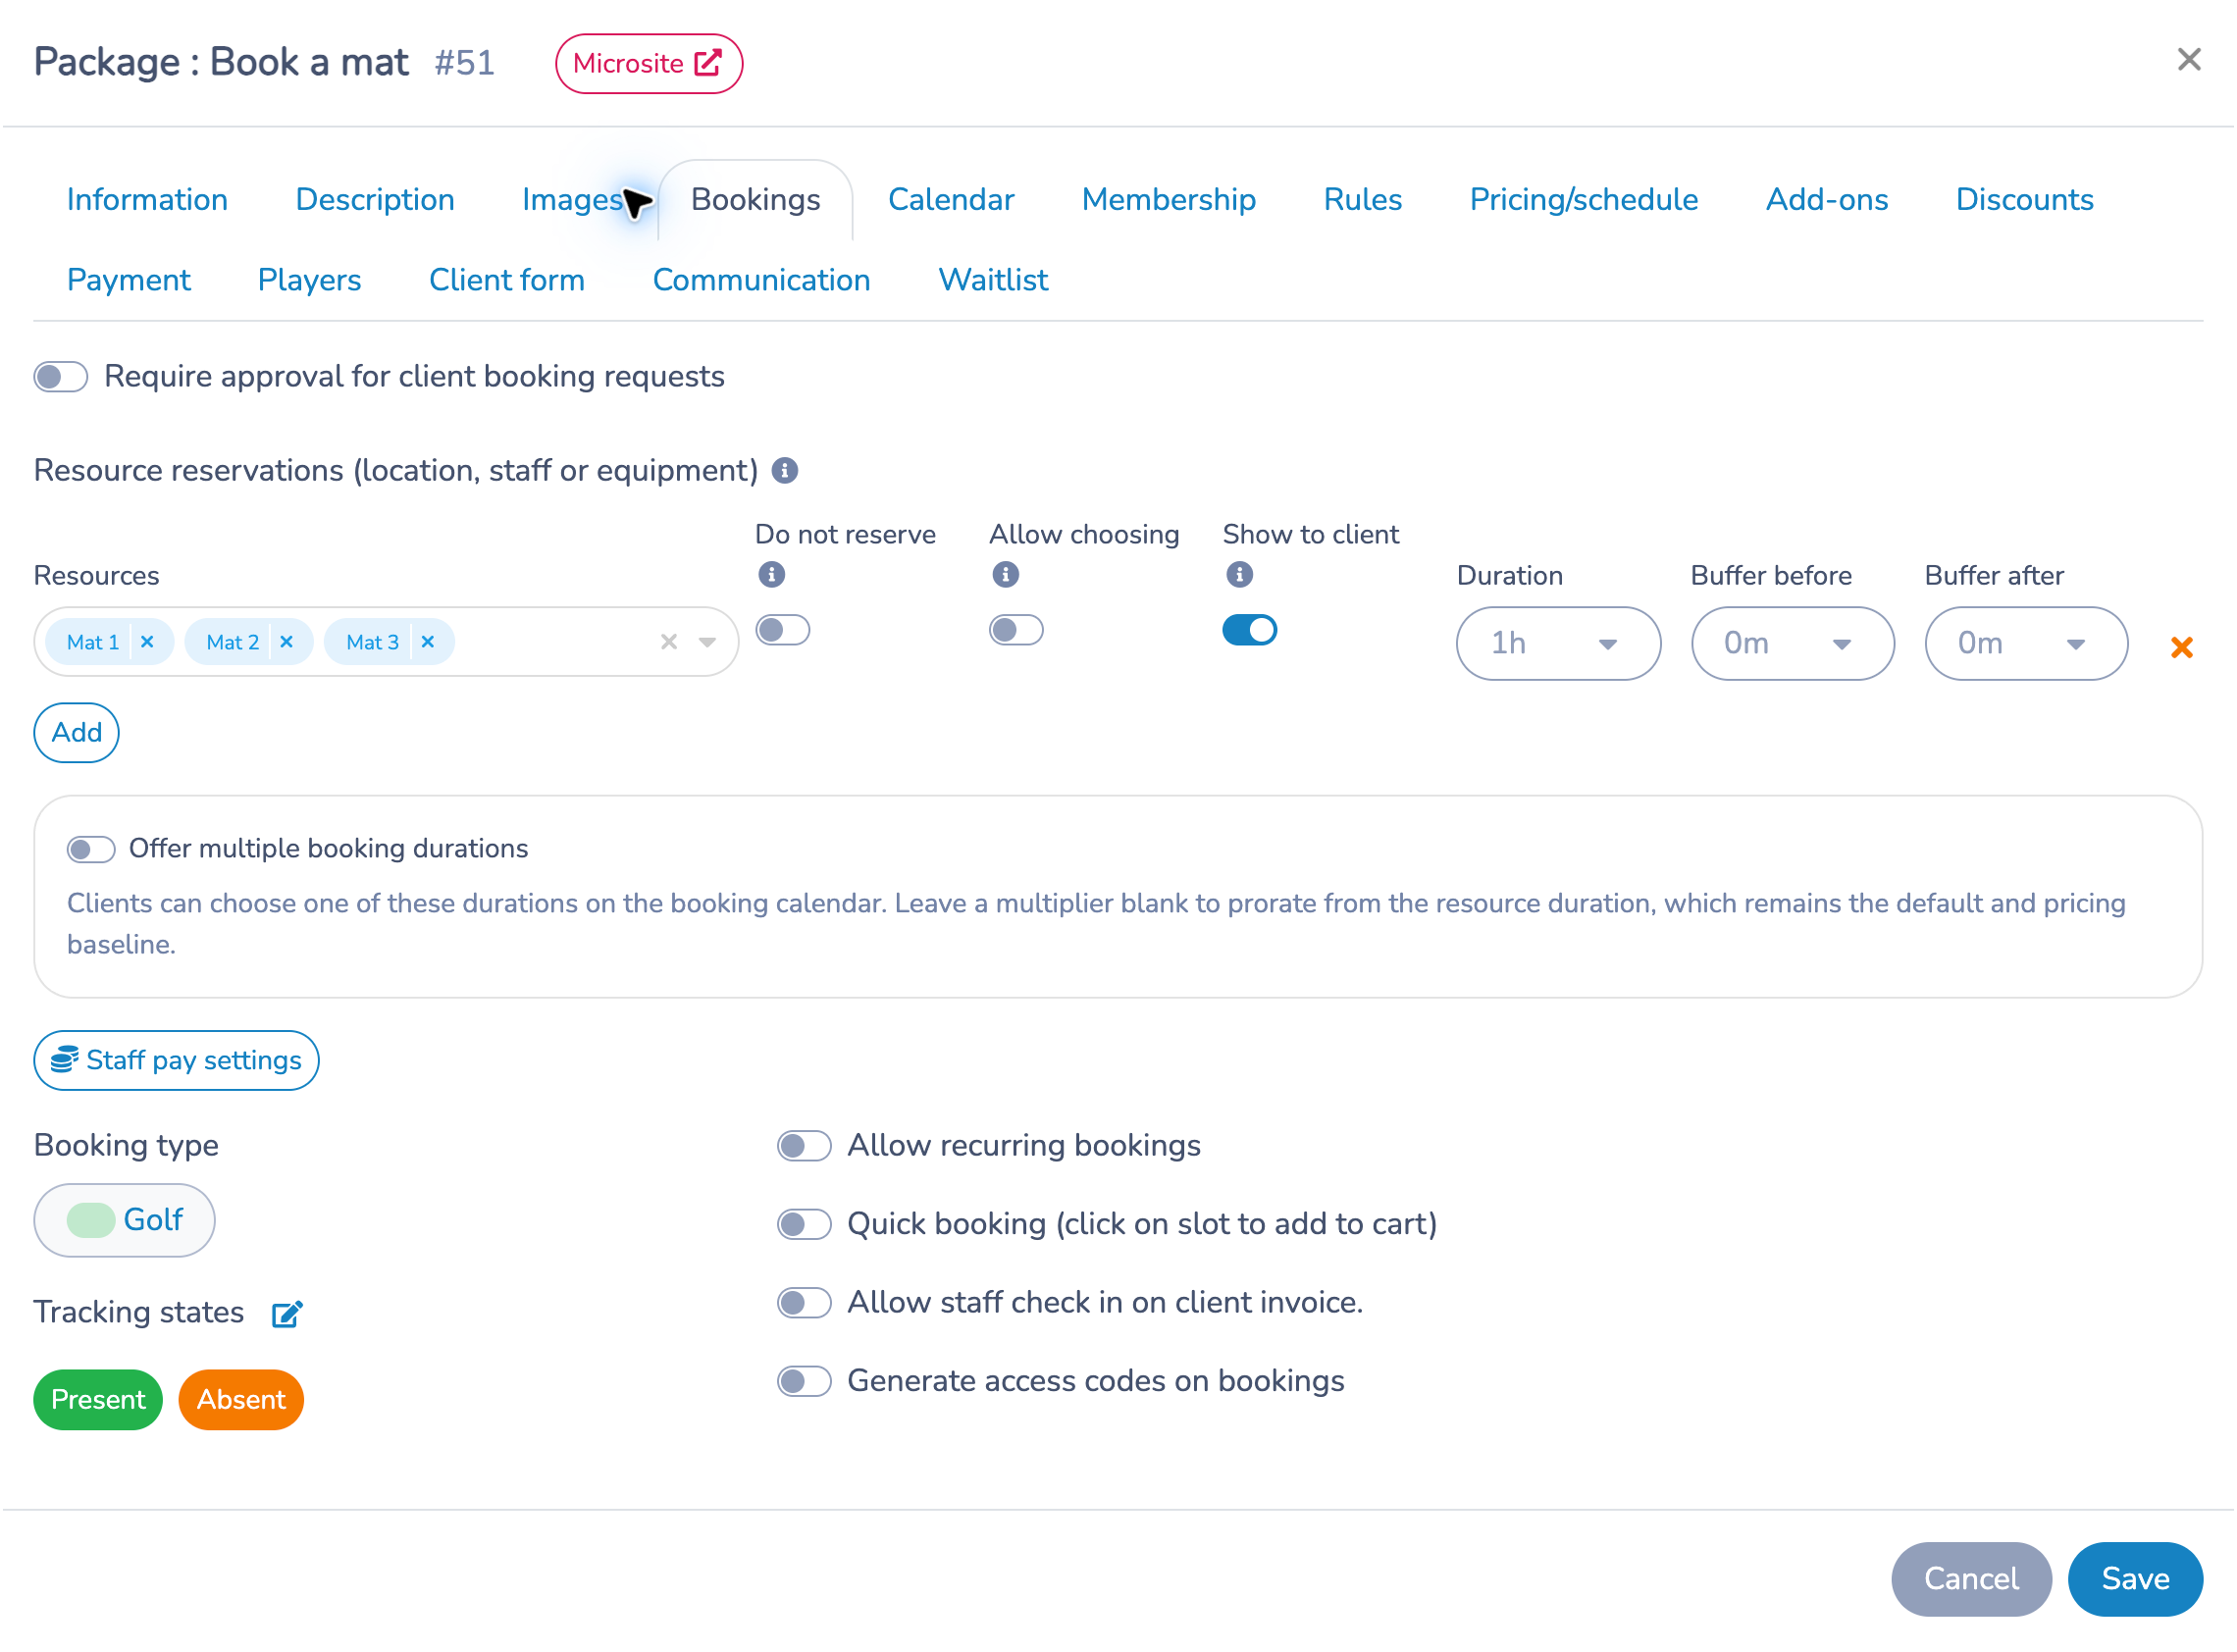
Resources in one row are alternatives: the first available resource is reserved. Separate rows are requirements: one resource must be available in every row. For example, a mat row plus a coach row requires both a mat and a coach for the booking.
The Do not reserve option changes a row into an availability check: all resources in that row must be free, but they are not reserved by that row. Use it only when that is the intended behavior.
Buffers reserve time around the appointment. Use them for setup or cleanup rather than extending the client-facing appointment. The example uses a single duration; Offer multiple booking durations is available when an offer needs a choice of lengths.
Calendar
Control how clients browse availability on the Microsite. Choose the default calendar view, the other views clients can select, the initial date and the first day of the week. Book a mat opens a three-day view and offers two-, three- and four-day views. The minimum calendar date controls the initial date shown; it is not the advance-booking rule.
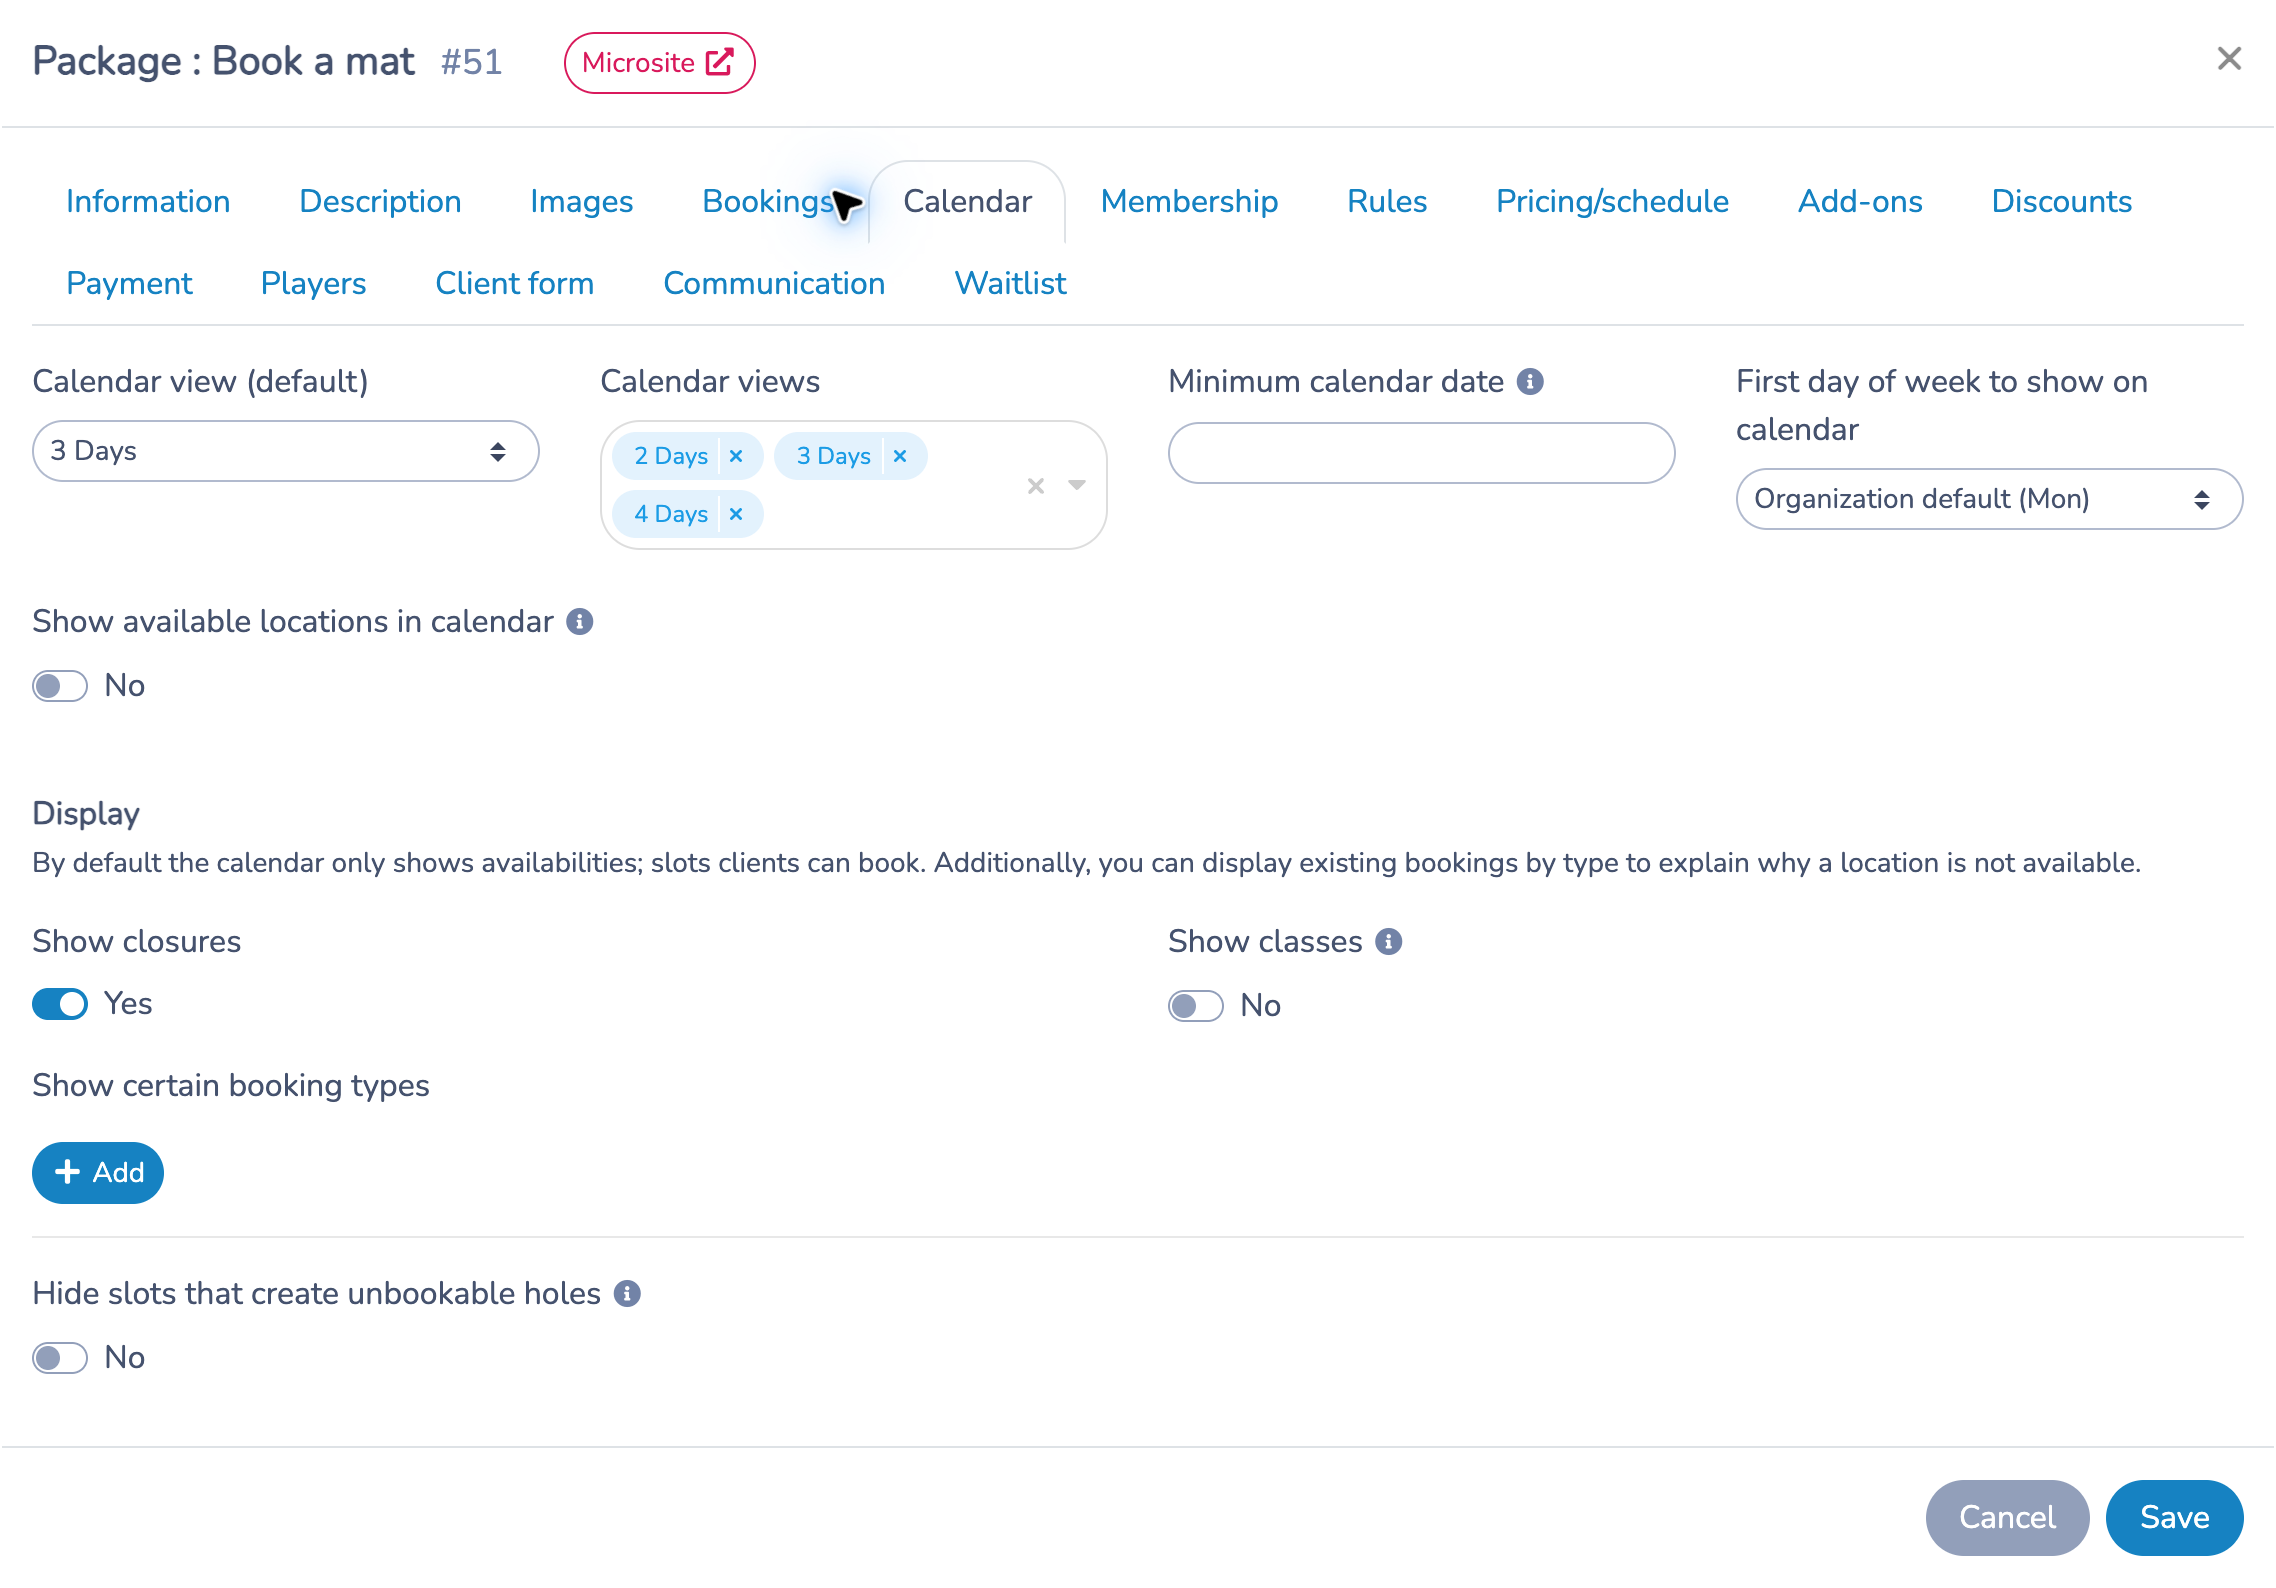
Show available locations in calendar lists resources in each availability. Use it for a small number of resources so the calendar stays readable on mobile. Under Display, show closures, available classes or selected booking types to explain occupied periods. For selected booking types, configure the displayed title, popup description and splitting interval. Hide slots that create unbookable holes hides options that would leave an unusable gap; enable it and set the gap in minutes when you want to avoid such gaps.
Membership
Use this tab when booking is restricted to members; it appears when memberships are enabled for your organization. Turn on Requires a membership for reservation and choose the memberships that grant access. Leaving the membership list empty accepts any valid membership when the requirement is enabled. The date-validity option checks that the membership covers the booking date.
When available, the membership-purchase options let clients buy a qualifying membership if they do not have one. Link memberships here before configuring membership-specific booking rules in Rules. Book a mat does not require membership in this example.
Rules
Set when clients can book and what changes they may make afterward. Book a mat currently opens sales seven days in advance and stops sales 60 minutes before the booking starts.
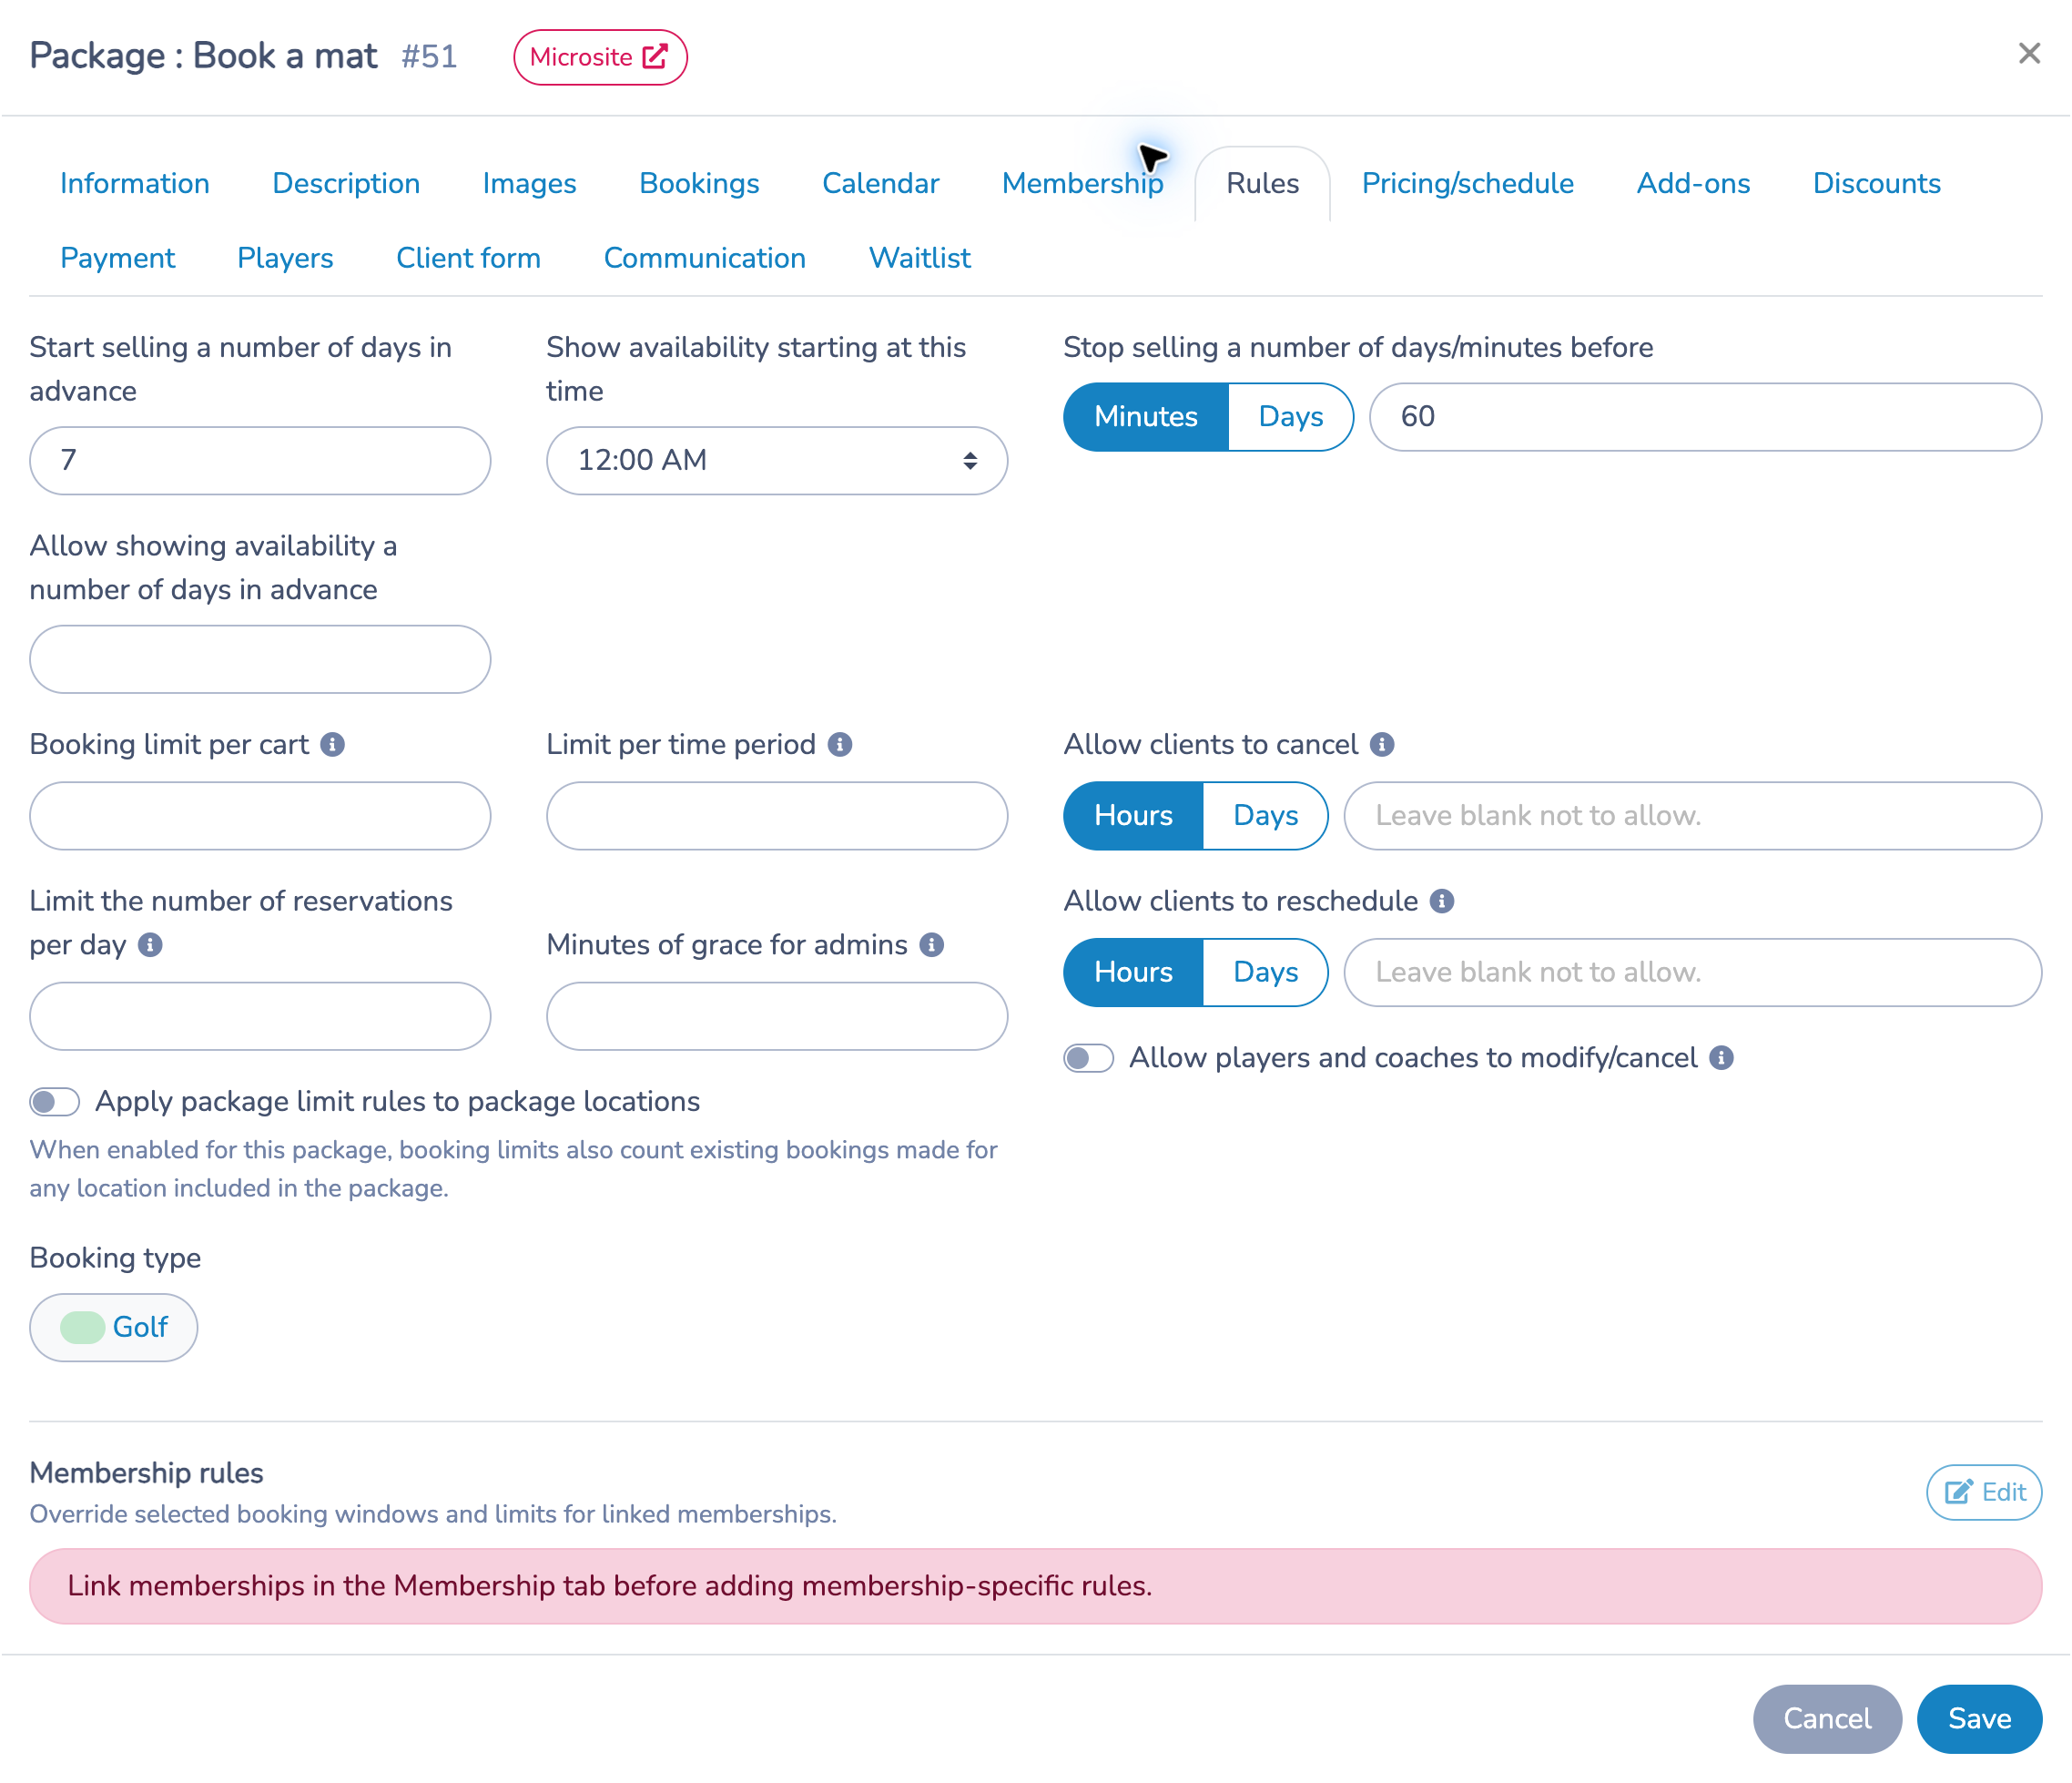
- Advance booking: set the number of days before a booking that sales open, and the release time. The separate availability-display setting can let clients see times before they can buy them.
- Sales cutoff: choose minutes or days and enter how far before the start to stop selling. Check the selected unit carefully.
- Limits: control bookings per cart, per time period and per day. The daily limit requires membership and normally works with other packages in the same category. The package-location option also counts existing bookings for resources included in this package.
- Minutes of grace for admins: allow an administrator to book shortly after a slot starts. For example, 15 minutes permits a 10 a.m. slot to be booked at 10:05 a.m.
- Cancellation and rescheduling: enter separate deadlines in hours or days. Leave the fields blank to prevent client self-service cancellation or rescheduling. A client cancellation credits the booking; it does not automatically refund the payment.
- Booking type and membership rules: review the booking classification and, where relevant, override selected windows and limits for linked memberships.
Blank values do not have the same meaning everywhere: limit fields allow no restriction, while cancellation and rescheduling fields disable those client actions. Follow the field's helper text.
Pricing/schedule
This tab combines the Displayed price, taxes and the Pricing schedules that determine offered start times and their prices. The displayed price is the package's presentation price; changing it alone does not update the prices already entered for each weekday in a schedule.
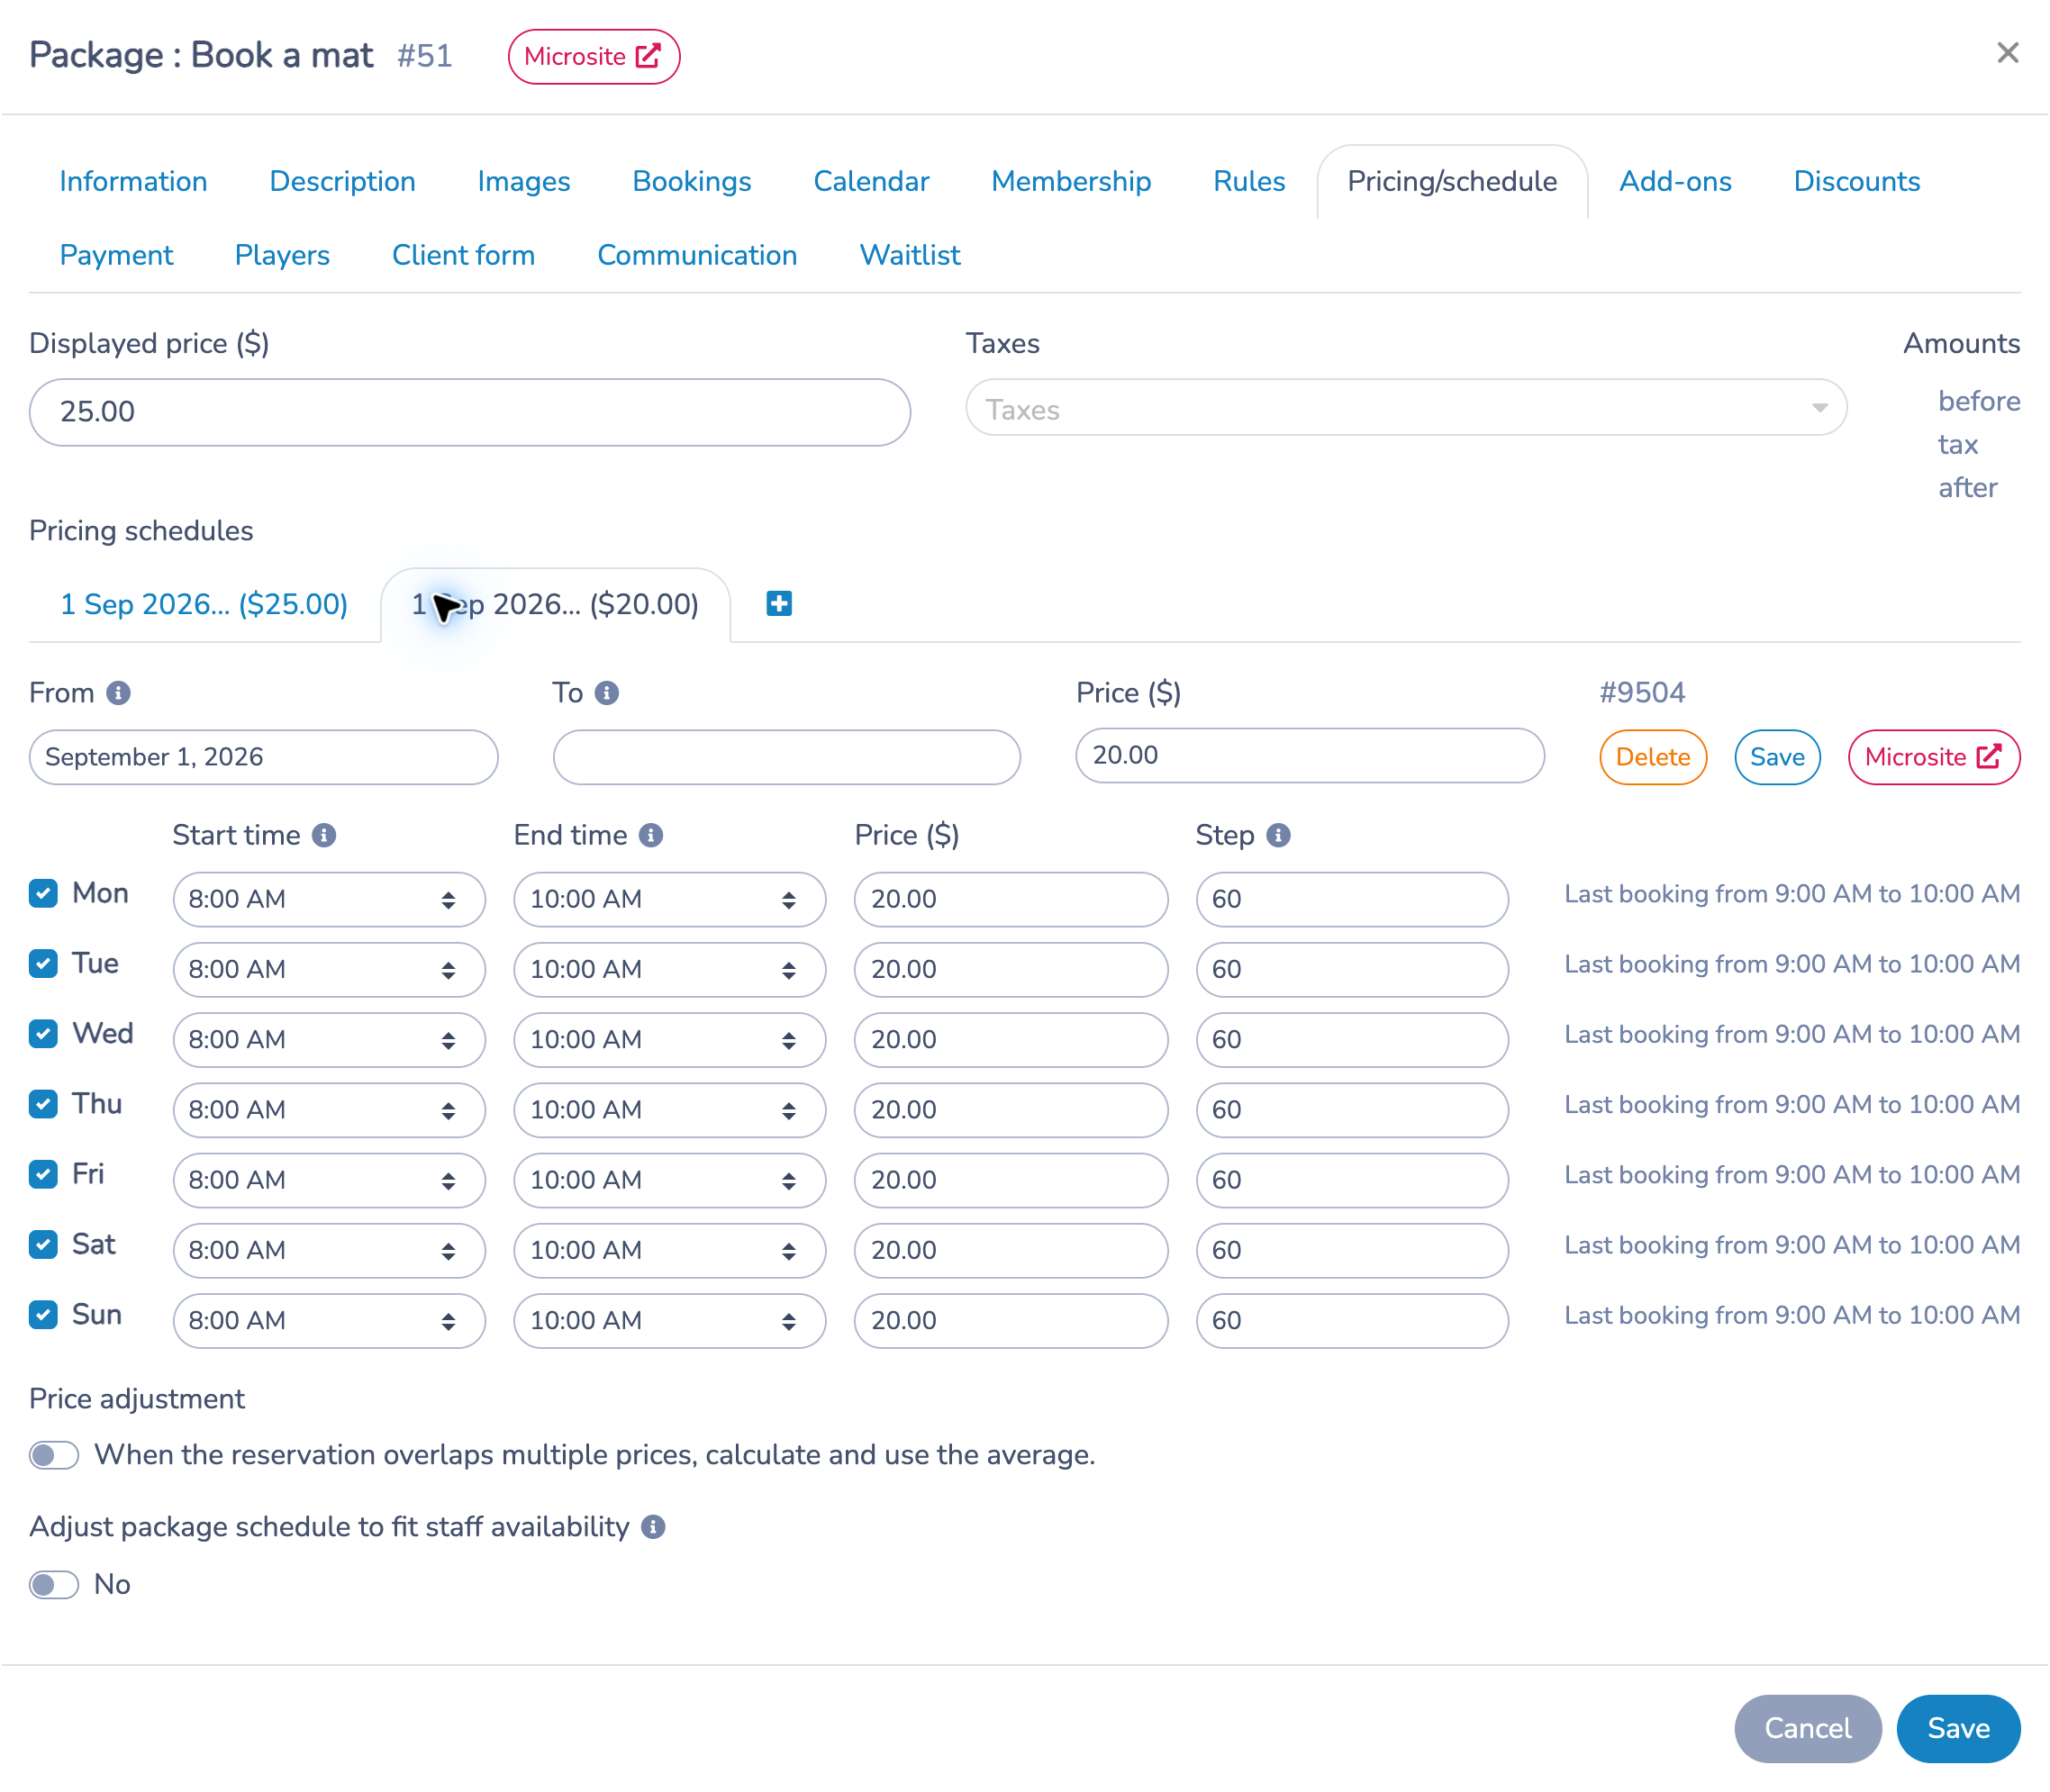
Each schedule has an effective From date, an optional To date, a price and a row for each weekday. Check the days you offer, then set their Start time, End time, Price and Step. The weekday price is the amount used for that day's start times. Check every enabled row when changing prices.
Step is the number of minutes between possible start times; Duration is configured in Bookings. The end time is an exclusive limit on start times, not a guarantee that the appointment ends at that hour. Read the “Last booking” message beside each row, especially after changing duration or step.
Example: $20 from 8 a.m. to 10 a.m.
Use multiple schedules to offer different prices within the same day, different weekday patterns, or seasonal date ranges. Keep them in the same package so they share the resources, booking rules and checkout settings.
Book a mat uses two schedules, both effective September 1, 2026, with no end date:
| Schedule | Hours | Price per one-hour booking | Step | Available starts |
|---|---|---|---|---|
| Morning | 8 a.m.–10 a.m. | $20 | 60 minutes | 8 a.m. and 9 a.m. |
| Daytime | 10 a.m.–8 p.m. | $25 | 60 minutes | 10 a.m. through 7 p.m. |
To configure this pattern:
- Keep the daytime schedule at $25, with each offered weekday set to 10 a.m.–8 p.m. and Step 60.
- Click the + beside the schedule tabs. It copies the last schedule, so review its dates and every weekday row.
- Select the new schedule. Keep the same effective dates for a daily morning rate, or choose a limited date range for a seasonal offer.
- Set its schedule price and each enabled weekday's price to $20. Set each offered day to 8 a.m.–10 a.m., with Step 60.
- Confirm that the last morning booking is 9 a.m.–10 a.m. A booking starting at 10 a.m. belongs to the $25 daytime schedule.
- Click Save, then use Microsite to check the offered times and prices. Resource availability and Rules still determine whether clients can book them.
Use adjacent time ranges for a clear morning/daytime split. If schedules generate the same start time, the more recently created schedule takes precedence for that start; a later effective date alone does not establish priority. For seasonal changes, check the date ranges and any gap warning so future days remain covered.
Price adjustment can average the applicable slot prices when a reservation spans multiple price periods. It is off in this one-hour example. Adjust package schedule to fit staff availability, when available, further limits a staff-based offer to the staff member's availability.
Add-ons
Offer extras alongside the booking. Book a mat has Small bucket ($5), Medium bucket ($10) and Large bucket ($15). Configure each add-on's price, taxes, required/optional status and quantity limits. Use the resource options when an extra also needs a resource, and conditional rules when an add-on should appear only in certain situations.
Show add-ons as checkboxes suits extras that can be selected only once; quantity, minimum and maximum are fixed to one. Keep quantity controls when clients may buy several units. Review the customer cart to confirm the extra is attached to the intended booking.
Discounts
Add a discount rule when the booking price should be reduced under specific conditions, such as a booking close to its start time or an eligible membership. Set the name, minutes-before condition, membership selection, amount or percentage, and ledger code as needed. Book a mat has no discount rule in this example. For a predictable daily morning rate, use the two pricing schedules above.
Payment
Choose how to collect payment: offline, credit card, Interac e-Transfer, or credit card or Interac, according to the methods configured for your organization. Book a mat uses credit card payment.
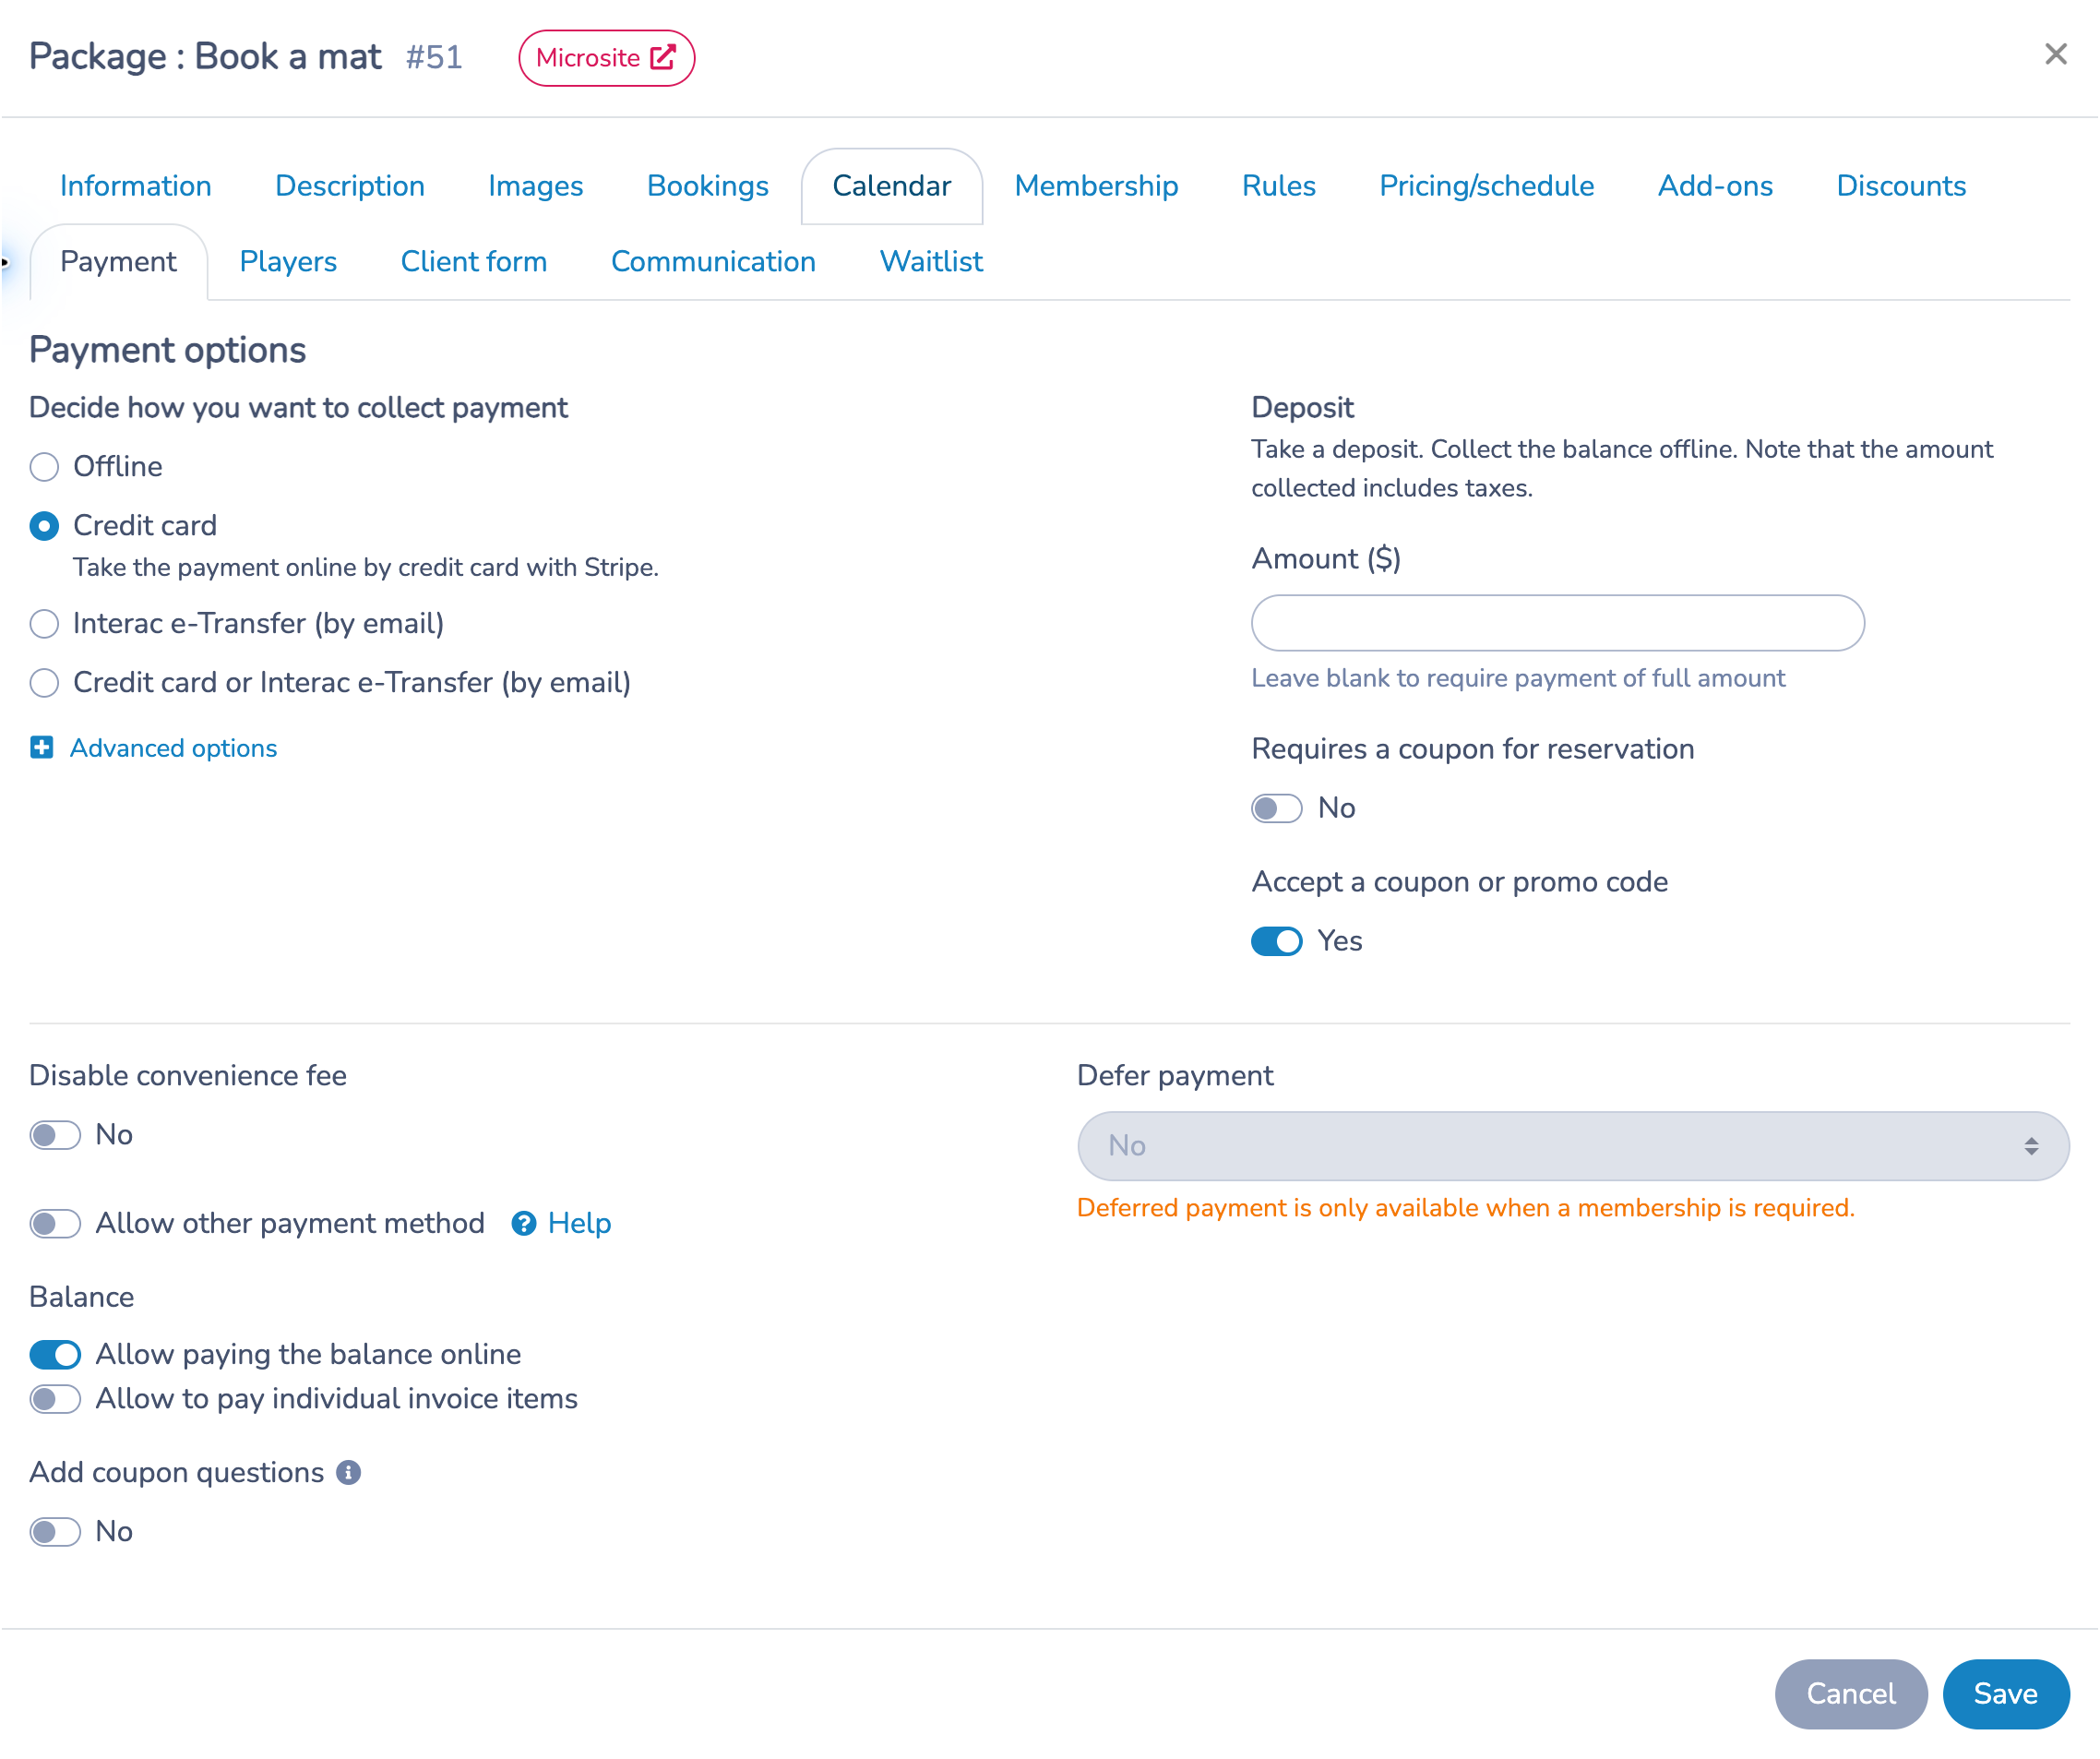
Leave Deposit blank to require the full amount, or enter the deposit to collect, including taxes, and decide how to collect the balance. Review whether coupons are required or accepted, convenience fees, other payment methods, online balance payment and payment of individual invoice items. Add payment instructions where offered so clients know how to settle an outstanding balance.
Defer payment schedules collection before or at the end of the booking. It requires a membership, a supported credit-card payment option and no deposit. It is unavailable for Book a mat while membership is not required. These settings control collection; the actual booking price and taxes are set in Pricing/schedule.
Client form
Choose the checkout form clients complete before payment. If none is selected, Activity Messenger creates one for you. Use it to collect the information needed for the booking.
You can also select a separate form to complete after purchase, such as an additional information form or waiver. Its button appears on the purchase confirmation screen. An after-purchase form is a different step from the checkout form.
Communication
Choose confirmation and cancellation email templates. When no custom template is selected, Activity Messenger supplies one. The confirmation includes the invoice PDF; the cancellation email includes the receipt PDF.
Select the staff who should receive email or SMS after a booking, cancellation or reschedule. Choose whether staff booking emails include payment details and the invoice PDF. Configure reminder and follow-up templates before the event, on the event day, before its end or after it, with the relevant day offset and sending time. Where offered, include assigned resources in the notifications.
Save the package after reviewing the tabs, then open its Microsite link to check the customer experience.
# 4. Follow the client's Microsite checkout
Use an incognito/private browser window to see the customer experience without the administrator session.
- Open Book a mat and its Calendar. Browse to an available day.
- Select a time. The example shows a one-hour slot starting at 10 a.m.
- Click Book to add the reservation to the cart. With this package's settings, an available mat is assigned automatically and its name is shown.
- Choose any optional add-ons, then click Checkout.
- In Shopping cart, review the package, date, time, assigned mat and total. Add-ons can also be selected here; choose which booking receives an add-on when the cart contains several bookings.
- Click Next, complete Your information, and continue through Payment and Confirmation as required by the checkout.
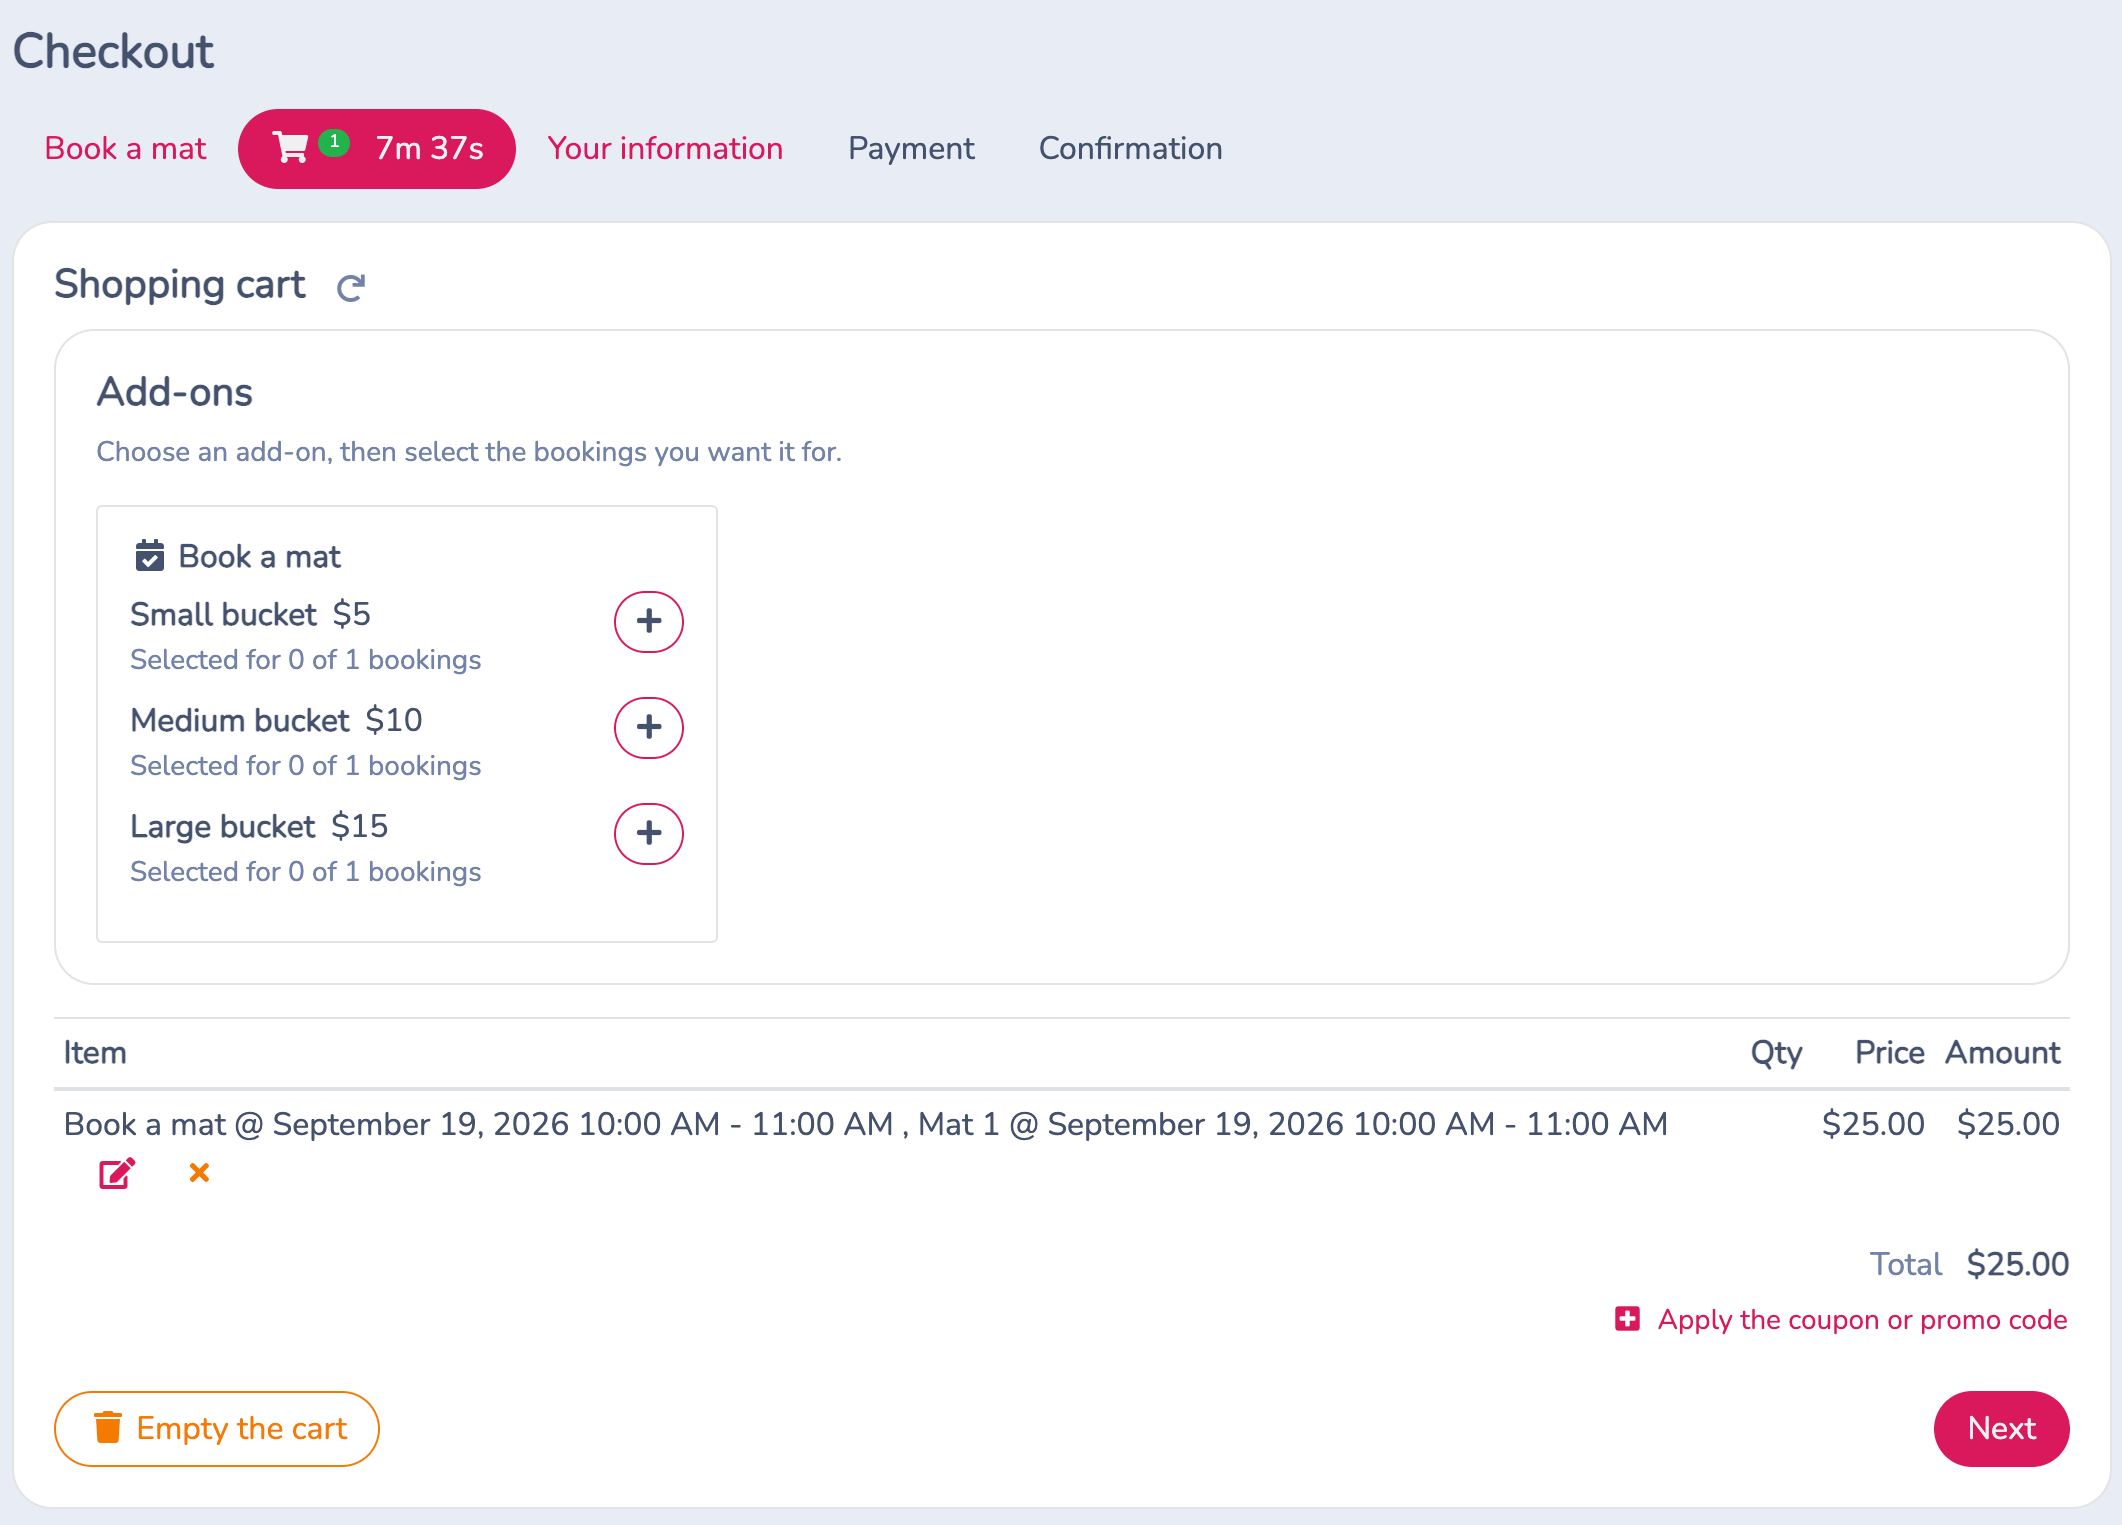
The screenshot shows the cart before payment, with no add-on selected. A cart timer indicates a temporary hold. Adding a booking to the cart is not the same as completing checkout: the client must finish the remaining steps. If the hold expires, check availability again.
# 5. Use Today as the daily operations screen
Open E-Commerce → Today. This is the staff view for seeing which resources are occupied, finding a reservation and handling day-to-day booking work. Despite its name, you can select another date to prepare for an upcoming day or inspect a previous one.
- Choose the date.
- Select the Golf resource tag to focus on the three mats.
- Read the time rows and resource columns. Select a reservation to open its details; the detail view depends on the kind of booking.
- Use the name, email or phone search fields to find a client's reservations. Use Search for the booking search modal.
- Refresh when needed. The toolbar also provides display settings, archived items, printing and full-screen viewing.
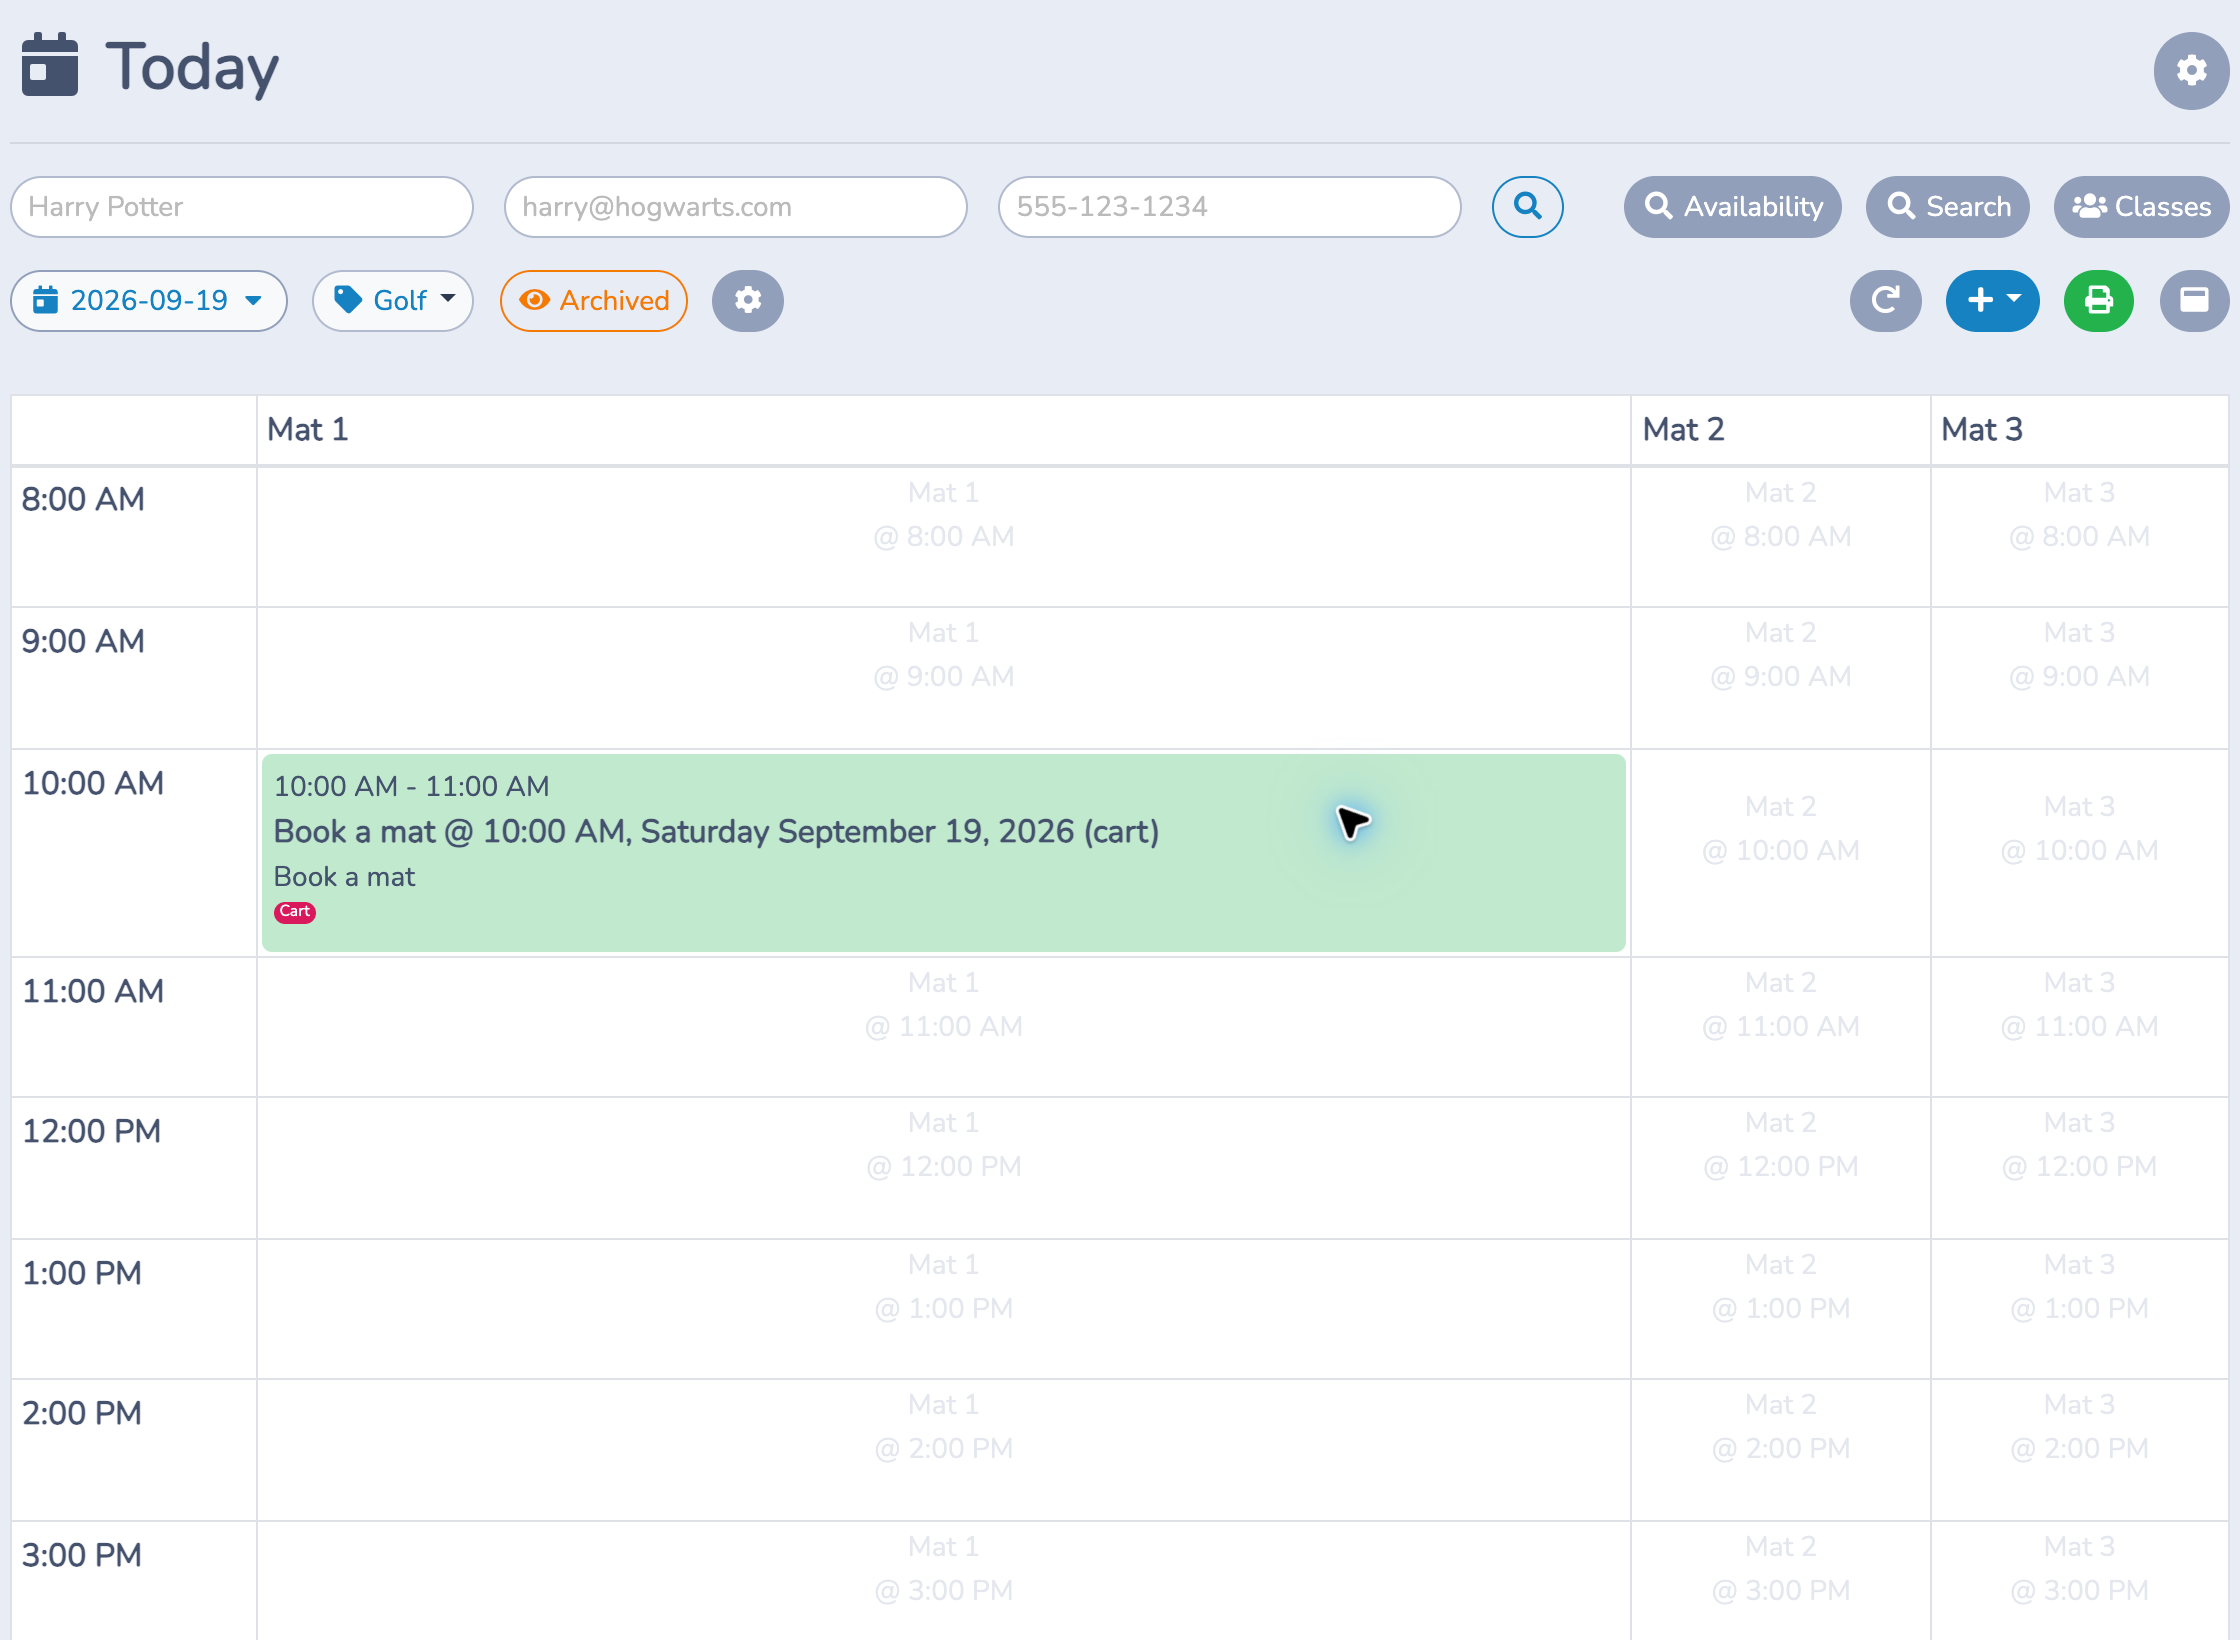
In this example, Mat 1 shows the reservation temporarily held by the Microsite cart. The Cart label distinguishes that hold from a completed customer checkout. This helps staff understand why a time is currently occupied without treating every visible block as a paid booking.
Today is an occupancy view. An empty cell does not by itself mean that a package is offered to clients at that time: the package's schedule and booking rules still matter.
# 6. Make a client booking from Availability
Use this workflow when staff take a booking by phone or at the front desk.
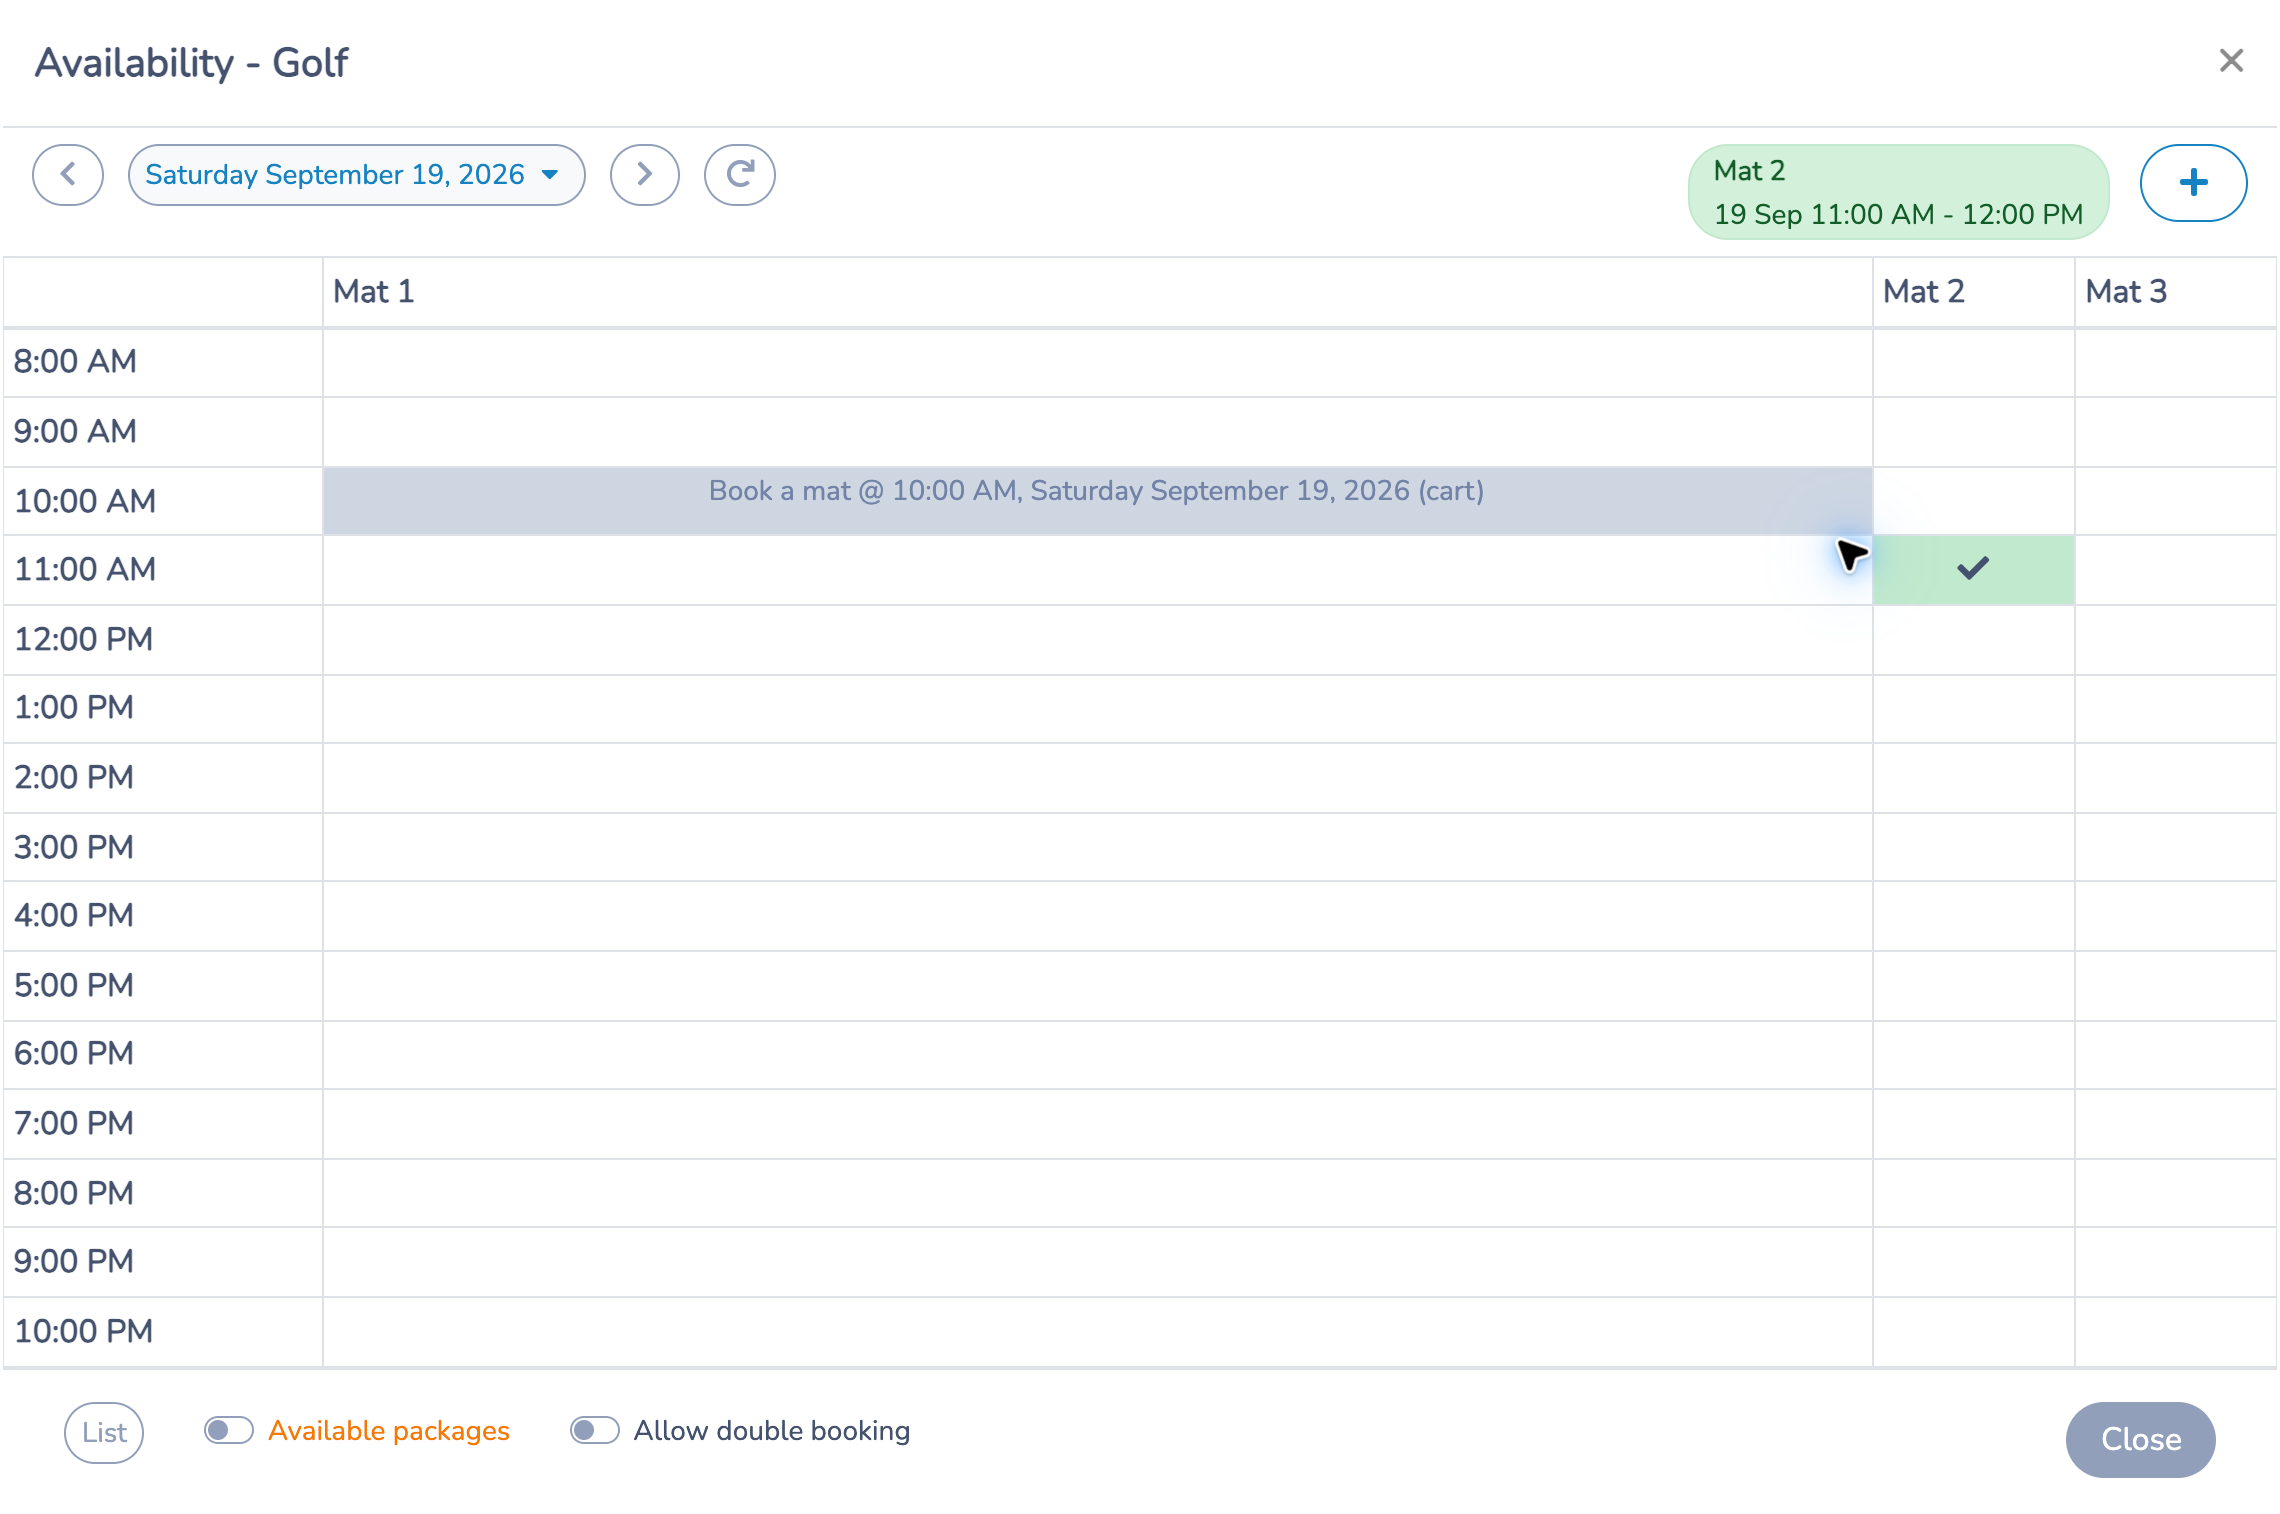
- On Today, select the date and the Golf tag. The Availability button appears when a tag is selected and it contains resources.
- Click Availability. Use the arrows or date selector to change the day if needed.
- Click a free cell under the desired resource. In this example, select Mat 2 at 11 a.m. The selection summary shows 11 a.m.–12 p.m. Click a selected cell again to deselect it; check the summary if you select additional cells.
- Click the + beside the selection summary.
- In Booking with invoice, verify the suggested Package. For this selection it is Book a mat. Check the Golf booking type, resource, duration and $25 total.
- Use the Client selector to choose the client. The Create button remains unavailable until the required client information is present.
- Review Send confirmation email to client. In this example it is off; select it if the client should receive a confirmation.
- Click Create when everything is correct. This creates the booking with an invoice. Review the resulting invoice and handle payment using your organization's normal billing workflow.
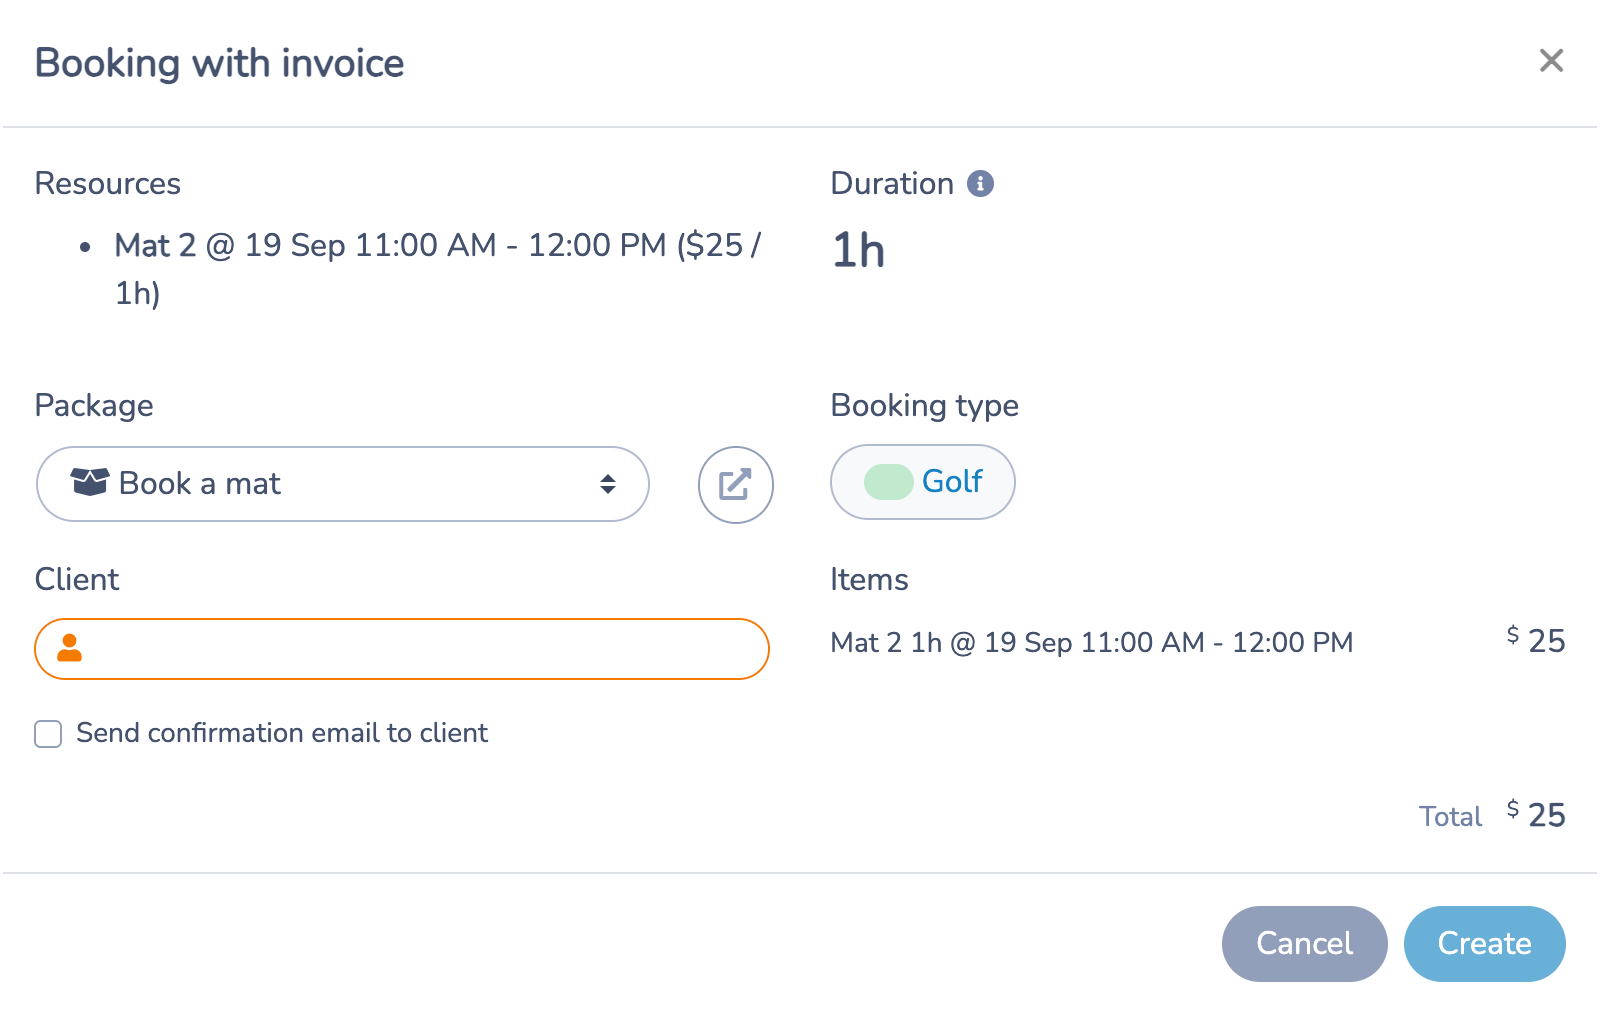
Creating an invoice does not by itself mean that payment has been collected. Check the invoice's payment state separately. The screenshot shows the form before a client has been selected.
Leave Allow double booking off for ordinary bookings. It deliberately permits an administrator to select an already-booked cell. Booking-type overrides are a separate exception controlled by the booking type's settings. Resolve conflicts before confirming a real reservation.
# If an expected time is missing
- Check that the package is visible and not disabled.
- Check the pricing schedule's effective dates, weekdays, hours and step, as well as the booking rules.
- Confirm the required resources are available for the full duration and buffers. Check parent/overlap and blocking relationships too.
- Look for existing reservations and temporary cart holds on Today.
- If Availability is missing on Today, choose a resource tag that contains resources and check the user's permissions.
# Related guides
- Memberships, for offers restricted by membership.
- Rental contracts, when a rental also requires a contract.