Membership
Here's how to create, configure, and manage subscriptions in ActivityMessenger, including payment recurrence and linking to courses or events.
# Access the membership section
Go to the E-commerce tab. Click on Memberships to view or create a new membership.

If a membership already exists, you can modify it.
Otherwise, click the + button to create a new one.

# Configure membership details
Name and Duration: Enter the name of the membership.
Define the duration (e.g., fixed, monthly, annual).
Examples: annual subscription for 12 months or monthly with recurrence.
Payment Recurrence: Enable payment recurrence for monthly or annual memberships.
Set the billing date (e.g., every 15th of the month).
Add a pro-rata invoice if the customer signs up mid-period.
Start and End Dates: Specify the start and end dates of the membership.
Example: sports federation memberships may start on September 1 and end on August 30, even if registration occurs in July.
Number of Cycles: Limit the number of payment cycles (e.g., 3, 6, or 12 months).
Example: 3-month subscription with 3 payments, after which renewal is requested.

# Add a description and financial details
Description: Add a short description of the membership.
Price and Taxes: Specify the membership price and apply the appropriate taxes.
Account Code: Associate an account code with the membership to track revenue.

# Configure automatic renewal
NOTE : ACTIVATING THE RENEWAL WILL AUTOMATICALLY GENERATE AN INVOICE. If the member does not want to renew the admin's action will be to cancel the item in the newly created invoice and archive it.
Alternatively, you can set up a forced recurrance which will automatically renew the membership.
Enable automatic renewal for annual or monthly memberships.
A message will be sent to members a certain number of days before the membership ends, offering them the option to renew.
Create a renewal contract that the member must sign.
Use a custom template to send an alert email with a renewal button.
Recurring memberships (monthly/annually) can use the force recurrence toggle from the Information tab as an alternative renewal process.

# Generate membership cards
Enable the option to generate a virtual membership card.
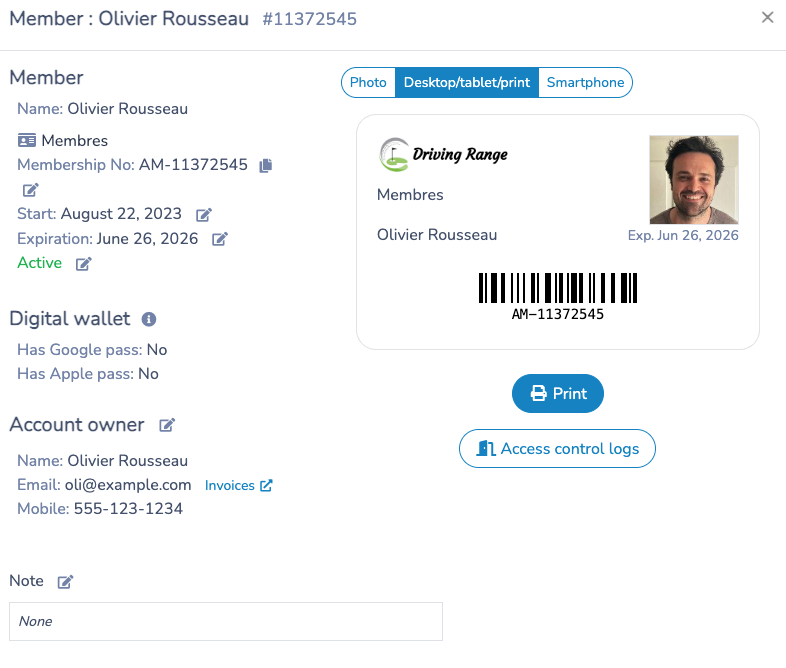
The card will display a barcode for scanning at entry, the expiration date, and the type of membership.
You can add a photo of the member on the card.
Cards can be virtual (accessible via smartphone) or printed, depending on the member's preference.

# Linking to courses and events
Access to Courses: Associate the subscription with courses or events.
You can make the subscription required for course registration.
If the subscription is not required, you can offer a discounted price for members (e.g., $8 for non-members, $5 for members).
Automatic Attendance: Set up automatic addition of registered members to the attendance list for courses.

# Using coupons
Offer coupons following the purchase of a subscription.
Example: 6 coupons for free or discounted courses, usable during specific periods or for specific events.
Configure the expiration date of the coupons and the courses to which they apply.

# Managing communications
Subscription Confirmation: Use a custom subscription confirmation template.
Payment Errors: Manage payment errors (e.g., expired credit card) by sending automated notifications requesting an update of information.

# Create a subscription form
Customize the subscription form to collect member information.
Examples of Fields: parental consent, family subscription, electronic signature, risk acknowledgment.
Once saved, this form will appear during the subscription process.

# Manage members
View all subscribers in the Members section.
Here, you will find names, emails, phone numbers, expiration dates, and other information related to each subscription.
Sort members by subscription type for better management.

# Member Profile
From the member list, you can open a member's profile. You can:
- Edit the activation and expiration date of the membership
- Suspend the member
- Upload the member's photo
- View access control
- Add notes to the file
- View the member's invoices

# Membership Card in Google and Apple Wallet
Activity Messenger allows members to add their card to their digital wallet, either Google Wallet or Apple Wallet. This simplifies the card scanning at access control.

