Activity Messenger Help Center
Payment forms
Before you begin
Prepare what you will sell, the information needed for the account owner and participants, the applicable taxes and the payment methods you will accept. For card payments, connect Stripe and explicitly check whether the account is in test or live mode. Do not assume a newly connected account is automatically in test mode.
Payment forms are forms with integrated payment. They extend the existing Forms that you already use for waivers and surveys. Just like regular forms, payment forms are standalone pages that have unique URLs. You can point your clients to the form, embed them on your website and even post a QR code on your wall for clients to purchase using their smartphone.
With Payment forms you can create a complete class or event registration in a single page. The form can include questions like parent, children, skills and preferences. The form can contain one item you are selling (i.e. class or event) or you can also bundle other items in the same form. Options are limitless. Best of all, since they are a single page, payment forms limit the number of clicks, steps and options a client has to make. Payment forms allow you to contextualize a purchase for your client.
To clients filling a payment form is a 3-step process:
Step 1 - Filling the form
The client fills in the form and answers questions. Answers will be used to build an invoice as per the question rules.
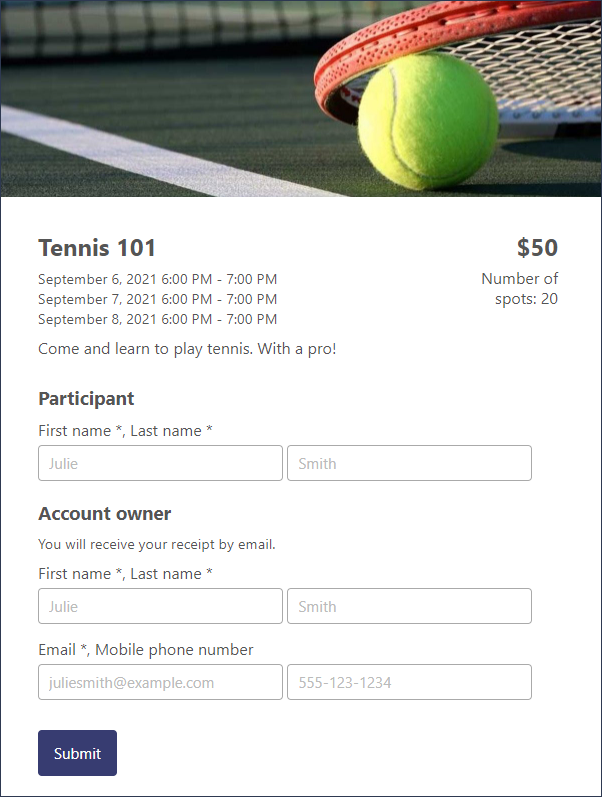
Step 2 - Invoice and payment
The invoice is presented based on question answers. A payment form is presented to the client.
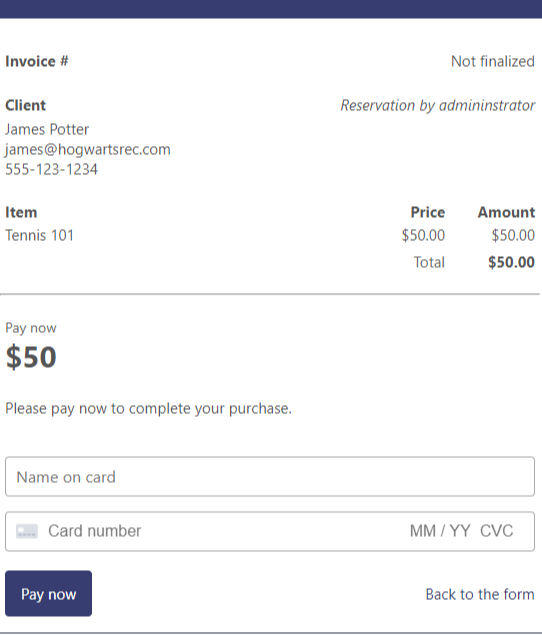
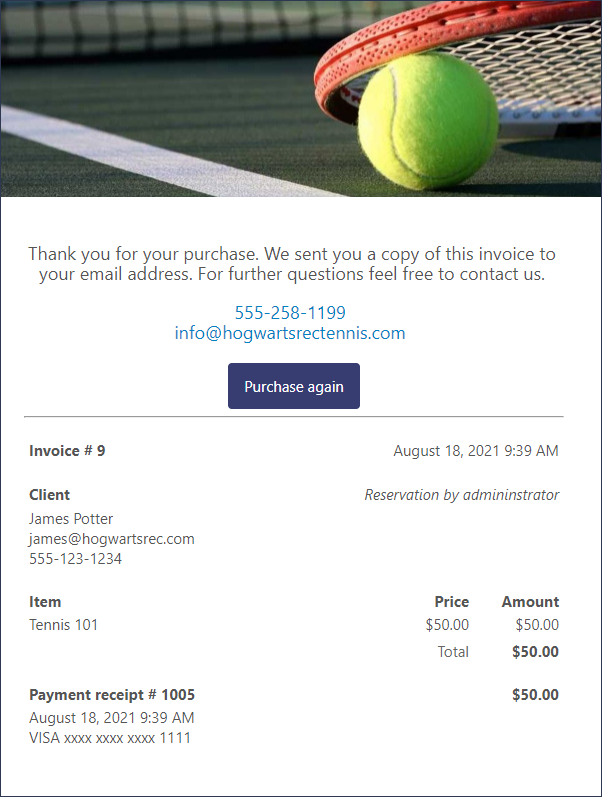
Step 3 - Confirmation
The client sees the confirmation for the selected payment method. Check the invoice and payment status: offline payments and pending bank payments are not the same as a completed card payment. Configure the confirmation email and PDF options for the client’s records.
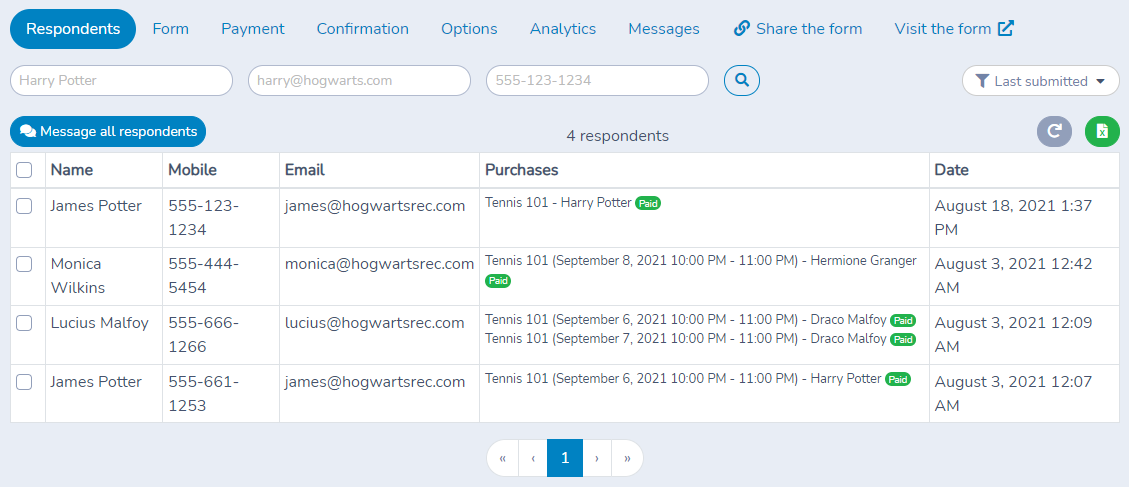
After a purchase is made, the client appears in the Respondents table of the payment form. A Purchases column shows you what was sold and what was paid. Click on a respondent to open up the Client billing.
Activity Messenger allows you to set up email notifications and configure the email confirmation message. More later on these options.
Creating a payment form
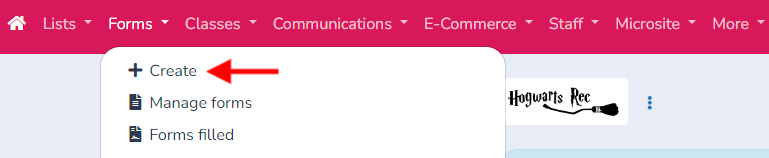
To get started click on Forms and "Create a payment form". Give your form a name and click on Create.
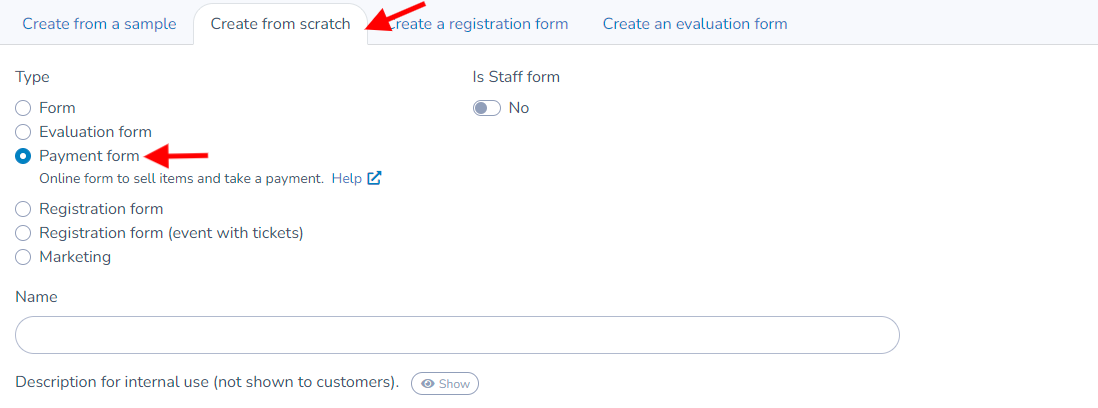
Choose the Create from scratch option, then Create a payment form. Give it a name and click Create.
Designing the Form
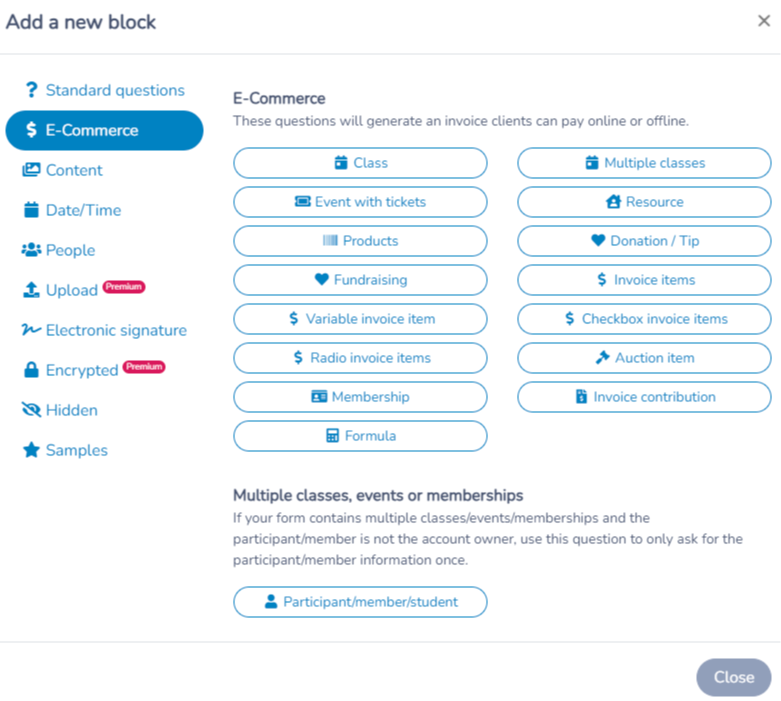
Click on the Form tab to build your form. Click on (+) to add questions. In the Add a question dialog, select the E-Commerce tab. Choose one of the options available. You can also add images and text block by choosing the Content tab in the Add a question dialog. For example this payment form includes an image, an event/class block and an account owner question.
Adding Courses
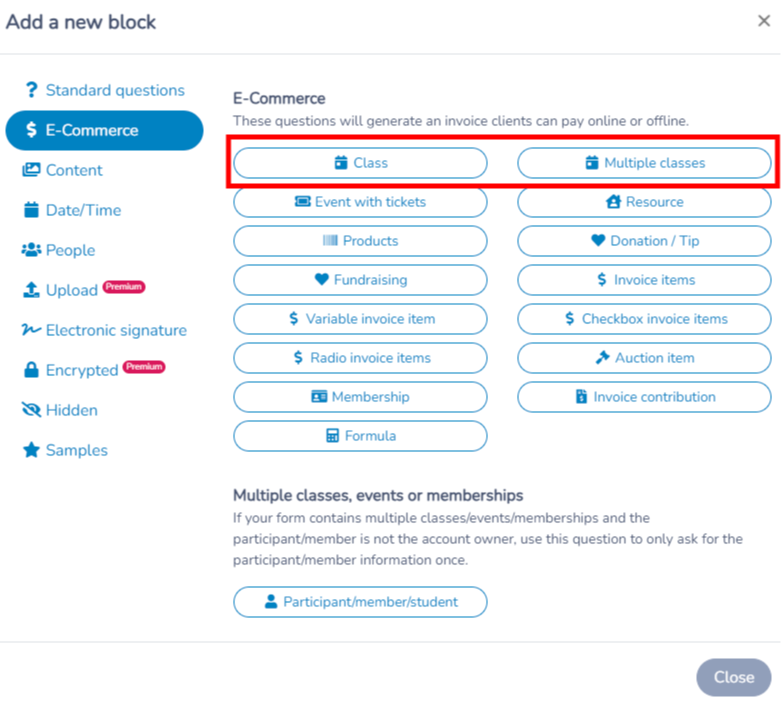
To add a course, click on Courses and select the course to add to the form.
If you want to add more than one course to your form, choose the multiple courses option. With this option, you'll need to set enrollment rules based on your preferences.
After saving, you'll see that the course has been added to the form, allowing users to purchase it.
Events with tickets
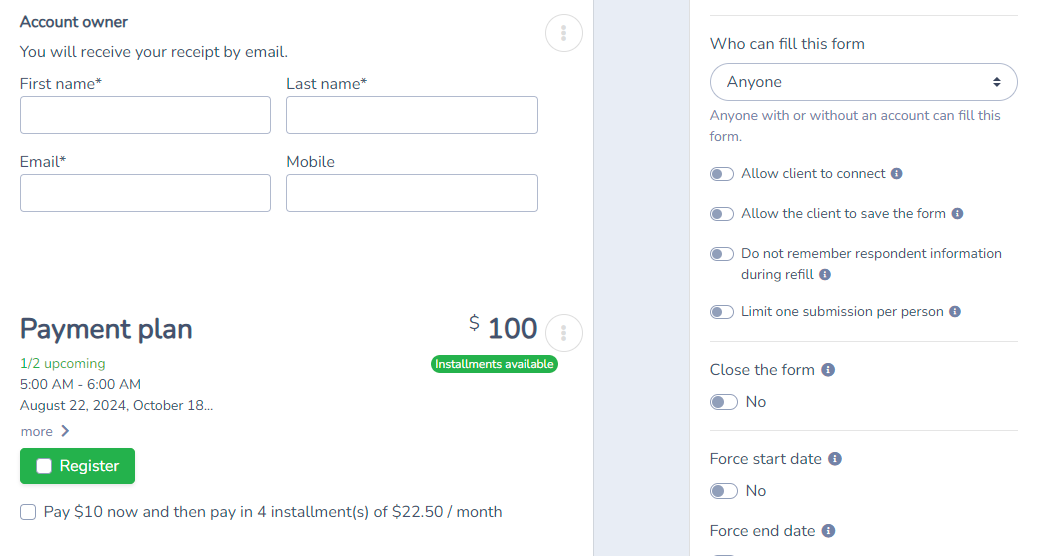
To add event tickets, click on Event with Ticket and select the desired event.
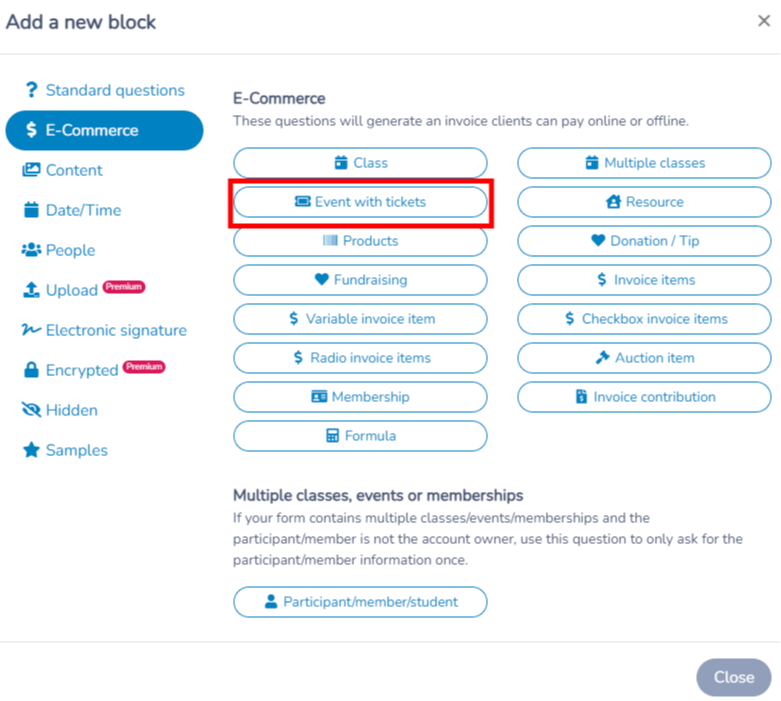
This will create an item that users can purchase with various options, such as adding multiple participants. A ticket with a QR code will be automatically generated along with the invoice.
Products
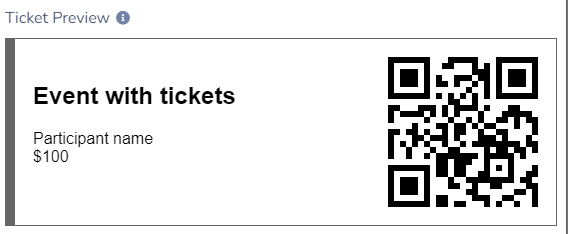
You can also add items like merchandise. Select the items you have created so that people can purchase them through the form.
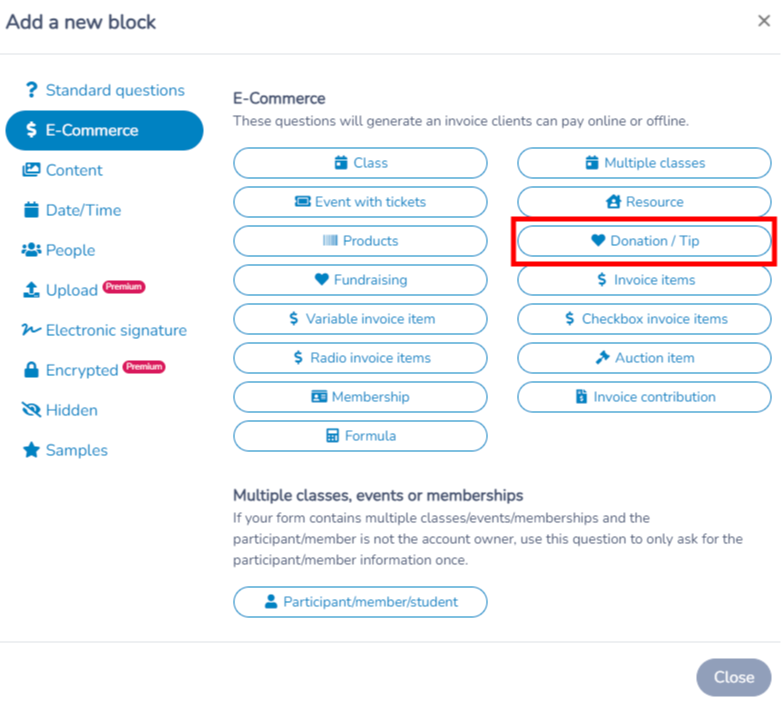
Donation/Tip
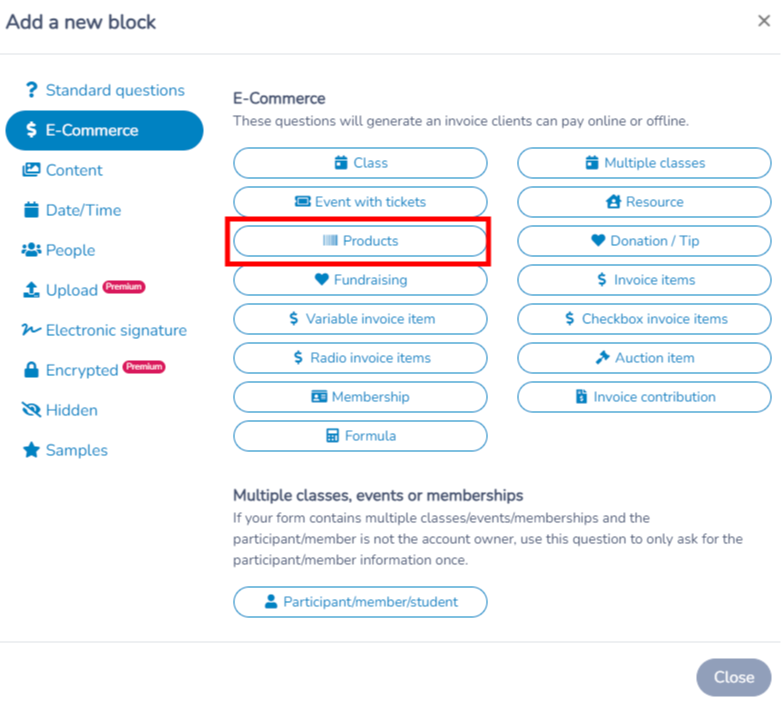
Donations and tips can be added, including options for recurring monthly donations. You can set a minimum or maximum amount and include a donation receipt via email.
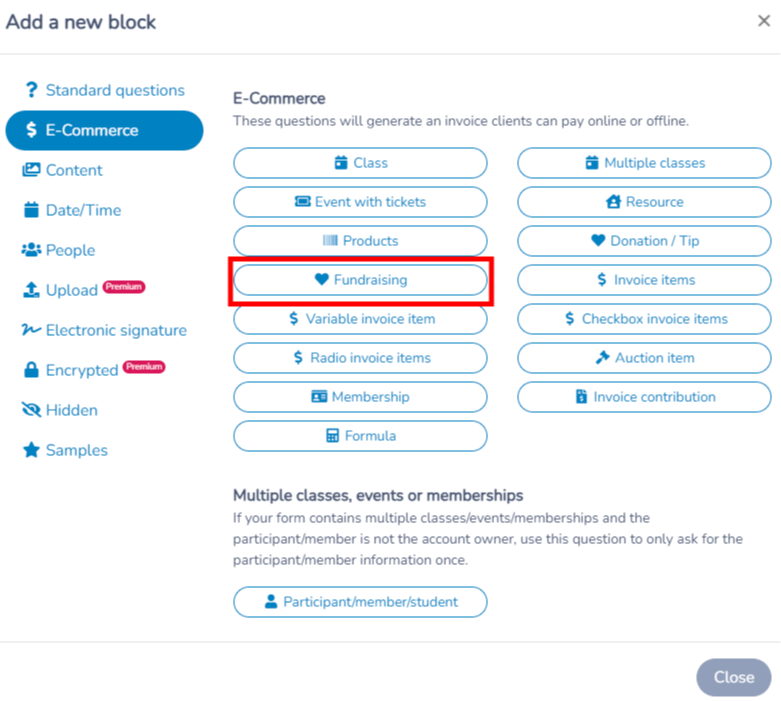
Fundraising
For fundraising, you can set a goal, such as $6,000, and allow people to contribute to that goal. You can choose whether or not to display the donors.
Invoice Items
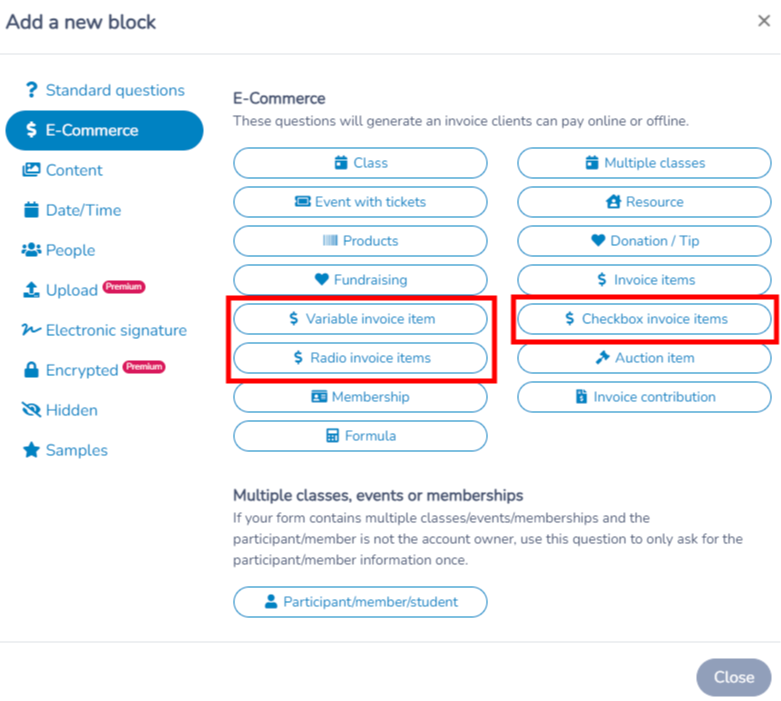
Invoice items can also be added. For example, for room rentals, you can add items such as the number of people, the price per table, or cleaning fees.
Mandatory Invoice Items: Set mandatory items by specifying minimum and maximum quantities, making certain items required for purchase.
Variable Invoice Item: Allow your customers to purchase an item while modifying its description, quantity, and amount.
Checkbox Invoice Items: Add multiple items with sub-options. With the checkbox option, the customer can choose multiple sub-options.
Radio Button Invoice Items: Add multiple items with sub-options. With the radio button option, the customer can choose only one sub-option.
Membership
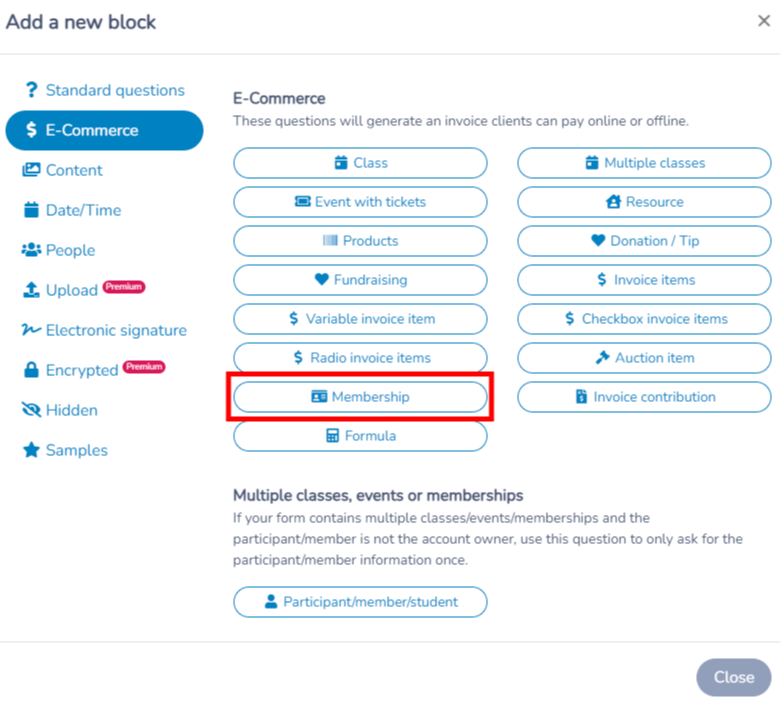
To add a membership purchase, click + on the Form tab, open the E-Commerce tab, and choose Membership. Configure the question for one membership. You can make enrollment required or optional, then save and preview the form. The question displays that membership and lets the client add it to the purchase; it does not provide a single mutually exclusive choice among several membership definitions.
To offer several standalone memberships, add one Membership question for each membership you want to offer. A class-registration question is not a way to present standalone membership choices. Use class participant rules only when the membership is linked to registration for that class. See Membership for membership setup and the class-registration workflow.
The question uses the membership's effective price unless you set a price override in the form question. Review the question price and preview the invoice total before sharing the form.
Contribution to an Invoice
This is useful for allowing multiple users to pay a single invoice. For example, an invoice of $1,000 for a team of 5 people. Each team member can contribute $200 to participate.
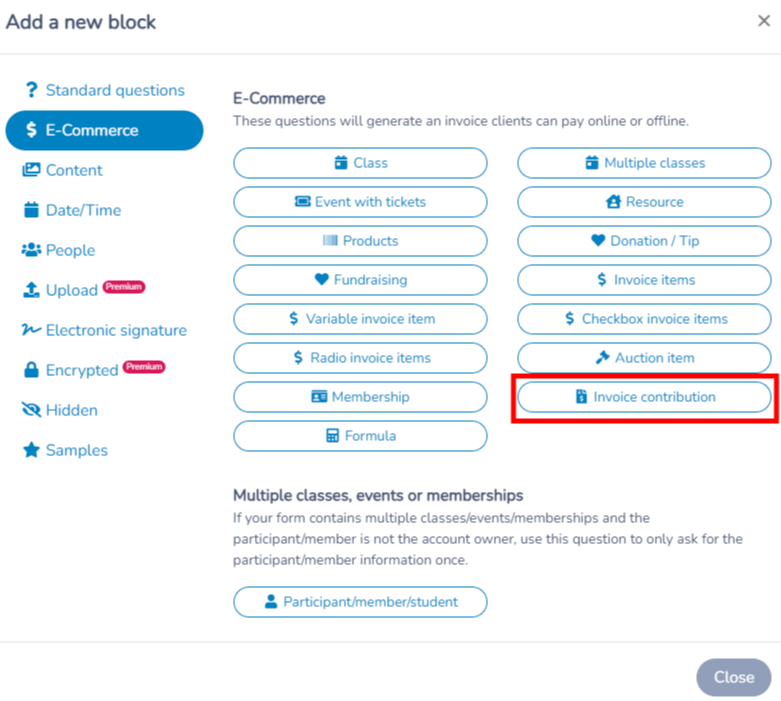
Every option of the E-Commerce blocks is listed in Form question reference.
Configuring the Payment step
Click on the Payment tab. A preview of the payment step will be displayed. Click the button to configure the payment method.
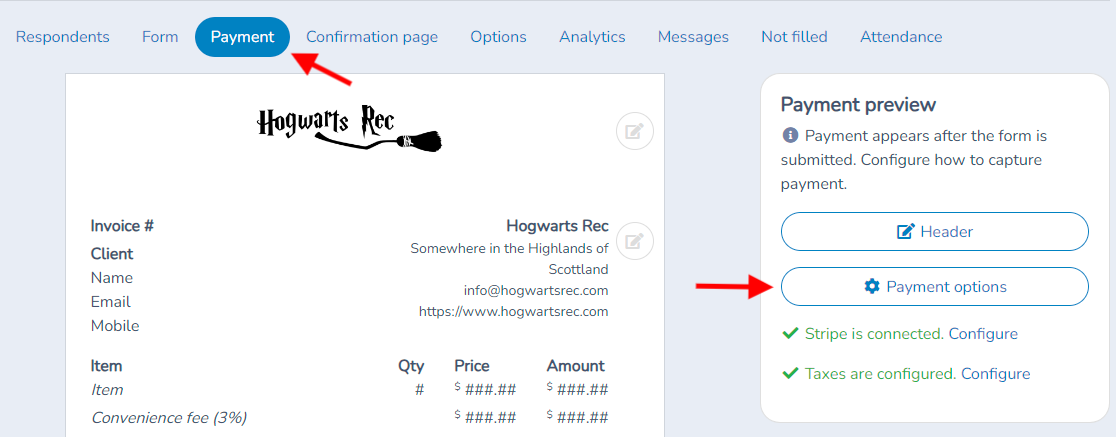
Different Payment Types Available:
Offline: Payment is made outside of the platform.
Credit card (via Stripe): The customer pays directly at the end of the registration form with their credit card.
Gift card: The customer can pay with a gift card that you have previously created on the platform.
Interac e-Transfer (by email): The customer pays via Interac transfer through email.
Stripe bank transfer (a switch in the same window, when available): Ideal for larger transactions. The customer logs into their bank account, with Stripe acting as the intermediary. The payment may remain pending for up to 5 business days before being automatically reconciled.
It is also possible to take a deposit or allow scheduled payments.
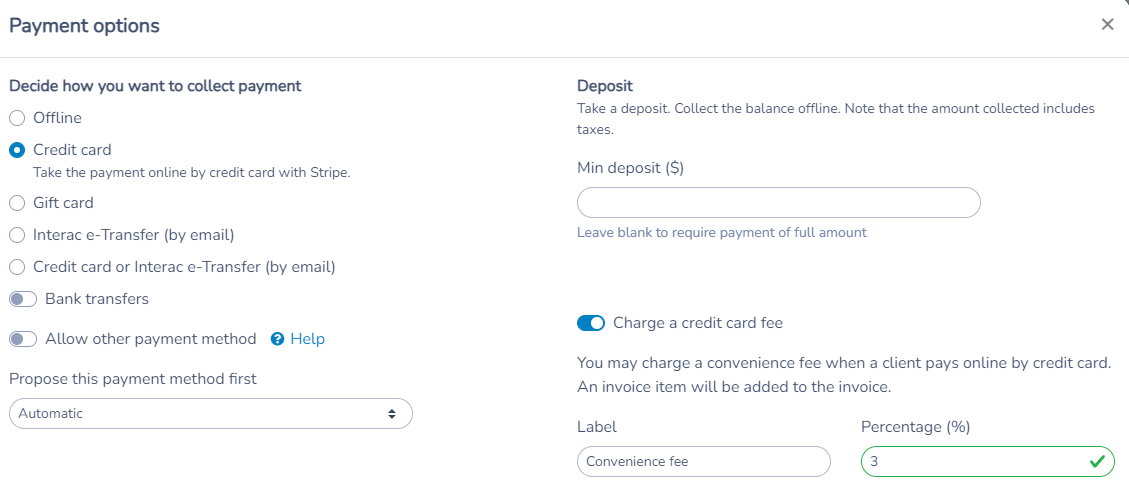
Your clients can pay in other ways. Check the Payment methods help page to learn more.
Configuring the confirmation step
Customize the confirmation page that users see after completing the form. This page can include the invoice, additional text, or links to your website.
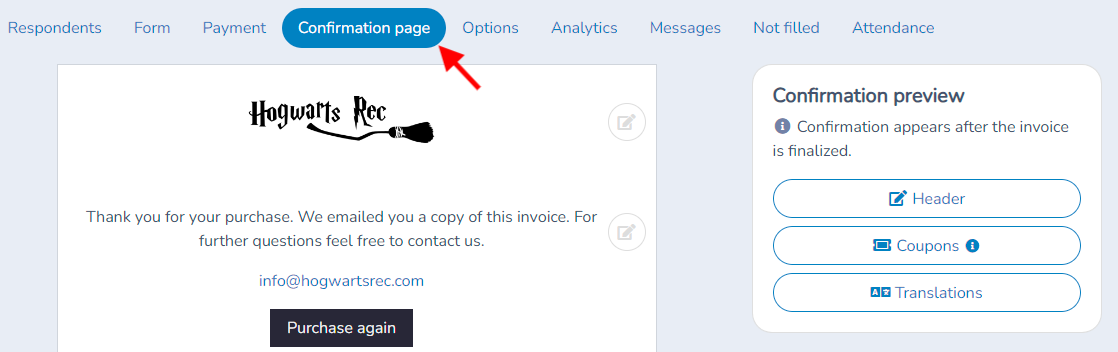
Payment form options
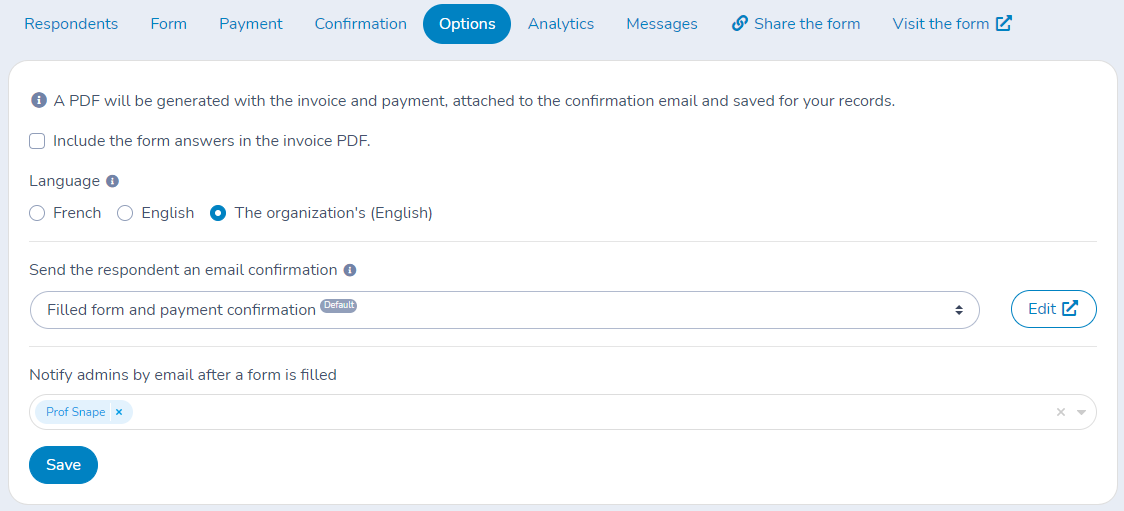
Click on the Options tab. Several options are available.
If your payment form also serves as a contract, Activity Messenger can include the answers to the questions in the PDF invoice document. The PDF file will be sent to the client and kept for your records. You can even include an electronic signature.
Activity Messenger uses a template for the confirmation email. You can modify it or design your own template.
You can notify one or more users (coaches or administrators) via email after a purchase. They will receive a copy of the PDF file as an attachment.
Your customers can pay by other means. Checkout the help page Payment methods to find out more.
Analytics
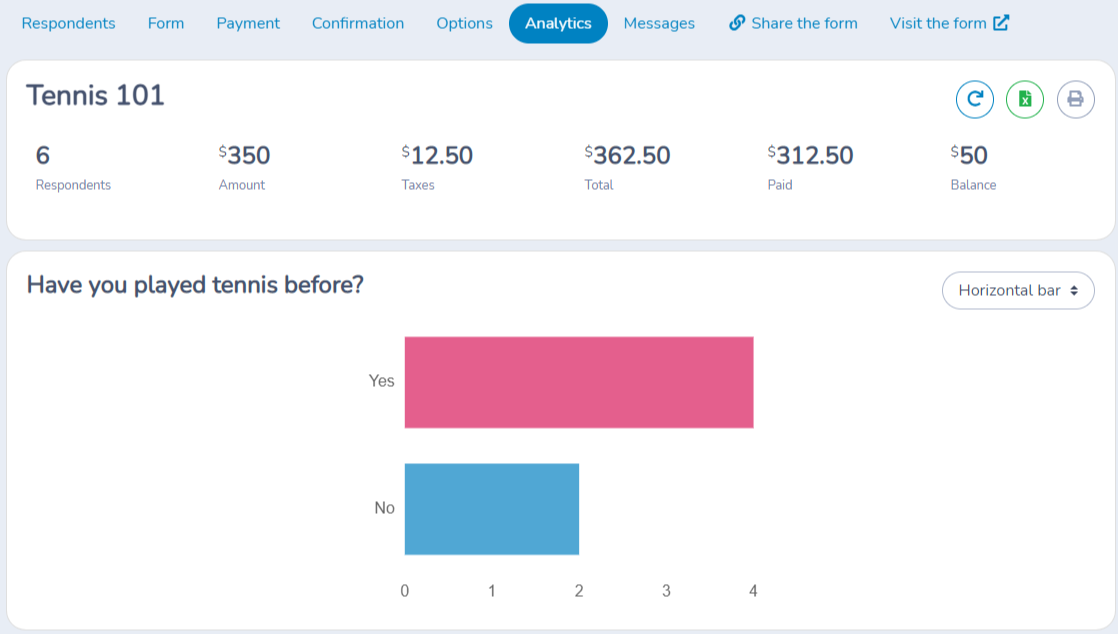
The Analytics tab provides charts and metrics. It gives you a summary of sales, payments and balance. It will also present charts for specific questions you may ask. Consult the Surveys and analytics help page to find out more.
Share the form
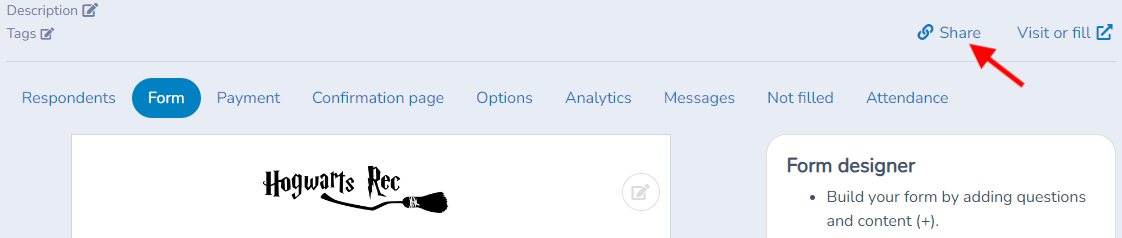
Once your payment form is ready, click on Share to obtain a unique link, a QR code, or an embed code for your website. You can also send it via email or SMS to your participants or clients.
Check the full purchase before launch
- Configure prices and taxes on the invoice-producing questions, not only in the organization’s settings. For a simple season fee, an Invoice items question can define the description, price and allowed quantity. For scheduled registration, use the class question instead.
- Check the payment mode before submitting anything. In test mode, use the test details shown by your payment provider; in live mode, a card submission can create a real charge. See the Go live checklist for leaving test mode.
- Complete the form and review the invoice, chosen payment option and confirmation. A deposit leaves a balance; offline or pending payment does not mean the invoice is paid in full.
- Find the submission under Respondents. Review its purchases and open client billing to inspect the invoice and payment status.
- Review sales, taxes, payments and question summaries under Analytics. Use columns and exports to see the answers required by your team.
- Before sharing a public registration link, deliberately confirm your live payment configuration, taxes, confirmation text and notifications.
Keep invoice corrections, cancellations and refunds in the client billing workflow. For payment-method eligibility and processing details, use Payment methods.
Settings reference
The Payment, Confirmation page and Options tabs belong to the form you open from Forms › Manage forms. The Payment options window and the confirmation message window have their own Save button, and the Options tab must be saved with Save.
| Setting | Where | Default | Effect |
|---|---|---|---|
| Payment | Forms › Manage forms › form › Payment tab › Payment options | Offline | Chooses how the customer pays: Offline (the customer registers without paying and you collect payment yourself), Credit card (taken online with Stripe), Gift card (only gift cards are accepted), Interac e-Transfer (by email), Credit card or Interac e-Transfer (by email), or Pre-authorized debit (AFT) when your organization uses it. Credit card stays unavailable until a card gateway is connected, and the Interac choices need Interac e-Transfer activated. |
| Card gateway | Same window | Your organization default gateway | Appears only when more than one card gateway is configured and the chosen payment uses a card. |
| Require a credit card on file when paying by Interac e-Transfer | Same window, when an Interac choice is selected and a card gateway is connected | Off | Keeps a credit card as a backup with the selected gateway. Signed-in clients can use their saved card or replace it. |
| Stripe bank transfer | Same window | Off | Lets the customer pay by bank transfer through Stripe. The payment stays pending for up to 5 business days and then settles automatically. Appears only when bank transfers are enabled for your Stripe account. See Bank debits with Stripe. |
| Pre-authorized debit (batch AFT) | Same window, only when your organization uses AFT | Off | Collects the client's bank account information and schedules future pre-authorized debit payments in batches. Stripe bank transfer cannot be on at the same time. See Pre-authorized debit batches (AFT) in Canada. |
| Deposit | Same window | No deposit (full amount) | For Credit card, Interac e-Transfer and Credit card or Interac e-Transfer. Choose a Fixed amount or a Percentage of the invoice total (with an optional Minimum deposit). The deposit includes taxes and you collect the balance offline. Leave the amount blank to require full payment. |
| Allow the client to set the deposit amount | Same window, when a deposit is set | Off | Lets the customer enter their own deposit amount. |
| Allow the client to decide to pay later | Same window, when the previous option is on | Off | Lets the customer choose to pay nothing now. |
| Allow multiple payments (Scheduled payments) | Same window | Off | Splits the invoice into scheduled payments with Stripe or Interac e-Transfer. Needs the Deposit left blank. When on, set Number of payments (1 by default) and Minimum amount (10 by default), and optionally Collect payment on a precise date, Every and Interval type (Month, Week or Day), Start date and what happens At purchase. |
| Offer to pay the invoice in full | Same window | No | Offers the customer to pay in full instead of scheduled payments in exchange for a promo code, which you must create first and select (required). A promotional message is shown on the payment page. Pre-apply promo code (No by default) applies the code automatically when paying in full is chosen. |
| Charge a credit card fee | Same window | Off, unless your organization settings turn it on | Adds a credit card fee to the invoice as an extra line (3% unless your organization settings differ). You can change the Label, Percentage, Taxes and Ledger code. Hidden when the payment is not by credit card or when convenience fees are disabled for your organization. |
| Add other fee | Same window | Off, unless your organization settings turn it on | Adds an additional fee to the invoice whatever the payment method. Choose Percentage (1% by default) or Fixed amount, plus Label, Taxes, Ledger code and Accepted promo codes. |
| Allow other payment method | Same window | Off | Adds a payment choice you name (Other by default) with your own instructions, for example a cheque or cash. It is not a payment processor: do not ask customers for card numbers. A checkbox limits it to the administrator. |
| Propose this payment method first | Same window, when the payment is not Offline | Automatic | Chooses which payment method the customer sees first. |
| Prevent payment at checkout with a gift card | Same window, when the payment is not Gift card | Off | Removes the gift card choice at checkout. |
| Prevent applying coupon or promo code at checkout | Same window | Off | Stops customers from entering a coupon or promo code on this form. |
| Allow using a second promo code | Same window | Off | Lets a customer apply two promo codes. |
| Enable tipping / donations | Same window | Off | Adds tip or donation amounts to the payment step. Choose the Mode (Tips or Donation), up to four suggested amounts, a Ledger code and an optional Donation receipt. |
| Instructions and Button text | Same window | Empty (default wording) | Replace the text above the payment button and the button label. When empty, a card payment shows "Please pay now to complete your purchase." and the button Pay now; Offline shows "No payment required." with a reminder that you will collect the balance, and the button Confirm and pay later. |
| Allow client to modify the payment amount | Same window, Client pay balance page | On | On the page where a client pays a remaining balance, lets them change the amount. |
| Allow client to pay the balance of their invoice with a gift card | Same window, Client pay balance page | On | Accepts gift cards on that balance page. |
| Show header with organization logo | Forms › Manage forms › form › Payment tab or Confirmation page tab › Header | On | Shows your logo at the top of the payment and confirmation pages. Use full width logo appears when your organization has a full width logo. |
| Message | Forms › Manage forms › form › Confirmation page tab › pencil › Message | Default thank-you message | The text on the confirmation page. The default reads "Thank you for your purchase. We emailed you a copy of this invoice. For further questions feel free to contact us." Leave blank to keep it. |
| Contact us | Same pencil › Contact us | Your organization email and phone | Email and telephone shown on the confirmation page. Each can be hidden with Hide on confirmation form. |
| Button | Same pencil › Button | Purchase again | Text and link of the button on the confirmation page. |
| Coupons | Forms › Manage forms › form › Confirmation page tab › Coupons | No coupons | Generates a number of single-use coupons when the form is filled. They are sent by email and available in the client account. |
| PDF (Include the form answers in the invoice PDF) | Forms › Manage forms › form › Options tab | Off for a form created from scratch | Adds the form answers to the invoice PDF. The PDF with the invoice and payment is attached to the confirmation email and saved for your records. |
| Language | Forms › Manage forms › form › Options tab | The organization's language | Forces the form to be shown in French or English. |
| Permission and Read only permission | Forms › Manage forms › form › Options tab | Nobody listed | Users who can view or only view the form. Owners and administrators always have access. |
| Send a confirmation message to the respondent | Forms › Manage forms › form › Options tab › Confirmation | Filled form and payment confirmation | The email template sent after a purchase, with the PDF attached. Send by chooses Email, SMS and email, or SMS (and Client preferences when your organization allows it). |
| E-transfer payment confirmation email | Forms › Manage forms › form › Options tab › Confirmation | The organization payment confirmation template | Sent when an Interac e-Transfer settles. Shown only when the form accepts Interac e-Transfer. |
| Bank transfer payment confirmation email | Forms › Manage forms › form › Options tab › Confirmation | The organization payment confirmation template | Sent when a bank transfer completes. Shown only when Stripe bank transfer is on. |
| Do not include invoice in the confirmation email | Forms › Manage forms › form › Options tab › Confirmation | Off | Sends the confirmation without the invoice. Hide invoice details on the form confirmation page then becomes available (Off). |
| Send confirmation to other parent / participants and members | Forms › Manage forms › form › Options tab › Confirmation | Off | Also sends a confirmation, without the invoice, when the other parent or participant has a valid email. The other parent option appears when the form has an Other parent question. |
| Notify admins after a form is filled | Forms › Manage forms › form › Options tab | Nobody | Users who receive a message after each purchase, by Email, SMS and email, or SMS (Send by). Also notify these admins after a form is imported is Off by default. |
| Set the reply-to address to the respondent's email address | Forms › Manage forms › form › Options tab | Off | Makes replies to your notifications go to the respondent. |
| Enable webhook | Forms › Manage forms › form › Options tab | Off | Sends the form answers to the URL you enter. |
| Use this template when an invoice is cancelled | Forms › Manage forms › form › Options tab › Cancellation | Purchase cancellation | Template sent with the cancellation invoice and receipt PDF when an invoice is cancelled. |
| Reply to | Forms › Manage forms › form › Options tab | Empty (your organization email) | Address that receives replies to confirmation and cancellation emails. |
| Exclude this form from search engine indexing | Forms › Manage forms › form › Options tab | Off | Adds noindex instructions so search engines do not list the form. Anyone with the link can still open it. |
| Share | Forms › Manage forms › form › Share | Not applicable | Gives the shareable link (with an optional Custom URL slug), a QR code, and embed codes Directly in the page or Button with popup. |
Common questions
How do I accept online card payments with a payment form? Create a payment form from Forms › Create, then open its Payment tab. Use Payment options to configure the payment method(s) offered on the form; the available choices depend on your organization’s payment setup. To connect Stripe, use the Connect Stripe button on the Payment tab (or the organization account settings). Complete the Stripe connection, then return to Payment options and configure the desired method. Save your changes. Do not assume a new form always defaults to Offline or that every account sees a specific card option. See Configuring the Payment step.
Can I take a deposit and collect the rest later? Yes, with Credit card, Interac e-Transfer or Credit card or Interac e-Transfer. Set a fixed Deposit amount or a Percentage in Payment options. The balance is collected offline or from the client pay balance page. A deposit cannot be combined with Scheduled payments. See Configuring the Payment step.
Can customers pay in instalments? Yes, with Allow multiple payments. It works with Stripe or Interac e-Transfer, and the Deposit must be blank. At each date Activity Messenger charges the card on file; if a card payment fails it is not retried, and the invoice shows the error so you can follow up. See Configuring the Payment step and Payment methods.
Can I charge customers the card fee? Yes. Turn on Charge a credit card fee in Payment options. It adds a line to the invoice, 3% by default, and appears only for credit card payments. If you do not see it, your organization has disabled convenience fees. Use Add other fee for a fee that applies to every payment method.
Can customers pay by cheque, cash or another method? Choose Offline for payment collected outside Activity Messenger, or turn on Allow other payment method to add a named choice with your instructions. Never ask for card numbers there. Check the invoice status afterwards: an offline payment does not mean the invoice is paid in full. See Payment methods.
Where do I change the thank-you page and the confirmation email? The page is on the Confirmation page tab: click the pencil to edit the Message, Contact us and Button. The email is chosen on the Options tab under Send a confirmation message to the respondent. Click Save on the Options tab. See Payment form options.
How do I get notified of each purchase? On the Options tab, add users under Notify admins after a form is filled and choose Send by. They receive the message, with the PDF attached, after each purchase. Click Save. See Payment form options.
How do I test before sharing the form? Check whether your payment account is in test or live mode before submitting anything. In test mode use the test details from your payment provider; in live mode a card submission creates a real charge. See Check the full purchase before launch and the Go live checklist.