
Home
Account setting
Staff
Lists
Forms
Templates (HTML emails/SMS messages)
Sending messages by SMS and email
Classes, events, attendance and Zoom
Automation
Create a birthday invitation and automation
Communication
Microsite
E-Commerce
Networks, Federations and Franchises
How to guides
Personal information and electronic message laws in Canada and the USA
Get support
Terms and conditions
RL-24
https://activitymessenger.com/
10410 Waverly, Montréal, H3L 2W4
Terms and conditions

Sell products and track inventory
Use products to sell merchandise, equipment, rentals, vouchers, or other items through Activity Messenger. You can sell products from payment forms, the microsite, POS, and admin invoices, then use inventory reports to know what is available to sell, what is physically in stock, and what still needs to be picked up or returned.
# Before You Begin
You need permission to manage products. If your organization uses accounting reports, create the needed taxes and ledger codes before creating products.
Decide whether each product needs inventory tracking. Some products, such as a digital item or an unlimited service, may not need a quantity limit. Physical merchandise usually does.
# 1. Create Or Edit A Product
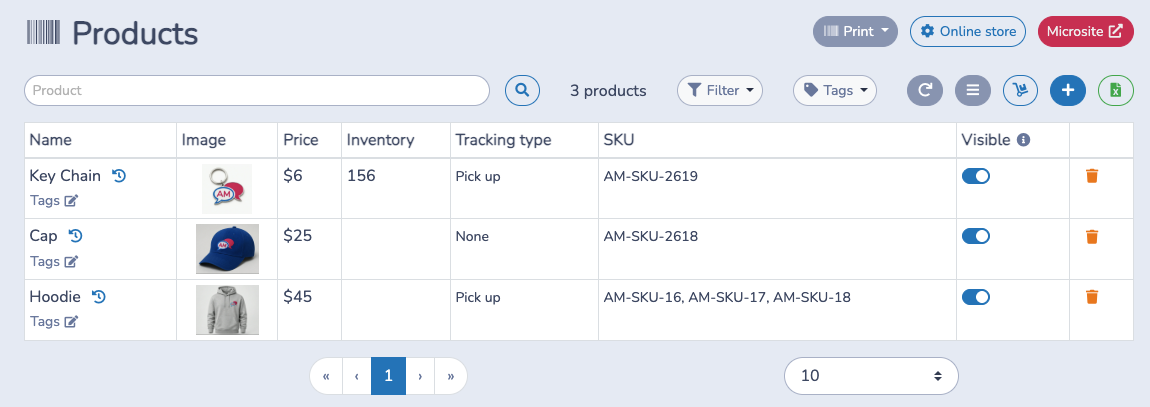
- Go to E-Commerce > Products.
- Click + to create a product, or click an existing product to edit it.
- Enter the product name, description, price, taxes, ledger code, SKU, and image.
- Use Visible to decide whether the product appears in your online store.
- Use tags to organize products and make them easier to filter in reports and sales workflows.
- Save the product.
Products can be sold on their own or alongside classes, memberships, booking packages, and other invoice items.
# 2. Add Variants When Needed
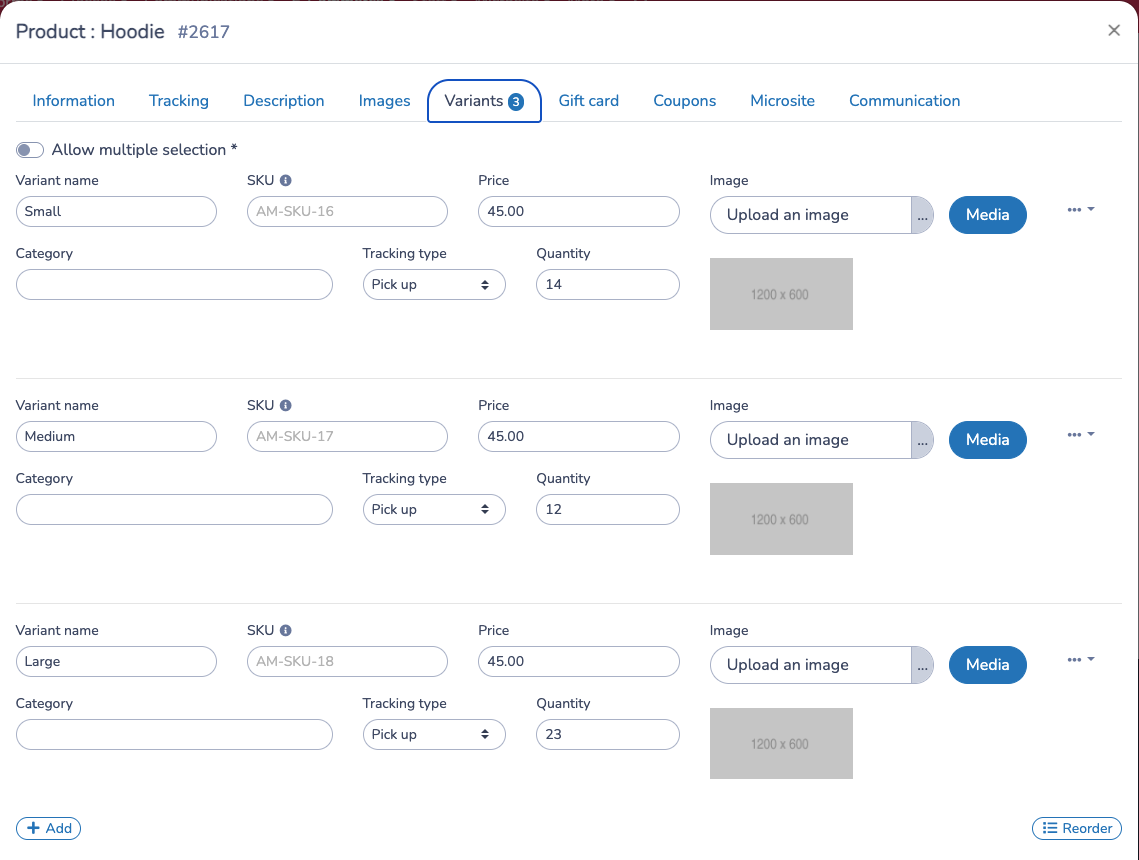
Use variants when one product has choices such as size, colour, level, or style. Each variant can have its own name, image, category, SKU, and price.
If each variant has its own stock, open the product's Tracking tab and enable Track inventory per variant. Each variant then has its own tracking type and quantity. If you leave this off, variants share the product's main inventory quantity.
# 3. Choose The Inventory Tracking Type
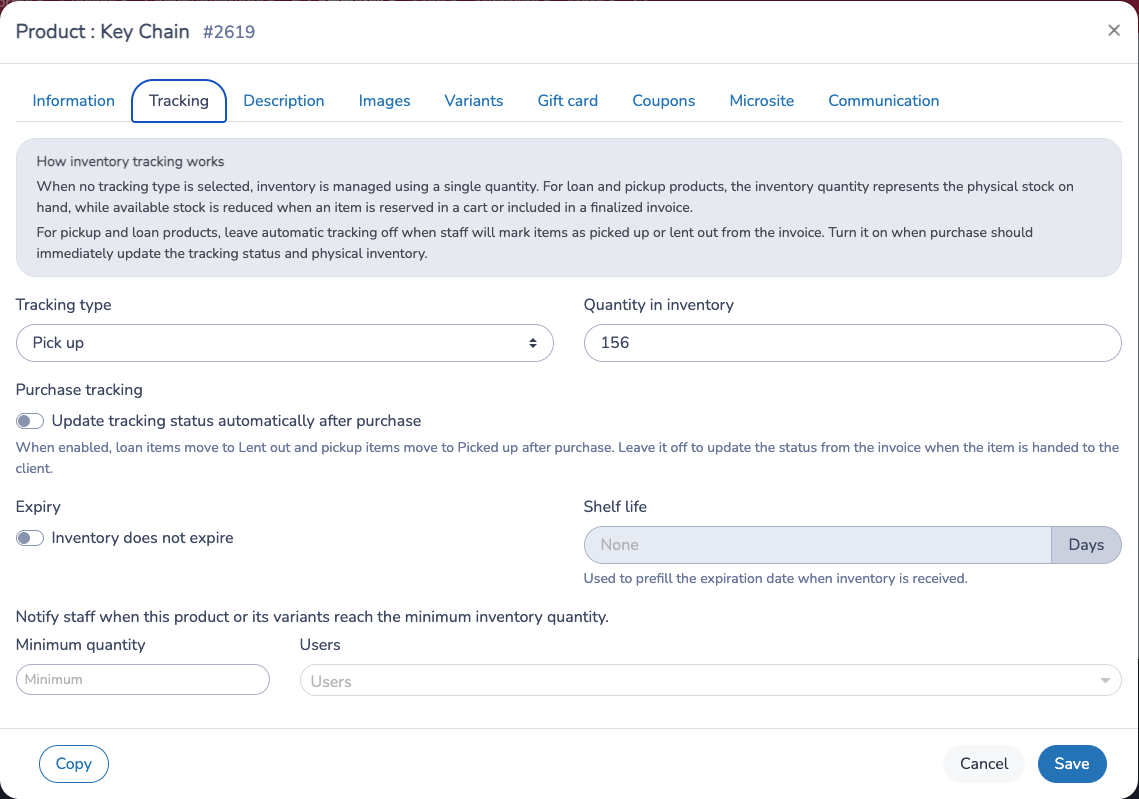
Open the product's Tracking tab and choose a tracking type.
No tracking type means Activity Messenger does not use pickup or loan statuses for the product. The product also does not have separate available and physical quantities. If you enter a numeric quantity, that quantity can still limit sales. Leave the quantity empty when the product should not be limited by inventory.
Pick up is for products that are purchased first and handed to the client later, such as merchandise picked up at the front desk.
Loan is for products that leave your physical inventory temporarily and are expected to come back, such as loaned equipment.
For pickup and loan products, the inventory quantity represents the physical stock on hand. The available quantity can be lower because Activity Messenger reserves stock when a client adds the item to a cart or when an invoice is finalized.
# 4. Understand Available And Physical Quantity
For products with no tracking type, there is only one quantity.
For pickup and loan products, Activity Messenger separates two ideas:
- Physical stock is what is actually on hand.
- Available to sell is what can still be sold after reservations are taken into account.
Example: you have 15 hoodies in the shop. A client buys one for pickup. You still physically have 15 hoodies, but only 14 are available to sell because one is reserved for that client. When staff marks the item as picked up or delivered, physical stock becomes 14.
# 5. Decide Whether To Update Tracking Automatically
In the product's Tracking tab, use Update tracking status automatically after purchase when purchase/finalization means the item has already been handed to the client.
When this option is enabled:
- Loan products move to Lent out after purchase.
- Pickup products move to Picked up after purchase.
- Physical inventory is updated immediately.
Leave it off when staff should update the item later from the invoice or from the fulfillment report. This is usually best when clients buy online and pick up later.
This setting is on the product. If the product tracks inventory per variant, it also applies to variant purchases.
# 6. Sell Products
Products can be added to payment forms, sold on the microsite, sold through POS, or added to admin invoices.
For tracked pickup and loan products, Activity Messenger checks available quantity before clients can buy. Adding a product to a cart reserves available stock. Removing it from the cart, cancelling the invoice item, or reversing the sale releases or reapplies inventory according to what happened to that item.
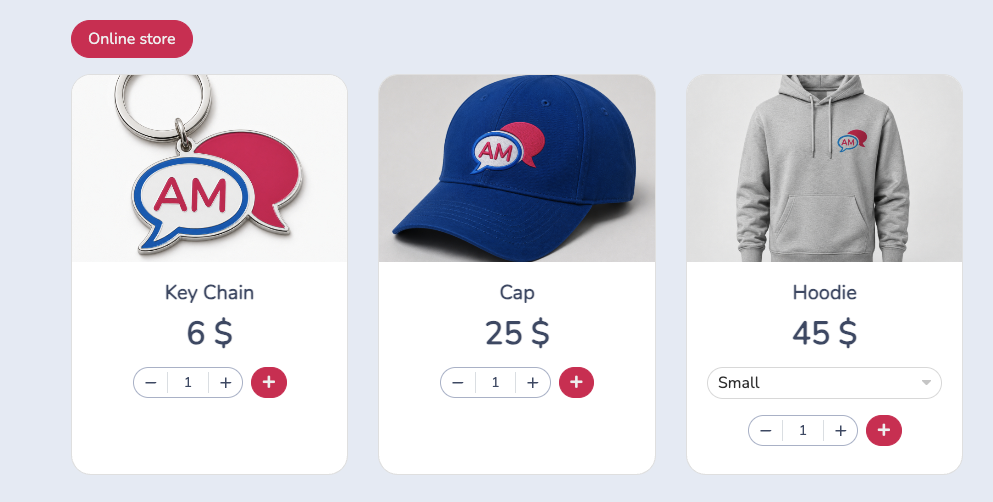
On the microsite, clients see product cards with price, quantity controls, and an add-to-cart button. When a selected product or variant is out of stock, the add action is disabled. Variants can also show an out-of-stock label in the selector.
In a payment form, clients see the products selected by the administrator in the Products question. If the question is configured to show inventory, Activity Messenger can display the available quantity. Tracked products and variants that are out of stock cannot be selected.
# 7. Update Product Status From An Invoice
You can also manage product tracking from an invoice.
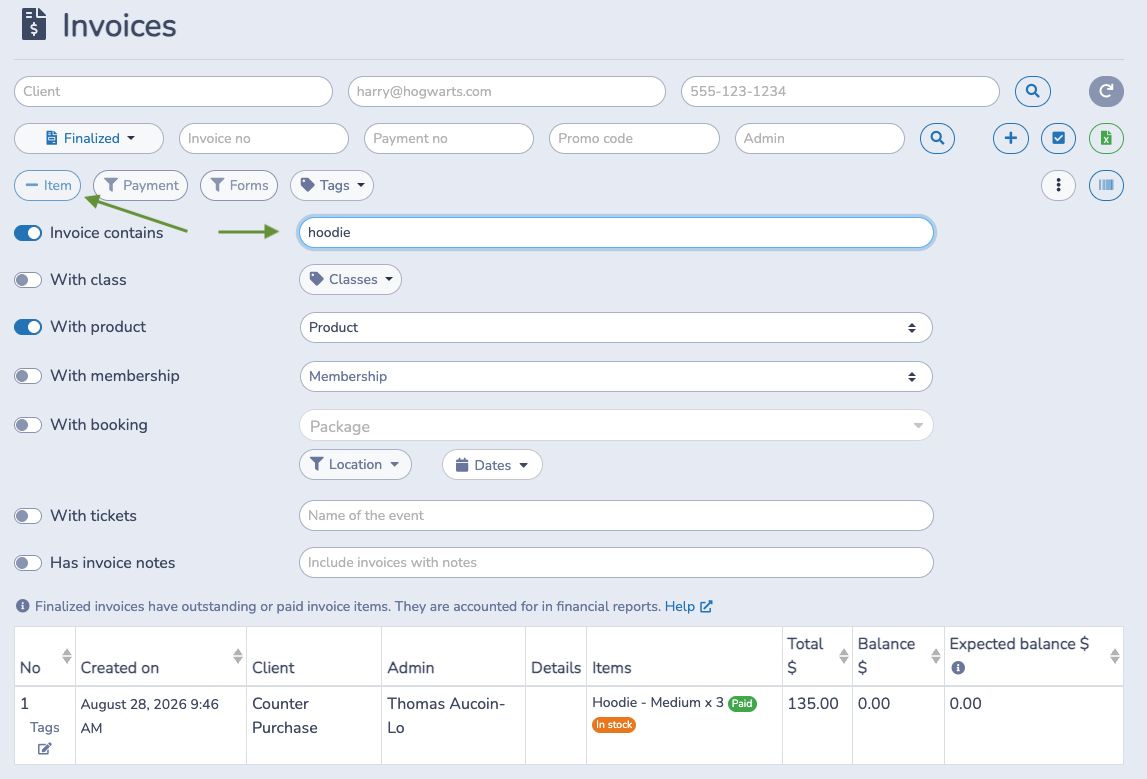
Go to E-Commerce > Invoices and use the item or product filters to find invoices that contain a product. The invoice list shows product items and their current payment and tracking status, so it can be useful when you are helping one client at a time.
Open the invoice to see the purchased products. For pickup and loan products, use the tracking status action beside the product line to mark the item picked up, delivered, lent out, returned, or back in stock.
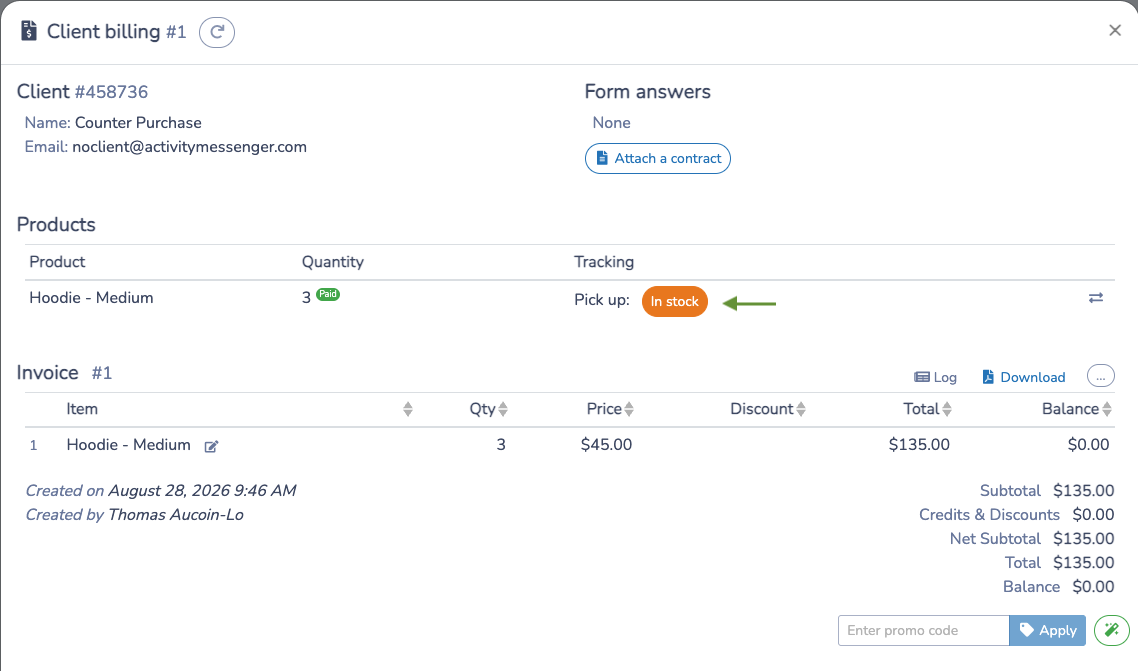
Invoice status changes and fulfillment report status changes use the same inventory rules. If the status change affects physical stock, Activity Messenger records the matching movement in Inventory history.
# 8. Use The Inventory Report
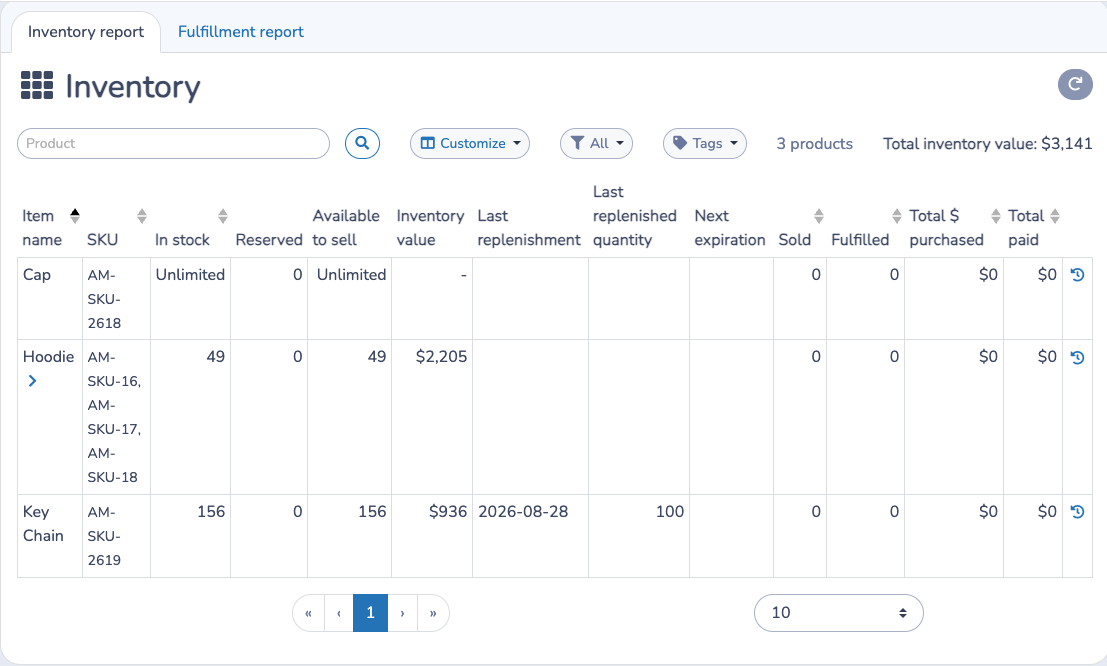
Go to E-Commerce > Inventory and open Inventory report.
Use this report to review products and variants by stock, available quantity, inventory value, low stock warnings, replenishment details, sold quantity, fulfilled quantity, paid totals, and discount loss. You can search by product, filter by product tag, and filter by item type.
Important: Fulfilled in this report is a status-based total from invoice items. It is not the same thing as physical inventory balance.
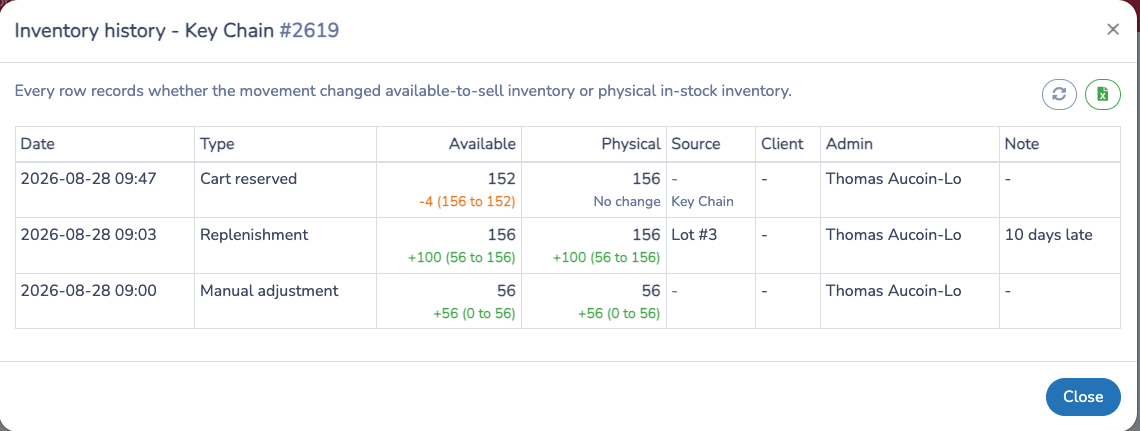
Click the history button beside a product or variant to open Inventory history.
# 9. Receive Inventory
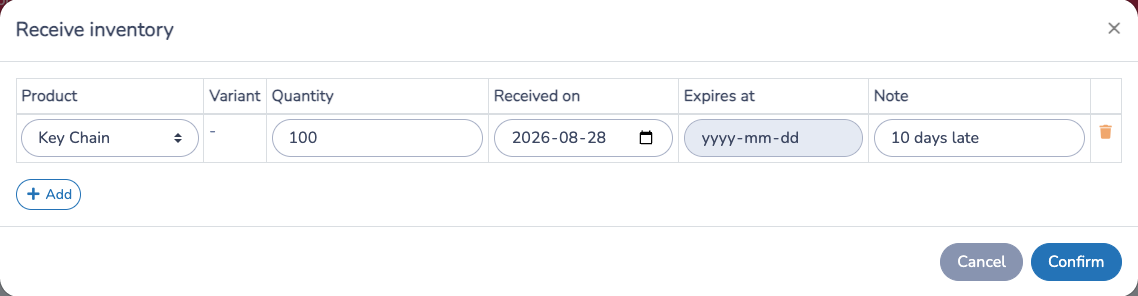
Go to E-Commerce > Products and click Receive inventory when new stock arrives. Use this instead of editing the quantity directly when you want an audit trail.
In the receive-inventory window, add one row for each product or variant you are receiving. Each row includes:
- Product.
- Variant, when the product tracks inventory per variant.
- Quantity received.
- Received date.
- Expiration date, when the product uses expiring inventory.
- Internal note.
You can add multiple rows before saving. Each saved row creates a dated inventory lot, increases the product or variant's physical stock, and records a Replenishment movement in Inventory history.
If the product has Inventory expires enabled and a shelf life in days, Activity Messenger can suggest the expiration date from the received date. You can adjust it before saving.
When physical stock later leaves inventory, Activity Messenger uses the available lots in expiration order first, then received date. This helps older or expiring stock be consumed before newer stock.
For products with variants, receive stock against the variant when inventory is tracked per variant. If variants share the product inventory, receive the stock against the product instead.
# 10. Use Inventory History
Inventory history is the audit trail for a product or variant. Each row explains what changed, when it happened, who or what caused it, and the balance before and after the movement.
History separates:
- Available balance: sellable stock after reservations.
- Physical balance: stock physically on hand.
Common movement types include cart reserved, cart released, sale, cancellation, cancellation reversed, exchange, loan out, loan returned, fulfilled, fulfillment returned, replenishment, and manual adjustment.
Use Inventory history when a product count does not match what staff expected. It is the best place to audit missing sales, cancellations, exchanges, returns, loans, pickups, and manual changes.
# 11. Use The Fulfillment Report
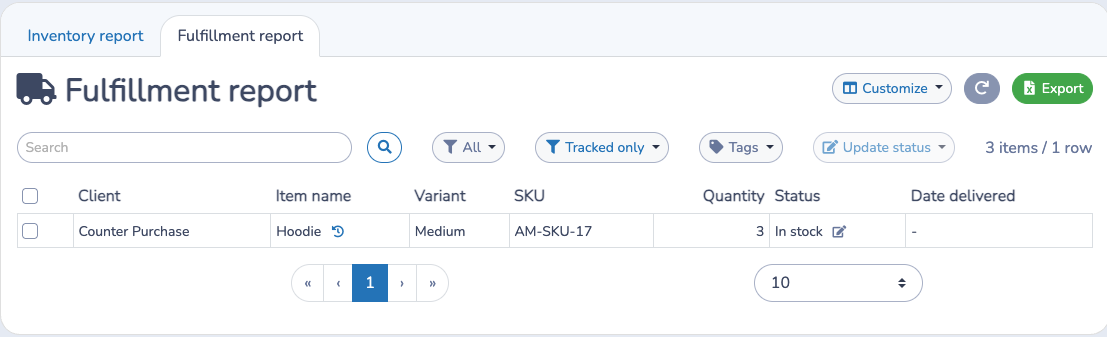
Go to E-Commerce > Inventory and open Fulfillment report.
The fulfillment report is the operational list of product invoice items that need pickup, delivery, loan tracking, or return tracking. It shows one row per product invoice item from finalized, non-cancelled invoices.
You can:
- Search by client, product, SKU, product ID, or invoice item ID.
- Filter by tracking status.
- Filter by tracking type, including loan, pickup, no tracking, or all tracked items.
- Filter by product tags.
- Export selected columns.
- Select one or more rows and update their tracking status.
When you update a pickup item to Picked up or Delivered, Activity Messenger records a physical fulfillment movement. When you move it back to stock, it records a fulfillment return if that item had been physically fulfilled.
When you update a loan item to Lent out, Activity Messenger records a loan out movement. When the item is returned, it records a loan return.
The history button in the fulfillment report opens the product or variant's Inventory history so you can compare the operational status with the audit trail.
# Fulfillment Report Vs. Inventory History
The fulfillment report answers: Who bought which product, and what is the current pickup or loan status?
Inventory history answers: Why did available or physical quantity change, and which invoice, item, admin, or replenishment caused it?
Use the fulfillment report for day-to-day work. Use inventory history for reconciliation.
# Example
You sell 15 hoodies for pickup.
- Set the product tracking type to Pick up.
- Leave Update tracking status automatically after purchase off, because clients will pick up later.
- A client buys one hoodie online.
- Available quantity changes from 15 to 14.
- Physical quantity stays at 15.
- Staff opens the invoice or fulfillment report and marks the item Picked up.
- Physical quantity changes from 15 to 14.
- Inventory history shows both the reservation and the pickup movement tied to the invoice item.
# Important Notes
- Use no tracking type when a product does not need pickup or loan status tracking. Leave the quantity empty when it should not be limited by inventory.
- Use Pick up when sold items are reserved before they leave your physical stock.
- Use Loan when items are expected to return.
- Use automatic tracking only when purchase/finalization should immediately count as picked up or lent out.
- For variants, choose whether inventory is shared at the product level or tracked per variant before entering quantities.
- Historical movements created before detailed inventory history was enabled may not show the same available and physical balance detail as newer rows.
- Use Inventory history before making manual adjustments, so the adjustment can correct the real mismatch instead of hiding it.