How to Create a Liability Waiver in Google Forms

Olivier Rousseau
10 November 2024 2 min read

Liability waivers protect your business by informing participants of the risks involved and having them acknowledge their responsibility. Google Forms is a quick, free way to create these waivers, making them accessible to small businesses. This article will walk you through creating a basic liability waiver in Google Forms, covering the essential steps to ensure that your waiver is complete, and professional.

Part 1: Building Your Waiver in Google Forms

Step 1: Define Your Waiver’s Purpose and Content

Carefully outline the critical elements that need to be in your waiver. A complete liability waiver typically includes:

  1. Activity Description: Clearly describe the activity or service participants will engage in.
  2. Assumption of Risk: Explain the potential risks involved in the activity.
  3. Release of Liability: Specify that the participant agrees not to hold your business responsible for injuries or accidents.
  4. Emergency Contact Information: Include fields for collecting emergency contact details.
  5. Agreement Confirmation: Add language confirming that the participant has read, understood, and agrees to the terms.

Step 2: Set Up Your Google Form

Go to Google Forms and create a new form. Here’s how to structure it:
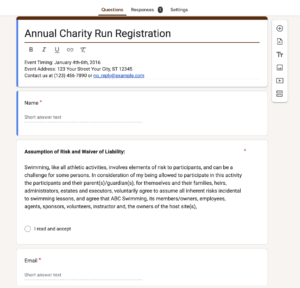
  1. Title: Name your form (e.g., “Activity Liability Waiver”) and add a brief introduction explaining the waiver’s purpose.
  2. Sections: Divide your waiver into sections:
    • Participant Information: Collect basic details like name, contact, and emergency information.
    • Waiver Terms: Present each clause (Assumption of Risk, Release of Liability) in separate questions with detailed text.
    • Consent and Agreement: Add a checkbox for “I agree to the terms of this liability waiver” and a field for the participant to type their name as acknowledgment.
  3. Required Fields: Make essential questions mandatory to ensure participants don’t skip over any critical parts.
  4. Settings: Customize the confirmation message and adjust settings to limit participants to one response each.

How to Create a Liability Waiver in Google Forms

Part 2: Adding Digital Signatures to Your Google Form Waiver

While Google Forms is convenient, it lacks built-in support for legally binding digital signatures. Here are several options for adding this critical component, from Google Forms add-ons to third-party tools and specialized waiver software.

Option 1: Use Google Forms Add-Ons

Add-ons extend the capabilities of Google Forms, including digital signature capabilities. Here are some options:
  • DocuSign for Google Workspace: This popular e-signature tool integrates with Google Docs. Export responses to a Google Doc, then send the waiver to participants through DocuSign for an official digital signature.
  • PandaDoc: PandaDoc allows you to import responses from Google Forms and request digital signatures. This option is especially effective if you already use PandaDoc for other document workflows.

Google docs and docusign

Option 2: Connect Google Forms to a Digital Signature Tool with Zapier

Zapier is a powerful automation tool that connects Google Forms to digital signature applications like HelloSign, Adobe Sign and SignNow. Here’s how it works:
  1. Create a Zap: Set up a workflow to trigger when a new response is submitted in Google Forms.
  2. Link to a Signature Tool: Zapier will automatically send waiver details from Google Forms to your chosen e-signature tool.
  3. Send Signature Request: Participants will receive an email with the waiver and a prompt to sign it digitally.

Zapier

Option 3: Use an Online Waiver Tool with Built-In Digital Signatures

For organisations dealing with a high volumes of participants, an online waiver tool may be the best solution. These platforms offer digital signature capabilities and additional features such as SMS reminders, real-time tracking and storage. Some popular options include:
  • Activity Messenger: Activity Messenger offers customizable waivers, automated SMS and email reminders, and legally-recognized digital signatures, making it ideal for a streamlined waiver process.
  • WaiverForever: This app allows digital signatures, real-time tracking, and offline access. It’s beneficial for businesses operating in areas with limited connectivity.
  • Smartwaiver: Smartwaiver enables customers to sign waivers from any device and offers integrations with CRM software, making it a comprehensive waiver solution.

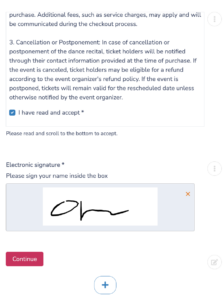
Add Essential Fields and Digital Signature

Option 4: Link to an External Digital Signature Form

If you’re looking for a simple solution, you can include a link in Google Forms to a separate digital signature document. Here’s how:

  1. Create a Digital Signature Document: Use a tool like Adobe Sign or HelloSign to create a signature form.
  2. Embed the Link in Google Forms: At the end of the Google Form, add a link to the digital signature document.
  3. Separate Storage: This option works best for low volumes, as you’ll need to manage responses from two sources.


Why Adding a Digital Signature Matters

Adding a digital signature brings several benefits to your liability waiver:

  • Legal Compliance: Digital signatures are generally more enforceable in court than typed names, offering added legal security.
  • Professionalism: A waiver with a digital signature step presents a polished, reliable image to participants.
  • Streamlined Workflow: Automating digital signatures means fewer in-person waivers to collect, speeding up check-in and simplifying record-keeping.

Pros and Cons of Each Approach

Approach Pros Cons
Google Forms Only Free and easy to set up No digital signature, limited options
Google Forms with Add-Ons Adds signature functionality Limited features, subscription costs
Zapier Integration Automates signatures Requires paid Zapier and signature tool
Online Waiver Tools Comprehensive, feature-rich Subscription required
Link to External Signature Form Simple, low-cost Separate response management

Conclusion

Creating a liability waiver in Google Forms is an excellent starting point for small businesses. Google Forms makes it easy to organize waiver content and collect participant responses quickly. However, adding a digital signature is crucial for ensuring legal enforceability and professionalism.

Using add-ons, Zapier integrations, or specialized waiver software like Activity Messenger can take your waiver to the next level. If you’re handling high-risk activities or need legally binding signatures, investing in an online waiver tool with built-in digital signatures can save time, ensure compliance, and enhance the participant experience.

With these options, you’re well on your way to creating a streamlined, secure liability waiver process that works for your business.

Written by Olivier Rousseau Olivier is a kids sports programs owner who has been operating for over a decade with locations in Montreal, Quebec city & Ottawa. He also helps Gymnastics Club, Swim Schools and Dance Studios streamline their operations. He is the co-founder of Activity Messenger an online registration platform for the sports & leisure industry.

Create a liability waiver form today!

Subscribe for exclusive content

Receive News and Updates about our product

© Activity Messenger

info@activitymessenger.com