
Home
Account setting
Staff
Lists
Forms
Templates (HTML emails/SMS messages)
Sending messages by SMS and email
Classes, events, attendance and Zoom
Automation
Create a birthday invitation and automation
Communication
Microsite
E-Commerce
Networks, Federations and Franchises
How to guides
Personal information and electronic message laws in Canada and the USA
Get support
Terms and conditions
RL-24
https://activitymessenger.com/
10410 Waverly, Montréal, H3L 2W4
Terms and conditions

Export journal entries to QuickBooks or Sage
Activity Messenger can turn your sales and payment data into balanced journal entries for QuickBooks or Sage. The integration is file-based: you configure your chart of accounts in Activity Messenger, preview the entries, and download a QuickBooks CSV or Sage TXT file. It does not sign in to your accounting software or synchronize changes automatically.
# Before you begin
You need:
- Permission to configure your organization and view financial reports.
- The account names or numbers from your accounting chart of accounts.
- Ledger codes assigned to the items you sell. See Set up accounting and ledger codes.
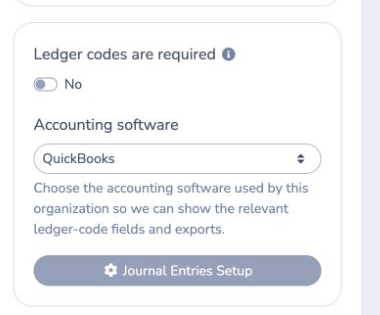
If every sold item must have a ledger code, enable Ledger codes are required.
# 1. Select your accounting software
- Go to E-Commerce → Ledger codes.
- Under Accounting software, select QuickBooks or Sage.
Activity Messenger then shows the corresponding account fields and download format.
# 2. Configure ledger codes
Create ledger codes that correspond to the accounts in your accounting software, then assign those codes to the items you sell.
QuickBooks
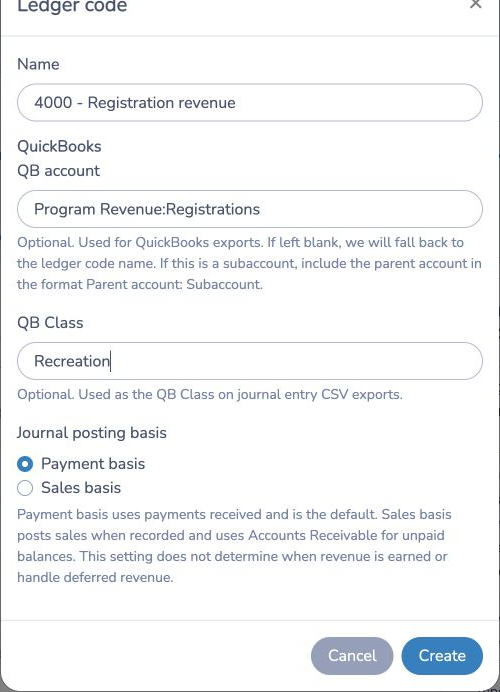
For each ledger code:
- Enter a clear Name.
- Enter the QB account exactly as it appears in QuickBooks.
- If you use a subaccount, enter it as
Parent account: Subaccount. - Optionally enter a QB Class.
- Select the Journal posting basis.
If QB account is blank, the export uses the ledger-code name. QB Class is optional and appears in the Class column of the journal-entry CSV.
Sage
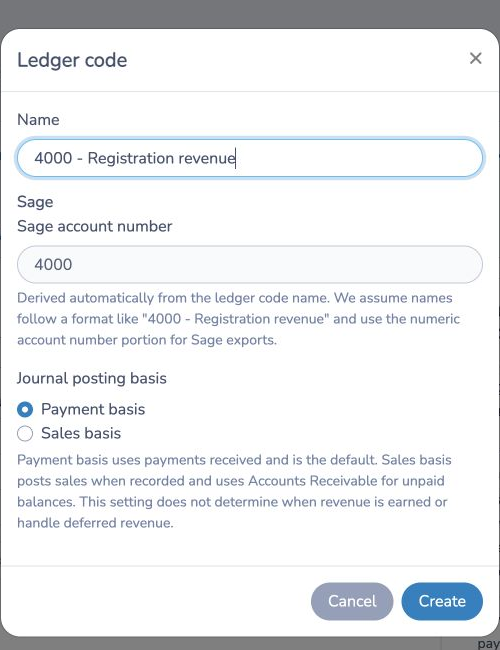
Include the Sage account number in the ledger-code name, for example 4000 - Registration revenue. Activity Messenger extracts the numeric portion and displays it under Sage account number.
# 3. Choose the journal posting basis
Each ledger code can use one of two posting bases:
- Payment basis is the default. It creates entries from payments received. These entries are available in the Payments and Stripe Payouts reports.
- Sales basis creates entries when a sale is recorded and uses Accounts Receivable for unpaid balances. These entries are available in the Sales → Journal entries report.
This setting controls which transaction event creates the journal entry. It does not determine when revenue is earned and does not manage deferred revenue.
# 4. Configure reporting accounts
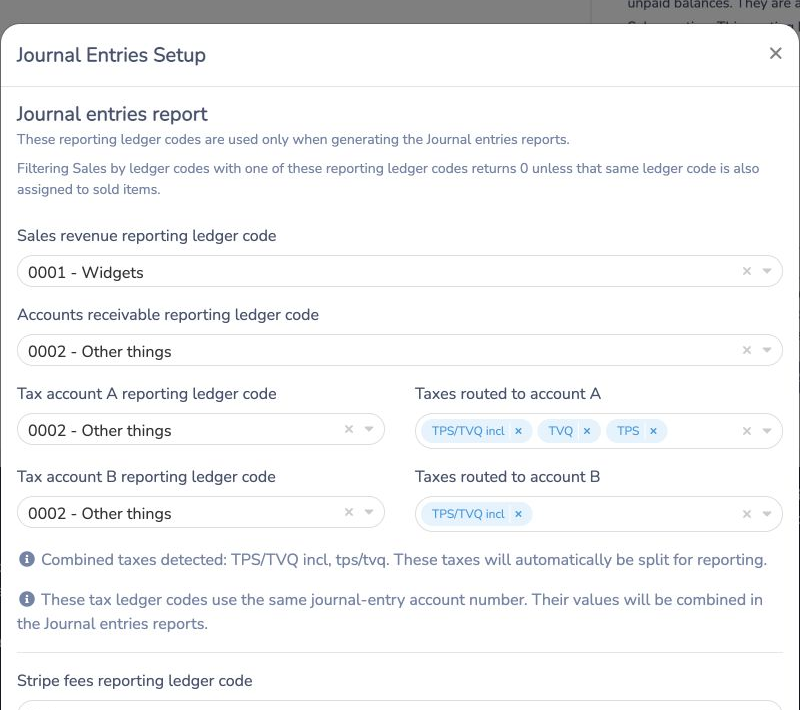
From the Ledger codes page, select Journal Entries Setup. Map the accounts needed for your reports:
- Sales revenue
- Accounts receivable
- Tax account A and the taxes routed to it
- Tax account B and the taxes routed to it
- Stripe fees
- Activity Messenger Stripe fees
- Federal and provincial taxes on Activity Messenger Stripe fees
Only configure the accounts that apply to your payment and tax setup. Combined taxes are split automatically between the configured tax accounts. Reporting accounts are used to generate journal-entry reports; they are not automatically assigned to sold items.
# 5. Preview and export journal entries
- Go to E-Commerce → Reports.
- Choose a date range.
- Select Journal entries from the report menu.
- Confirm that total debits and credits are balanced.
- Select QuickBooks (CSV) or Sage (TXT).
The QuickBooks file contains the journal number, date, account name, description, debits, credits, and optional class. The Sage file is a text export using the account numbers derived from your ledger codes.
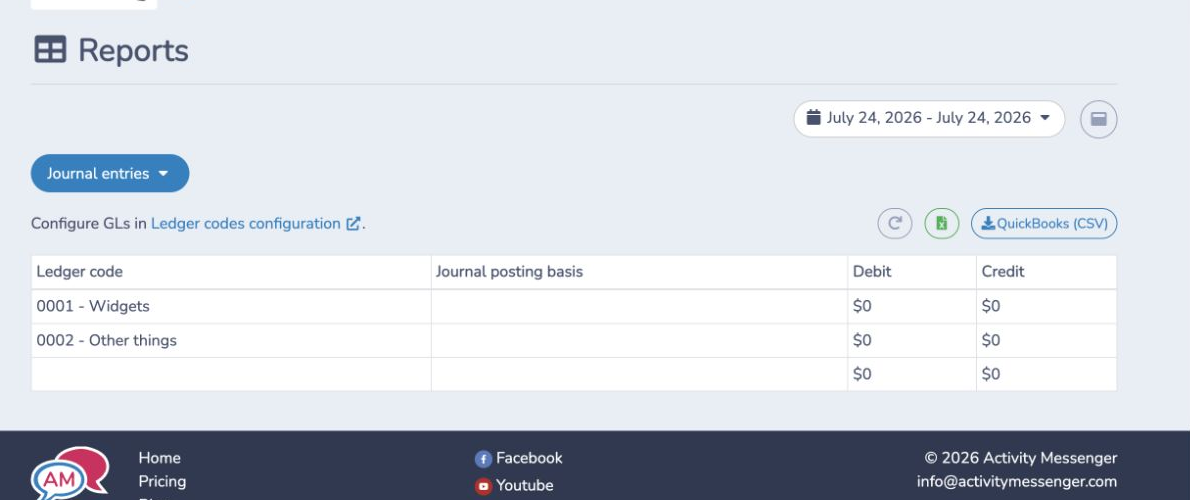
Payment-based entries can also be reviewed from the Payments report. Stripe card-payment entries are available by payout in Stripe Payouts.
# Example
Suppose registrations are assigned to 4000 - Registration revenue.
- In QuickBooks, you can map it to
Program Revenue:Registrationsand optionally use the classRecreation. - In Sage, Activity Messenger extracts
4000as the account number. - With Payment basis, the entry is generated when payment is received.
- With Sales basis, the sale is posted when recorded and any unpaid amount is assigned to Accounts Receivable.
Review the preview before downloading, then import the file using the journal-entry workflow supported by your accounting setup or provide it to your accountant.
# Important notes
- This is a file export, not a live two-way synchronization.
- QuickBooks account names and Sage account numbers must match your accounting chart.
- QuickBooks subaccounts must use
Parent account: Subaccount. - A blank QuickBooks account falls back to the ledger-code name.
- Sales-based unpaid balances require an Accounts Receivable reporting account.
- Missing ledger-code assignments reduce the usefulness of the exported breakdown. Requiring ledger codes helps prevent uncategorized sales.
- Always review the date range, account mappings, debit total, and credit total before importing.