How to Create a Google Form with Payment Options

Olivier Rousseau
16 November 2024 2 min read

While Google Forms doesn’t natively support payment collection, there are workarounds that can help you add a payment option. Whether you’re managing class registration, event tickets, or product sales, integrating payment into you Google Forms can save you time and simplify the process for users.

Here’s a step-by-step guide to creating a Google Form that offers a payment option.

Step 1: Create Your Google Form
Step 2: Include Pricing Information
Step 3: Add a Payment Integration to Your Google Form
Step 4: Automate Confirmation Emails


Feature Include a Payment Link Google Forms Payment Add-On All-in-One Form Builder (e.g., Activity Messenger)
Ease of Setup Simple but manual; copy-paste payment link into the form. Requires installation and configuration of add-ons. Ready-to-use; no extra setup needed.
Payment Integration Separate link to PayPal, Stripe, or Interac e-Transfer. Limited options, depending on the add-on used. Fully integrated payment system (e.g., Stripe, Interac).
Automation No automation; manual reconciliation required. Some automation but depends on add-on capabilities. Complete automation for payments, receipts, and follow-ups.
User Experience Users must switch between form and payment page. May feel clunky if add-on isn’t seamless. Smooth and professional; one form for everything.
Customization Options Basic customization limited to form design. Limited by Google Forms and add-on features. Advanced branding options, including Canva integration.
Additional Features Focused on simple payment collection. May include basic features like conditional logic. Combines forms, payments, SMS/email communication, and more.
Best For Small-scale or informal use cases. Intermediate users with moderate technical skills. Businesses needing professional and scalable solutions.

Step 1: Create Your Google Form

  1. Log into Google Forms: Visit Google Forms and sign in with your Google account.
  2. Choose a Template or Start Blank: Google Forms offers several templates, but for payments, starting blank is often better.
  3. Add Questions: Include the necessary fields:
    • Name
    • Email
    • Phone number
    • Class, product or service selection
    • Any additional information you need to collect.

Step 2: Include Pricing Information

Clear pricing is essential so respondents understand what they are paying for. You can use different question types to make this clear:
How to Set It Up

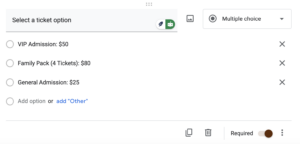
  1. Use Dropdowns or Multiple-Choice Questions:
    • Example: If you’re selling tickets to an event, list the options like:
      • General Admission: $25
      • VIP Admission: $50
      • Family Pack (4 Tickets): $80

 Include Pricing Information in your google forms

  1. Add a Description:
    • Create a “Section Description” to include details about the pricing.
    • Example: Include a breakdown such as:
      • Monthly Subscription: $100
      • One-Time Trial Class: $15
      • Discount: Register before [date] and get 10% off.
  2. Quantity Selection:
    • Use a short answer question or a dropdown menu to let respondents indicate the quantity.
    • Example: “How many tickets would you like to purchase?”

Real-Life Examples

Say you’re running a swim school and want to collect payments for the spring sessions:

  • Question: Choose your summer camp session:
    • Week 1 (June 10-14): $150
    • Week 2 (June 17-21): $150
    • Both Weeks: $280 (save $20)
  • Optional Question: Would you like to add extended care for $50 per week?

This structure ensures parents know the exact cost and options available before proceeding to payment.

Step 3: Add a Payment Integration

Since Google Forms doesn’t handle payments natively, you’ll need to connect it to a payment processor like Stripe or PayPal. Here are two effective ways:
Method 1: Include a Payment Link

  1. Create a Payment Link:
    • Use your payment processor to generate a dedicated link for the item or service.
    • Example with PayPal:
      • Log into PayPal and create a payment button or link.
      • Customize it with the item name, description, and amount.

Paypal and google forms integration

  1. Embed the Link in Your Form:
    • Add a final question or section in your form titled “Payment Instructions”.
    • Example Text:
      • Please complete your payment using the link below: Pay Here
      • Your registration will only be confirmed once payment is received.
  2. Redirect to the Payment Page:
    • Use a Google Forms add-on like FormLimiter to automatically redirect respondents to the payment page after submission.

Method 2: Use a Google Forms Payment Add-On

If you need a more advanced workflow, consider integrating third-party add-ons:

  • Form Publisher: This generates documents like invoices or confirmations based on responses.
  • Pabbly Connect: Automates payment workflows by linking your form to payment gateways

Real-Life Example

A gymnastics club collecting membership dues might create a form:

  1. Form Question: Membership Type
    • Monthly: $50
    • Annual: $500 (Save $100)
  2. Payment Section:
    • Please make your payment via PayPal at [link]. Include your member ID in the payment note.
  3. Liability Waiver
    • You’ll also want to include a liability waiver to be signed that explains the risk associated with the class.

Read more: How to connect stripe to google forms

Step 4: Automate Confirmation Emails

Once users fill out the form and complete payment, it’s critical to send a confirmation email to confirm their registration or purchase.

How to Automate Emails

  1. Integrate Google Sheets:
    • Google Forms responses are stored in a linked Google Sheet.
    • Use the sheet to track form responses and payment statuses.
  2. Set Up Notifications:
    • Install a Google Forms add-on like Form Notifications to send automated emails.
    • Example: “Thank you for registering for our event! Please complete your payment using the link provided.”
  3. Use Zapier or Pabbly Connect:
    • These tools can connect your Google Form to email platforms like Gmail.
    • Automatically send follow-ups when a form is submitted.
  4. Custom Confirmation Messages:
    • Add a custom “Thank You” message at the end of the form with details on next steps:
    • Example: “Thank you for signing up! Check your email for payment confirmation and additional instructions.”

Real-Life Example

A tennis club hosting a tournament might automate confirmations as follows:

  • After a participant registers via Google Form, they receive an email with:
    • A payment link.
    • A confirmation of the category they registered for (e.g., singles, doubles).
    • Event details like date, location, and rules.

If payment is not completed within 24 hours, a reminder email should be sent to reminder the player about the payment.

How Activity Messenger can optimize online payments

While Google Forms with payment can work as a workaround, it lacks the customization, polish and automation features required for more complex workflows. A tool like Activity Messenger provides a simple form-building solutions that eliminate the need for manual integration or additional apps.

Activity Messenger Advantages

  • Direct Payment Integration: Accept payments securely through Stripe or Interac e-Transfer directly in the form. Clients won’t be able to submit the form without having first paid their invoice.
  • Automated Confirmations: Send receipts and instructions immediately after payment.
  • Advanced Customization: Design professional forms with your branding (Canva Integration).
  • Attendance tracking: Easily monitor participation and manage attendance, keeping your records accurate and up-to-date.
  • All-in-One Platform: Combine forms, surveys, waitlists, payments, email marketing, and SMS notifications in a single tool.

For Canadian organizations, you can integrate Interac e-transfer payments into bilingual forms with all your data stored in Canada. For all these reasons, Activity Messenger can be a great alternative to Google Forms for businesses and organizations operating in Canada.

Dance Studio Management Platform

Real-Life Example with Activity Messenger

A dance studio uses Activity Messenger to:

  1. Create a registration form for summer camps.
  2. Offer direct payment options within the form.
  3. Automatically send a welcome email with the schedule once payment is completed.

This eliminates the back-and-forth of Google Forms and provides a simple experience for both the organization and its clients.

Conclusion

Google Forms can handle basic payment workflows, but it requires manual effort and lacks advanced features. If you manage registrations or payments on a regular basis, consider a tool like Activity Messenger for a more professional, efficient, and user-friendly experience. This is especially true for businesses that are growing, where Google Forms may not be the best fit at that point in time.

Check out our full guide on creating a registration form with payment to explore how Activity Messenger might be able to help

Or book a quick intro call with one of our experts.

Written by Olivier Rousseau Olivier is a kids sports programs owner who has been operating for over a decade with locations in Montreal, Quebec city & Ottawa. He also helps Gymnastics Club, Swim Schools and Dance Studios streamline their operations. He is the co-founder of Activity Messenger an online registration platform for the sports & leisure industry.

Add a payment option to your form today

Subscribe for exclusive content

Receive News and Updates about our product

© Activity Messenger

info@activitymessenger.com