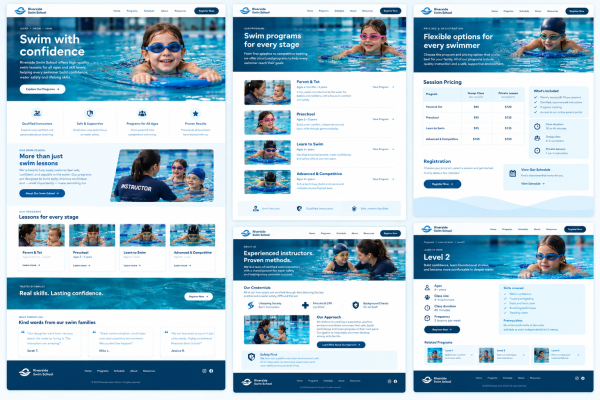
Building a swim school website means more than choosing a template and adding your logo. Parents need to quickly understand your programs, find the right lesson, check schedules and pricing, and feel confident registering their child.
Your website also needs to make things easier for your staff. Registration information, class availability, policies, instructor details, and other frequently asked questions should be easy for families to find without adding more work for your front desk.
The right swim school website builder can bring those pieces together in one place, without requiring you to build a website from scratch. This guide covers what to include on your site, how to structure it for swim families, and what to look for in a website builder.
Key Takeaways:
- A swim school website should make it easy for parents to find the right program, understand the details, and register.
- Your programs and skill levels should be clearly organized so parents can quickly determine which lessons are appropriate.
- Registration, schedules, availability, pricing, and policies should be easy to find without requiring families to contact your staff.
- Instructor credentials and water safety information can help parents feel confident in your program.
- Your website can also promote swim camps, birthday parties, special events, and other programs beyond weekly lessons.
- Mobile testing matters because many parents check schedules and register from their phones.
Table of Contents
- Step 1: Define What Your Website Needs to Do
- Step 2: Organize Your Programs and Skill Levels
- Step 3: Map Out Your Swim School Website
- Step 4: Set Your Branding
- Step 5: Build a Homepage Parents Can Trust
- Step 6: Connect Your Website to Registration
- Step 7: Make Your Policies Easy to Find
- Step 8: Showcase More Than Swim Lessons
- Step 9: Test Your Website on Mobile
- Step 10: Publish and Share Your Website
- Discover Activity Messenger’s Swim School Website Builder
- Frequently Asked Questions
- Final Thoughts
Step 1: Define What Your Website Needs to Do
Before choosing a template or deciding which pages to create, think about what you want parents to be able to do on your website.
For a swim school, that usually means finding the right program, understanding your lesson options, checking schedules and availability, learning about instructors and policies, and registering without needing to contact your staff.
Your website also needs to work for your team. If schedules, registration forms, availability, or policies change regularly, you’ll want a setup that makes those updates easy to manage.
👉 Before you start building, decide what you want parents to find and do without contacting your staff. Create a list of questions parents ask most often. If your front desk regularly spends time on lesson levels, pricing, makeup classes, what to bring, or registration, those answers should be easy to find on your website.
Step 2: Organize Your Programs and Skill Levels
Once you’ve defined what your website needs to accomplish, organize the information parents will use to choose a lesson.
Start with your swim levels and programs. Each level should have enough information to help a parent decide whether it’s appropriate for their child. Depending on your program, you might use a skills checklist, placement quiz, instructor assessment, or a simple description of what swimmers at each level can already do.
For each level, consider including:
- 🏊 What a swimmer can already do
- 🎯 What they’ll learn during the session
- ⏱️ Typical age range, if relevant
- ➡️ What progression to the next level looks like
- 👩🏫 Class size and instructor ratio
- 📅 Available sessions and class times
Keep the information consistent across levels so parents can easily compare them. If your school also offers private lessons, adult swim, competitive programs, or other services, organize those separately so families don’t have to sort through every offering to find the right lesson.
Step 3: Map Out Your Swim School Website
Once you’ve organized your programs and levels, map out the pages parents will need to move from learning about your school to registering.
A typical swim school website might include:
- 🏠 Home: Give parents a quick overview of your school, who you teach, and the fastest way to find the right lesson.
- 🏊 Programs and Levels: Explain your lesson options and, where relevant, what swimmers should be able to do at each level.
- 📅 Schedules and Sessions: Show class times, session dates, locations, registration deadlines, and current availability.
- 💰 Pricing: Make the cost of group, semi-private, and private lessons easy to understand and compare.
- 👩🏫 Instructors: Introduce your instructors and highlight relevant certifications, training, and experience.
- 📋 Policies: Explain makeup classes, cancellations, weather or pool closures, level changes, and other policies parents should know before registering.
- ❓ Frequently Asked Questions (FAQ): Answer practical questions about placement, what to bring, arrival times, swimwear, registration, and pool safety.
- 📞 Contact: Give parents an easy way to reach your team if they can’t find the answer they’re looking for.
You may also want dedicated pages for private lessons, adult swim, competitive or pre-competitive programs, multiple pool locations, or other services your school offers.
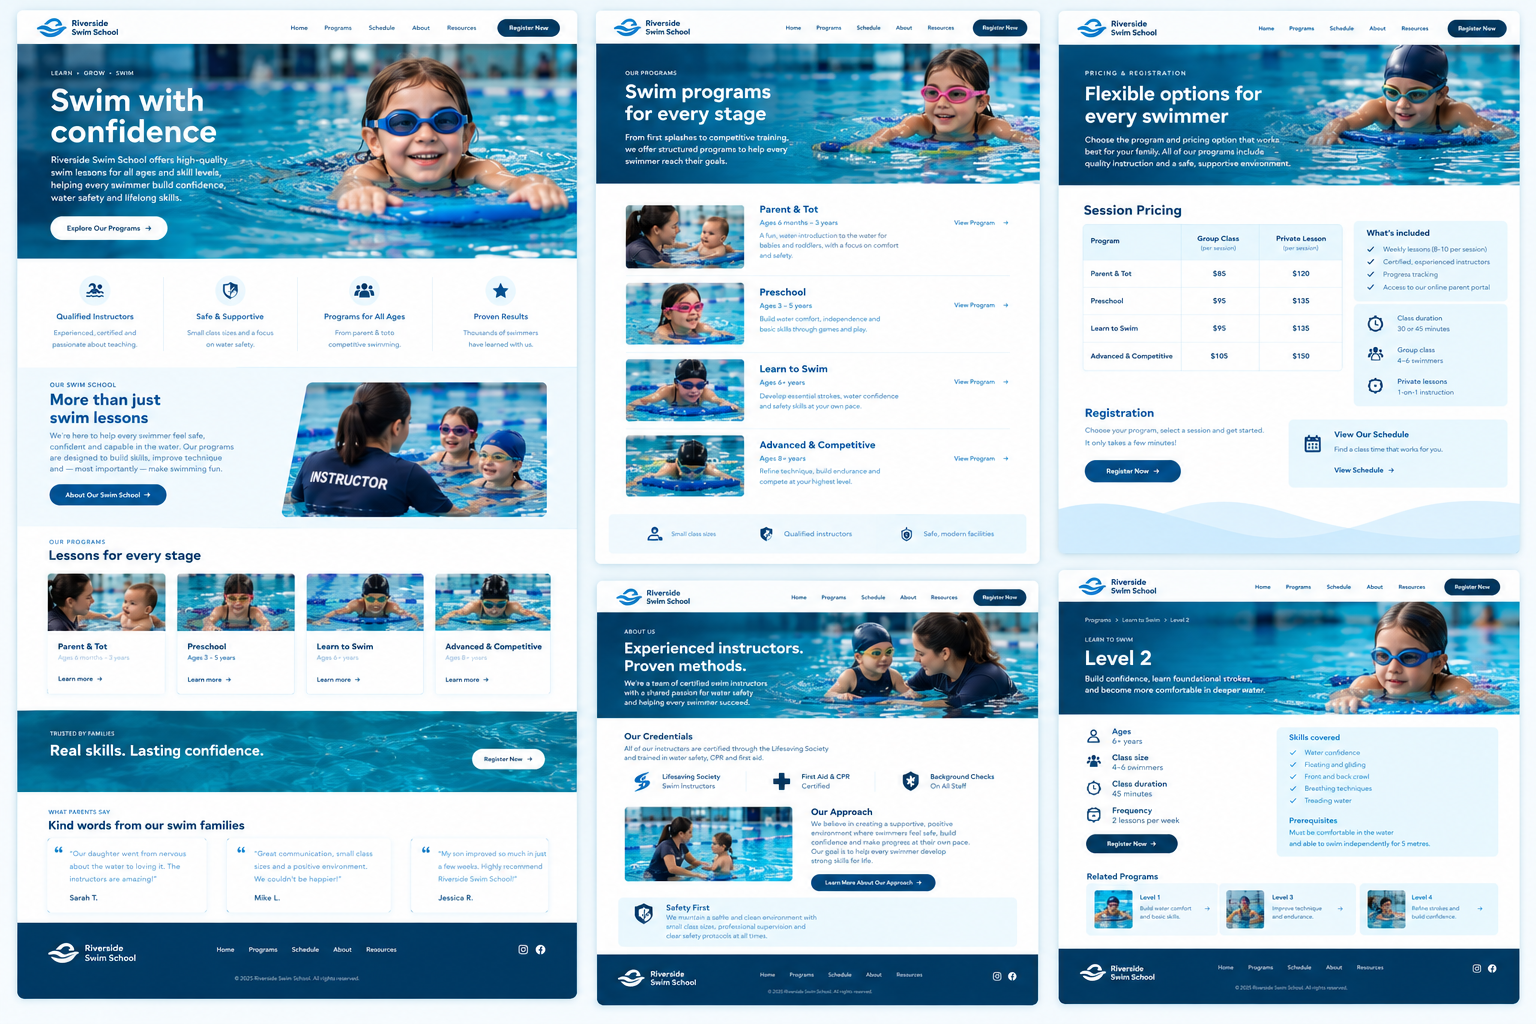
👉 The goal isn’t to create as many pages as possible. It’s to make the path through your website obvious: What does your school offer? Which option is right for my child? When is it available? How much does it cost? How do I register?
Step 4: Set Your Branding
Before building individual pages, lock in your visual style:
- 🎨 Primary and secondary colours
- 🔤 Fonts
- 🖼️ Logo placement
- 🧭 Navigation style
- 🔘 Button styles
- 📸 Image style
- ↔️ Spacing between sections
This matters more than it sounds. A parent who reads a calm, professional program description, then clicks through to a registration page that looks like it belongs to a different business, may start to second-guess whether they’re in the right place.
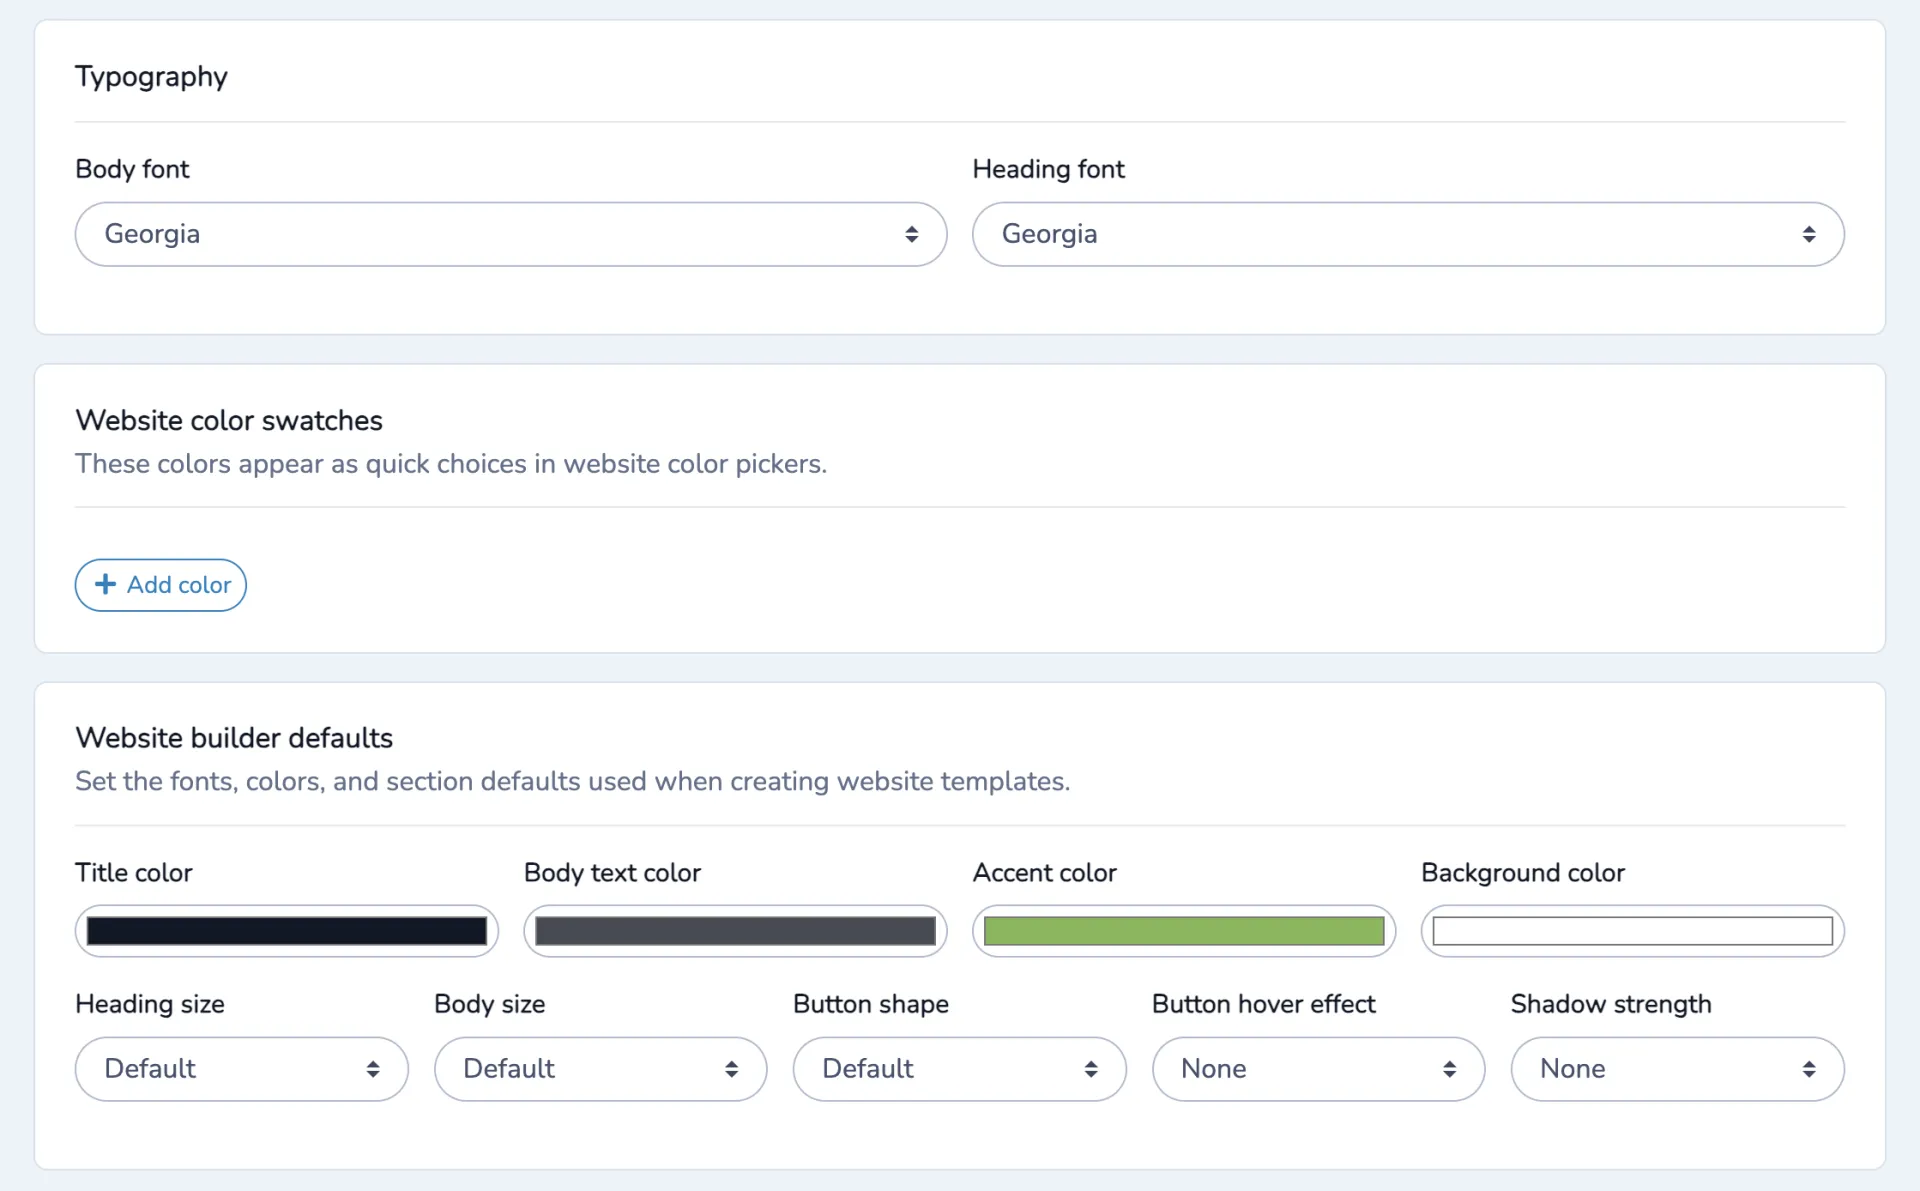
A website builder with centralized branding controls can set your colours, fonts, navigation, and button styles once and apply them consistently across your site.
Step 5: Build a Homepage Parents Can Trust
Your homepage doesn’t need to answer every question, but it should quickly show parents they’ve found the right swim school and point them to the information they need.
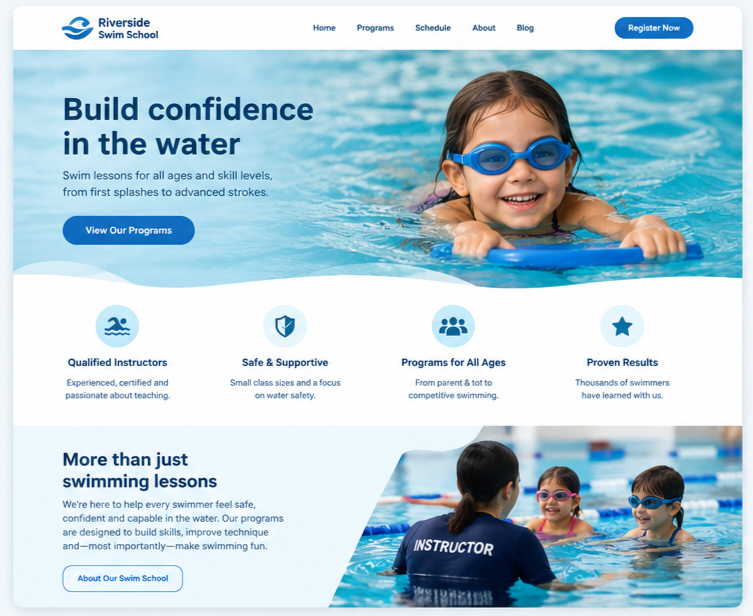
1. Say who you teach
Make it immediately clear what you offer and who it’s for.
Swim Lessons for Ages 3 and Up
Fall session runs September 8 to November 21
Follow with a clear action such as “Find Your Child’s Level” or “View Available Lessons” rather than a generic “Learn More.”
2. Make it easy to find the right program
Parents shouldn’t have to search through your navigation to figure out which lesson is appropriate. Link prominently to your levels, programs, or placement information.
3. Show availability and pricing
If families can see which classes are open and how much they cost, they can make a decision without contacting your front desk first. If a class is full, show the waitlist option instead of leaving parents to guess.
4. Build trust
Introduce your instructors, certifications, experience, and approach to water safety. Real photos or a short video of your lessons can also help parents understand what the experience will be like.
5. Give visitors one clear next step
Whether that’s finding a level, viewing available sessions, or registering, make the next action obvious. Don’t make parents figure out where to go from the homepage.
Step 6: Connect Your Website to Registration
Once parents understand your programs and know which level is right for their child, make registration the obvious next step.
Your website doesn’t need to handle the entire registration process itself. What matters is that parents can move from your program information to the appropriate registration option without having to search for it.
For example, a parent reading about Level 2 should be able to see a clear “View Level 2 Classes” or “Register for Level 2” button that takes them directly to the available sessions.
Before they click, make sure they can see the information they need to make a decision:
- 📅 Session dates and class times
- 📍 Pool location
- 💰 Pricing
- 👥 Class availability
- 👩🏫 Instructor information, where relevant
- 🏊 Level or program description
If a session is full, show a waitlist option instead of sending parents through a registration process that ends with a “class full” message.
The registration system can then handle the rest of the process, including participant information, swim level, waivers, payment, and confirmation emails. Your website’s job is to make the path to that registration process clear.
The goal is a simple journey:
Find the right level → See available classes → Register
Parents shouldn’t have to navigate through several pages or return to your homepage to figure out what to do next.
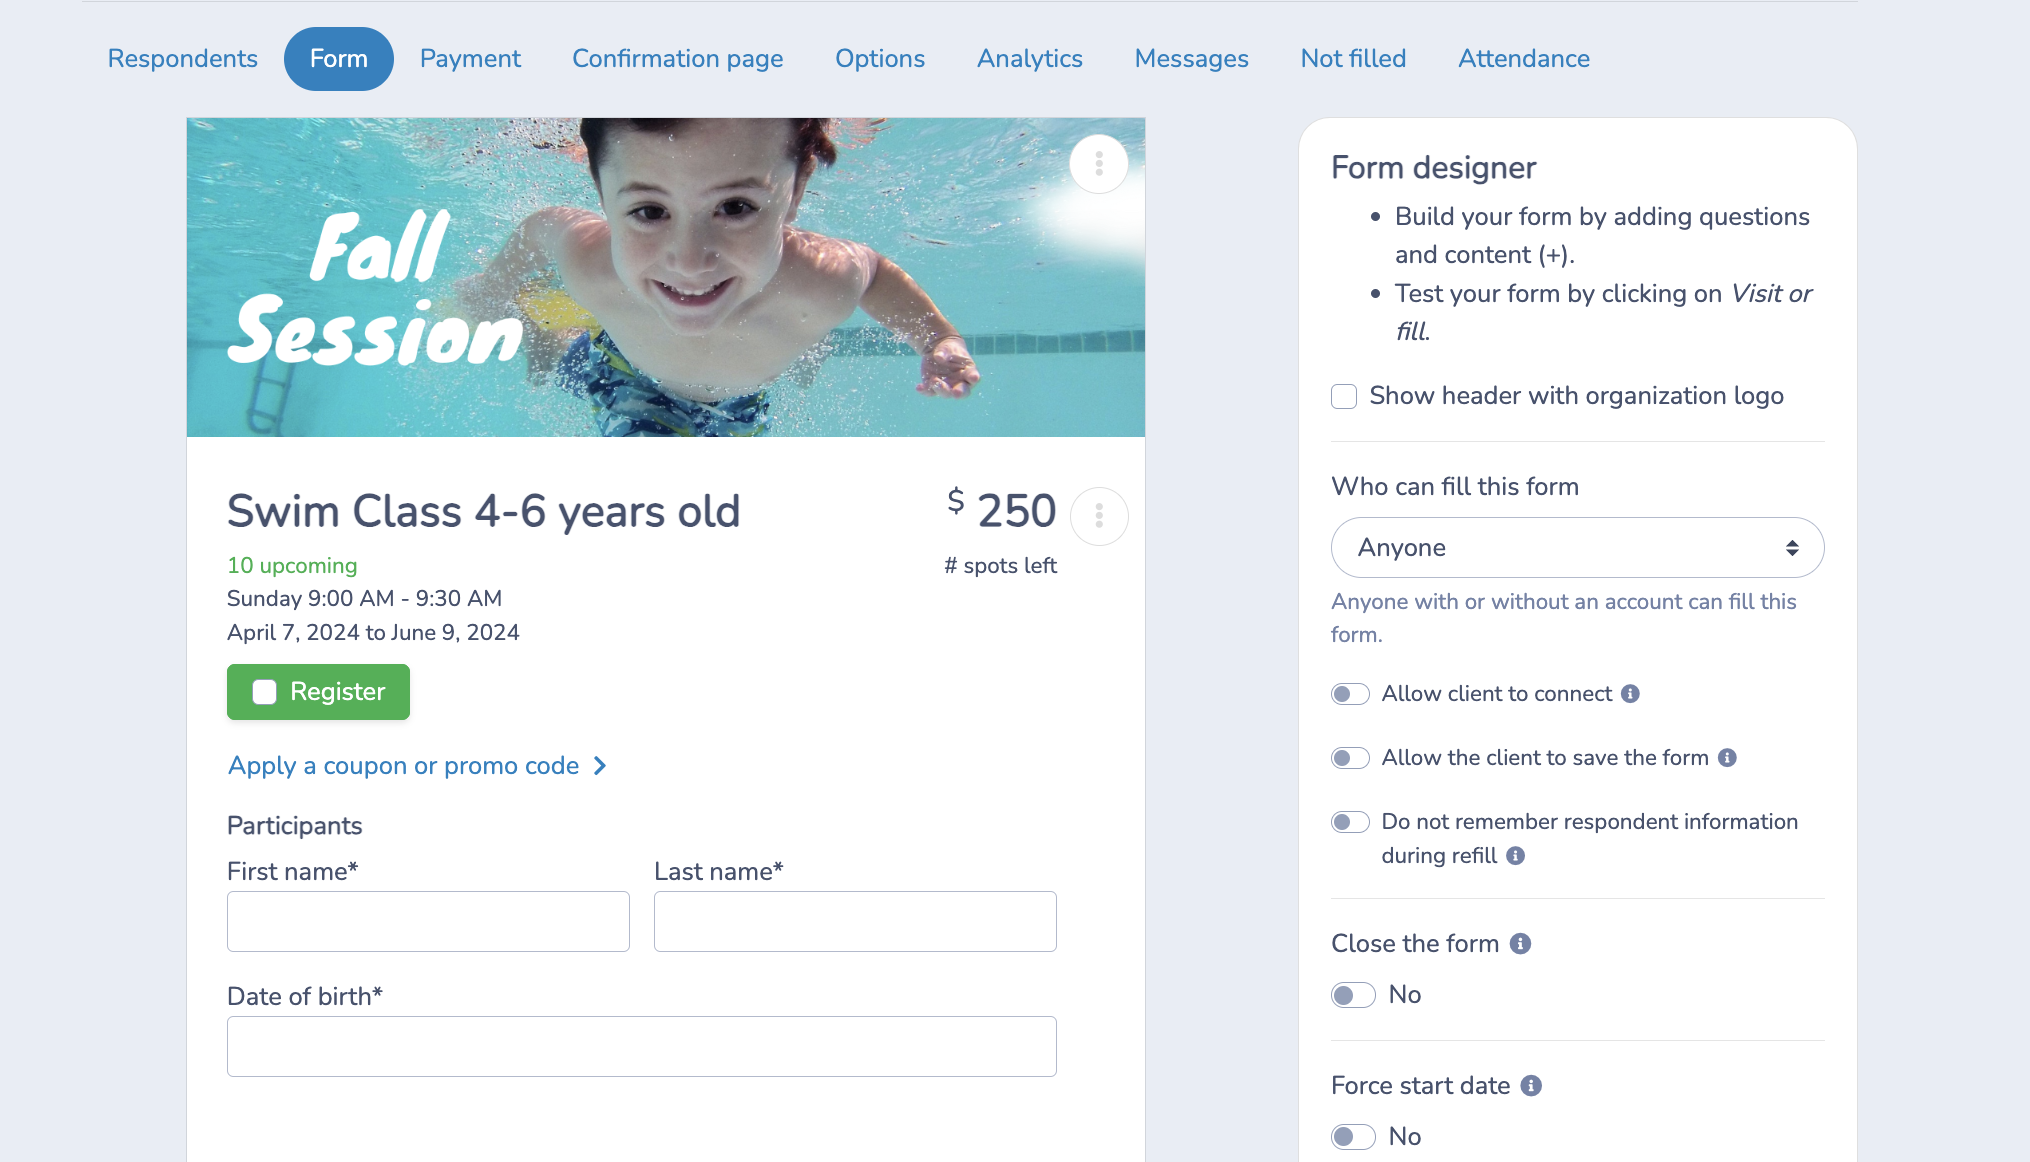
💡 Need help building the registration process itself? See our guide to creating a swim lesson registration form.
Step 7: Make Your Policies Easy to Find
Swim schools have a few policies that parents will want to understand before and during a session. Don’t hide them in a long FAQ or make families search through registration paperwork.
Make information about these situations easy to find:
- 🌧️ Weather or facility closures: Explain when a class will be cancelled and how makeups are handled.
- 🤒 Missed lessons: Clearly explain whether missed classes can be made up and how families request one.
- ⬆️ Level changes: Let parents know what happens if an instructor recommends moving a swimmer to a different level during a session.
- 📆 Deadlines: Include any deadlines for requesting makeups, changing classes, or making other adjustments.
Clear policies don’t just help parents, they also give your staff a consistent answer when these situations come up.
Step 8: Showcase More Than Swim Lessons
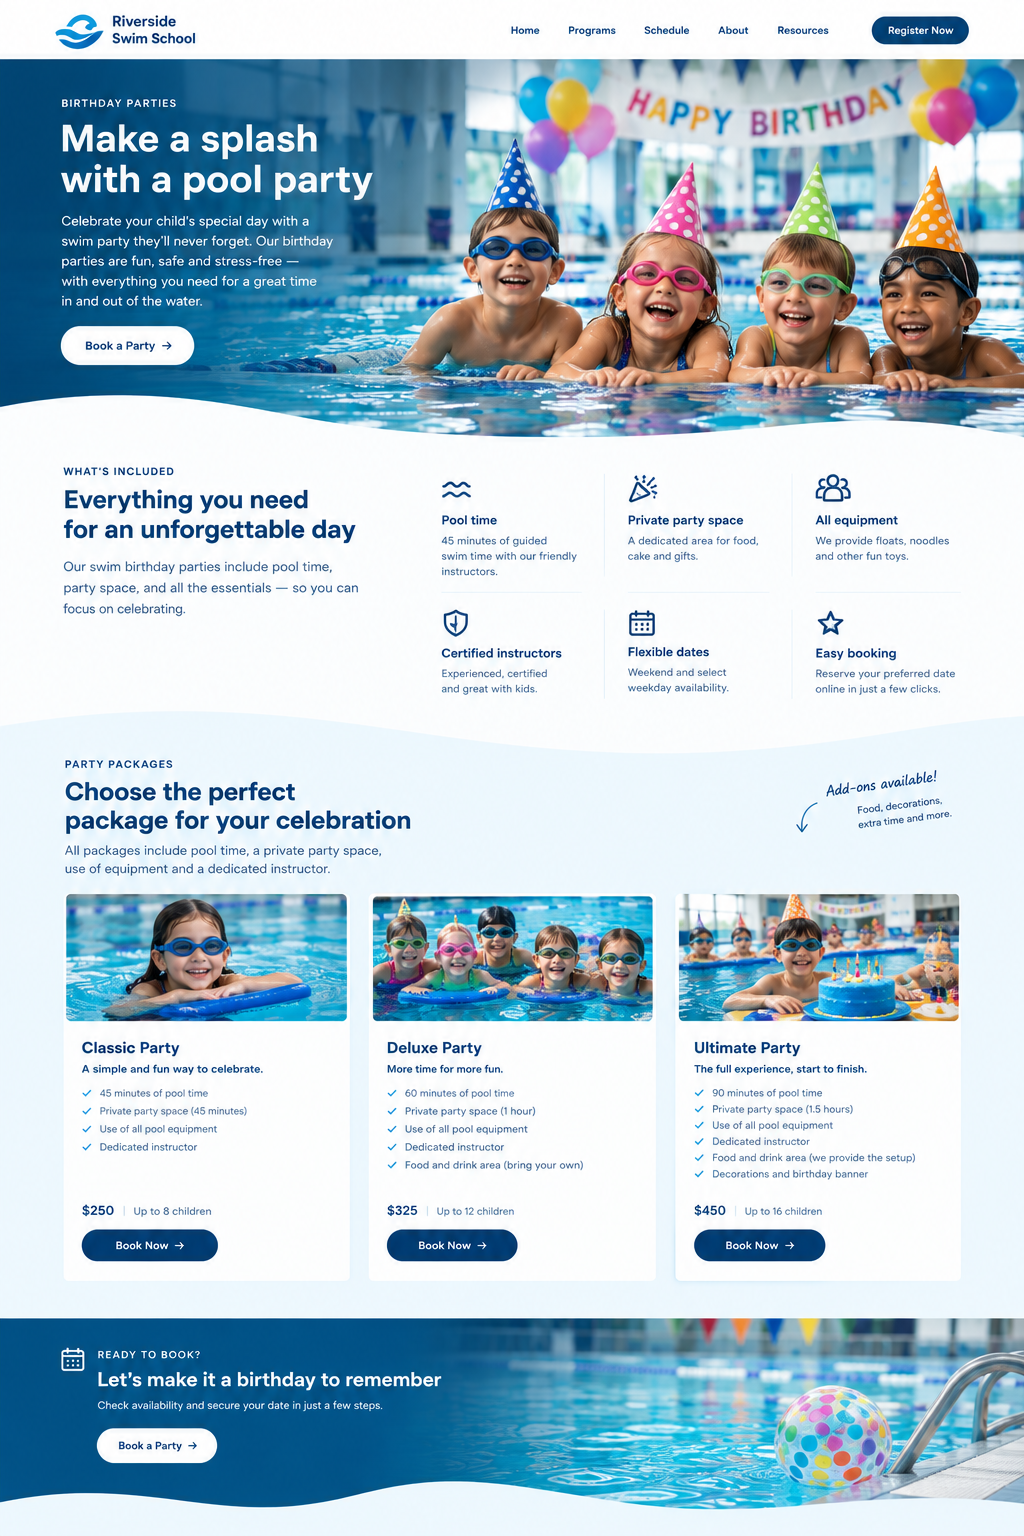
Your swim school website can do more than promote weekly lessons. If you offer swim camps, birthday parties, special events, or other programs, give those offerings a visible place on your site. Parents who are already visiting to register for lessons can then easily discover other ways to participate in your programs.
Consider creating dedicated pages or sections for:
- 🏕️ Swim camps: Explain dates, age groups, activities, schedules, and what’s included.
- 🎈 Birthday parties: Show what’s included, available dates, pricing, and how families can book.
- 🏊 Special events: Promote clinics, family swim events, holiday programs, or other one-time activities.
- 📅 Additional programs: Highlight private lessons, adult programs, or other services that don’t fit into your regular lesson schedule.
Whenever possible, connect these pages directly to registration or booking. A parent who sees a “Book a Birthday Party” or “Register for Camp” button should be able to go straight to the relevant form or available dates.
This gives families more reasons to use your website throughout the year, not just when weekly lesson registration opens. It also makes your website a central place to discover and sign up for everything your swim school offers.
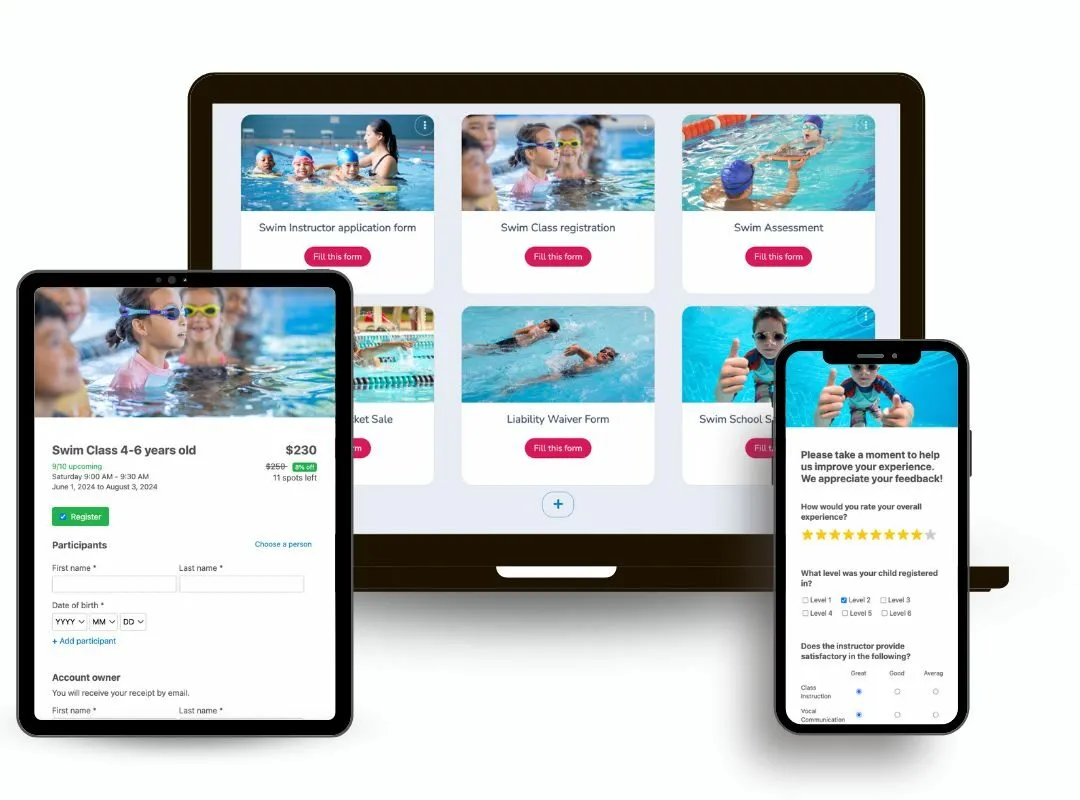
Step 9: Test Your Website on Mobile
Parents may check availability or register from their phones, sometimes from the pool deck while waiting for another child’s class. If your website builder includes mobile and tablet previews, use them on every page before publishing.
Check for:
- 👆 Buttons that are easy to tap
- 🔤 Text that’s large enough to read
- 📅 Schedules that don’t require awkward scrolling
- 🖼️ Images that load properly
- 🧭 Navigation that’s easy to follow
- 📝 Forms that are comfortable to fill out on a small screen
A Quick Parent Experience Test
✅ Can I find my child’s skill level without emailing anyone?
✅ Can I see which sessions are open?
✅ Can I find the price?
✅ Can I check instructor credentials?
✅ Can I find the makeup class policy?
✅ Can I register without getting lost?
✅ Can I do all of this comfortably on my phone?
If any answer is no, fix that page before sending families to it.
Step 10: Publish and Share Your Website
Once tested, get the site in front of families who already know you:
- 📧 Email past and current swim families
- 📱 Share on social media
- ✉️ Add the URL to staff email signatures
- 📝 Include it in session announcements
- 📲 Add a QR code near the pool deck or front desk
- 📍 Update your Google Business Profile and other local listings
If you run lessons across multiple pools or split learn-to-swim from a competitive track, some swim school website builders support multiple sites or subdomains from one account. This is worth checking before you commit to a platform.
Discover Activity Messenger's Swim School Website Builder
If you’re already using Activity Messenger for swim lesson registration, you don’t need to build your website and registration system as separate projects. Activity Messenger’s website builder lets you create branded pages around the schedules, registration forms, and other information already in your account.
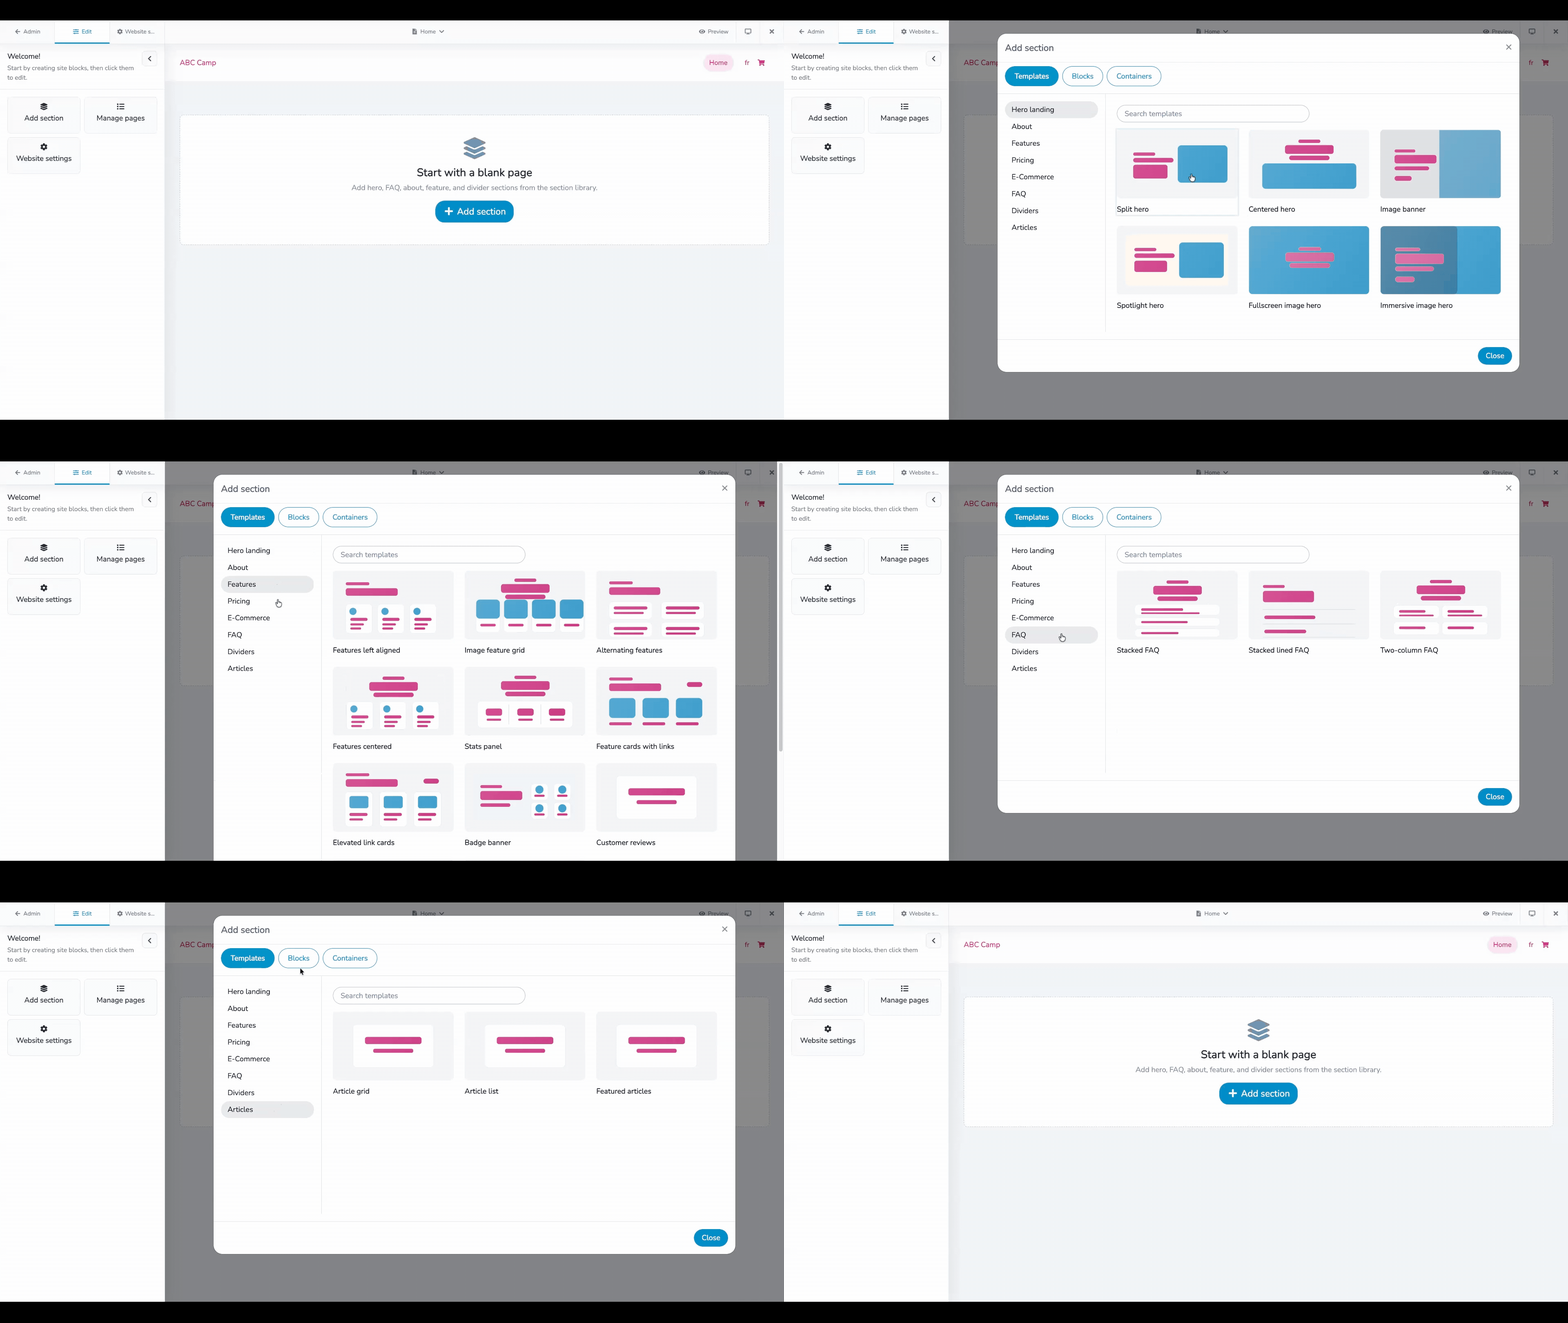
You can create pages with pre-built sections, connect buttons directly to registration options, and preview your site across desktop, tablet, and mobile before publishing. You can also use the website to promote additional offerings, such as swim camps, birthday parties, private lessons, and special events, and connect those pages directly to the relevant registration or booking options.
For swim schools managing multiple locations or programs, you can also create separate websites with their own domains or subdomains.
The result is a website that’s connected to the systems you’re already using to manage registrations, rather than a separate site that sends families somewhere else to complete the process.
👉 Discover more about our website builder and its features here. Stay tuned for upcoming updates as we continue to improve it for our organizations!
Frequently Asked Questions
What should I look for in a swim school website builder?
A good swim school website builder should make it easy to create and update pages while supporting the way your school actually operates. Look for features such as registration integration, schedules and availability, mobile-friendly pages, customizable branding, client portals, and the ability to connect programs or levels directly to registration.
Should my swim school’s registration form live on the website or a separate platform?
Ideally, parents should be able to move from your website directly into the appropriate registration form without having to search for it on another platform. If your website builder connects to your registration system, you can link individual programs, levels, or sessions directly to their registration options and reduce the number of steps between finding a class and signing up.
What pages does a swim school website actually need?
At minimum, include a homepage, program or level information, schedules, pricing, instructor information, policies, FAQs, and contact information. You can add dedicated pages for private lessons, adult swim, competitive programs, multiple locations, or other services depending on what your school offers.
How should I explain swim levels on my website?
Give each level a clear description of the skills swimmers should already have, what they’ll work on, and how they progress. Include age ranges where useful, but don’t rely on age alone to determine placement. Make it easy for parents to move from the level information to the appropriate available classes.
How do I handle makeup classes on my website?
Give your makeup policy its own visible section or include it prominently in your policies and FAQ. Explain how weather or facility closures are handled, whether missed lessons qualify for makeups, how families request one, and any deadlines they need to know.
How important is mobile design for a swim school website?
Mobile design is essential for any website, especially for swim schools. Parents may check schedules, availability, or registration on their phones, so every important page and form should be easy to use on a small screen. Test navigation, buttons, schedules, images, and registration forms on mobile before publishing.
Can I build separate websites for different pool locations or programs?
If you operate in multiple locations or have programs with different audiences, separate websites or subdomains can make sense. Look for a website builder that supports multiple sites if you need to manage different locations or brands without maintaining completely separate systems.
Final Thoughts
A good swim school website should make it easy for families to find the right program, understand what to expect, and register without contacting your staff for every question.
Start with the information parents need most: your programs and levels, schedules, pricing, instructors, policies, and registration. Then make sure the site is easy to navigate, works well on mobile, and showcases everything your swim school offers.
When choosing a swim school website builder, look beyond the templates. Consider how well the builder connects your website to the systems you already use for registration, scheduling, payments, and managing families.
Activity Messenger’s website builder brings those pieces together, so you can build a branded swim school website without separating your website from the registration experience.
🌊 Book a free demo to see how Activity Messenger can help you create a branded swim school website with registration, scheduling, and payments built into the same experience.