Activity Messenger Help Center
Accounting (payments, ledger codes and bank account reconciliation)
Use ledger codes to classify what you sell and prepare meaningful financial reports and accounting exports. This guide explains how to create or import codes, assign them to products and activities, group them into reporting categories, and configure QuickBooks or Sage journal-entry exports. It also clarifies required codes and reporting accounts, and distinguishes invoiced sales, collected payments and Stripe payouts.
Before you begin
You need permission to configure your organization’s ledger codes and view financial reports. For accounting exports, have your chart of accounts available and coordinate account mappings and historical corrections with your accountant.
Find and organize ledger codes
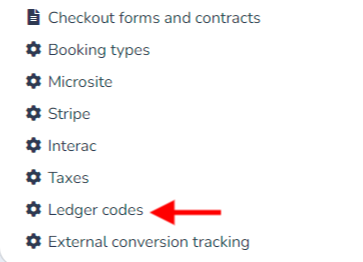
- Open E-Commerce → Ledger codes. You can also open Ledger codes from the organization menu (three dots) beside your logo.
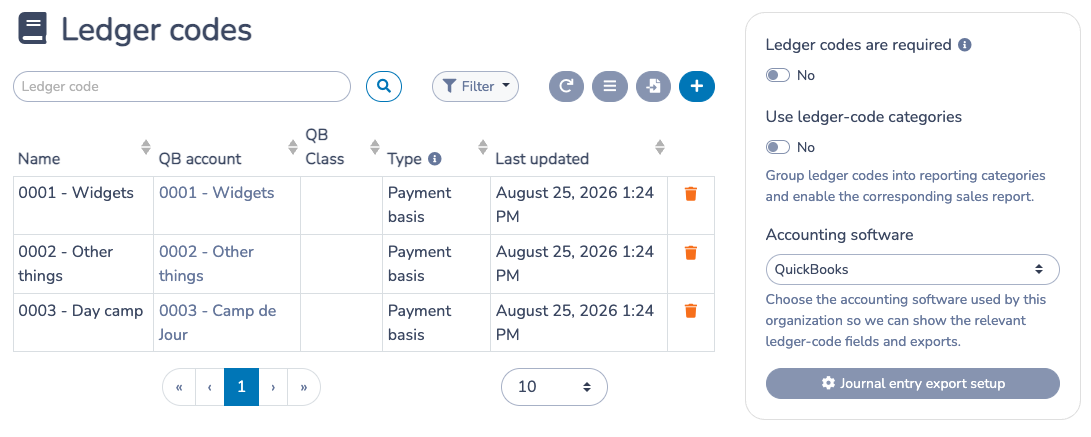
- Select + to create a code. Enter a clear Name, then configure any fields shown for your selected accounting software.
- Search or filter the table to find codes. Select a row to edit it. Use the archive action to retire a code that should no longer be assigned; restore an archived code when appropriate.
Import a QuickBooks chart of accounts
The import tool accepts a QuickBooks Online chart-of-accounts CSV. In QuickBooks Online, use Settings → Chart of accounts → Run report / Export, then choose the CSV file in Activity Messenger.
- Select the import icon above the ledger-code table and upload the CSV.
- Choose which account types to import. Income types are selected by default. Locked parent accounts are excluded unless you choose to include them.
- Choose whether account numbers should prefix code names. For example, the name can become
4105 - Adult programs; this is useful for Sage account-number extraction and sorting. - Optionally use the QuickBooks account type as a category. This option is available when ledger-code categories are enabled; it creates missing categories and assigns imported codes to the matching category.
- Choose the journal posting basis for the imported codes, then continue to the preview.
- Review the preview and uncheck any new rows you do not want. Confirm the import.
The expected CSV columns include Account name and Account type; Account number is optional. Existing codes, archived codes and duplicate rows in the file are skipped rather than overwritten. Review the preview before importing. This tool imports codes and mapping data; it does not import sales history.
Require a ledger code
On the Ledger codes page, turn on Ledger codes are required to require a code for items you sell. This helps prevent new items from being left without a code. The setting does not automatically assign codes to existing items; review your existing setup separately.
Assign ledger codes to classes, memberships and products
Assign the appropriate code in each item’s configuration. A code assigned to a class, membership or product is used for its applicable sales; changing the item’s setting does not automatically rewrite existing invoice items.
Assign a ledger code to a class
- Open Classes → All Classes and Events.
- Open the class or event to edit its settings.
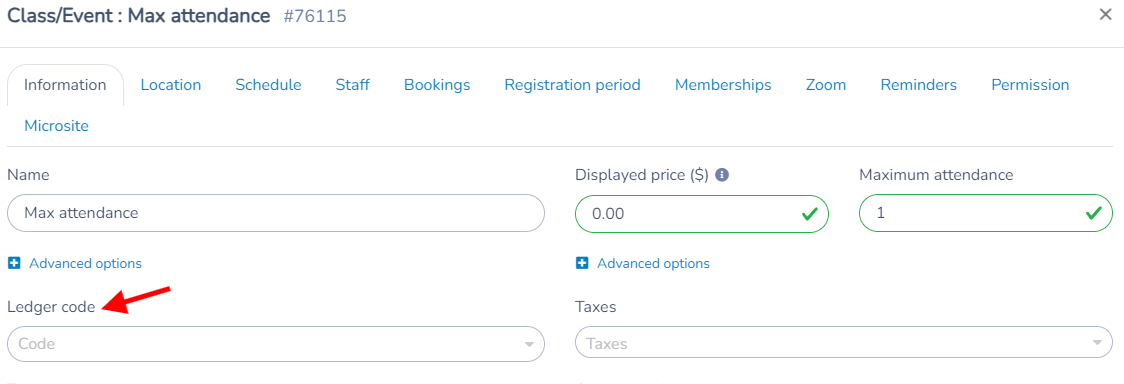
- Choose its ledger code from the ledger-code list and save.
When you duplicate a class, its assigned code is duplicated as well.
Assign ledger codes to classes in bulk
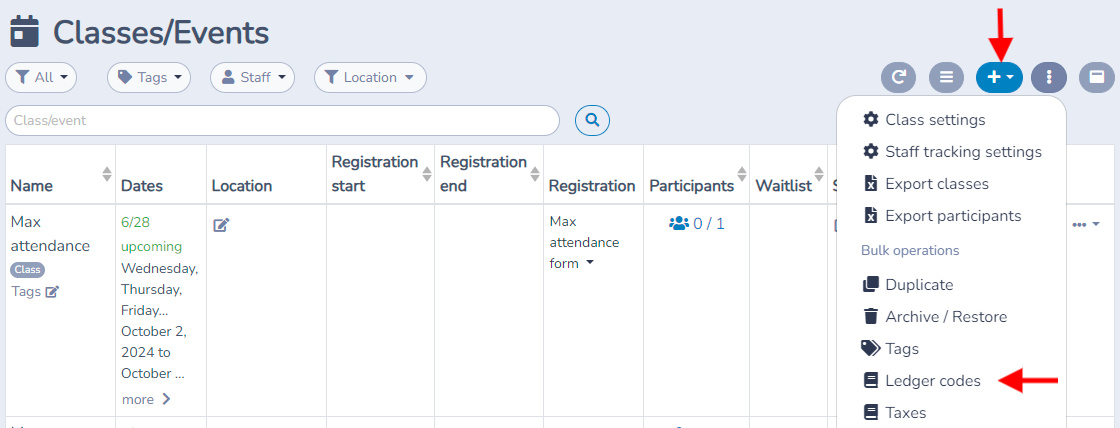
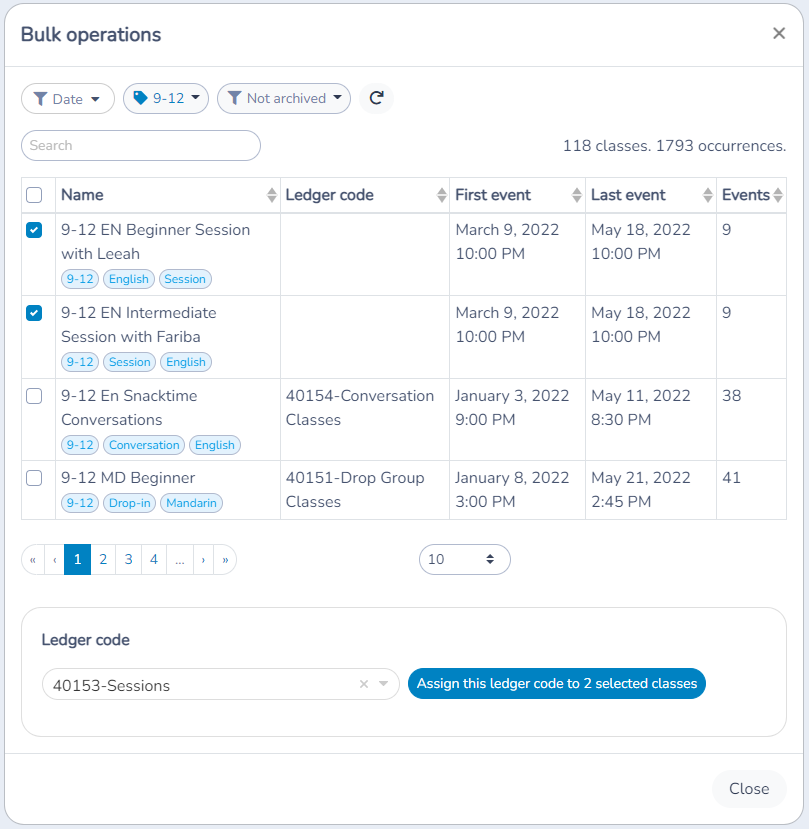
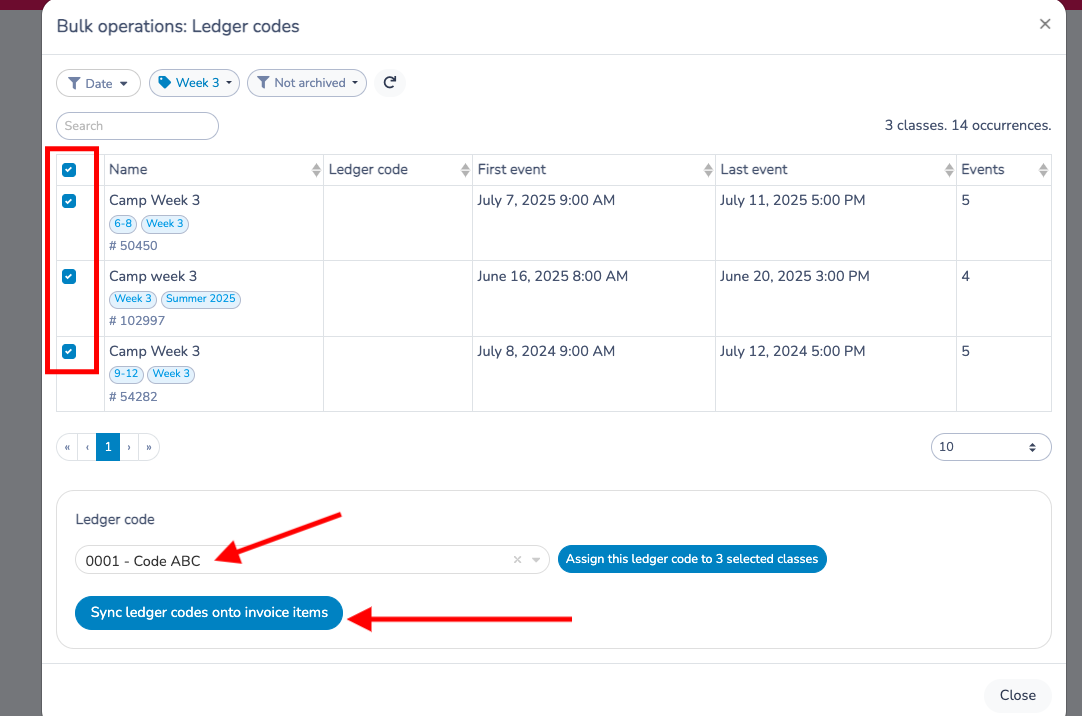
For multiple classes, open Classes → All Classes and Events, select the classes you want to update, and open the bulk-operation menu (⋮). Choose Ledger codes, select the code, then choose Assign this ledger code to [number] selected classes. To remove the assigned code from the selected classes, leave the code unselected and choose Unassign ledger codes on [number] selected classes.
Changing the class’s assigned code affects its current configuration; existing invoice items are not automatically changed. This lets the updated class code apply to future sales without silently rewriting past sales. To update existing invoice items too, use the separate synchronization action below and review the accounting impact first.
Update ledger codes on existing invoice items
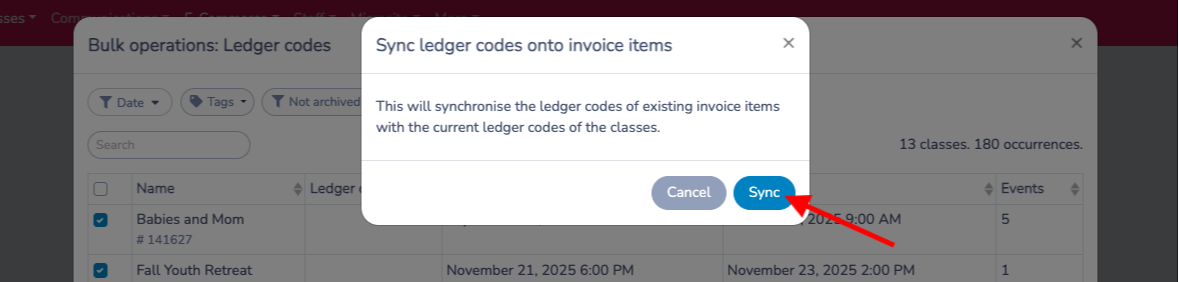
From the same Ledger codes bulk operation, select the affected classes and choose Sync ledger codes onto invoice items. Review the confirmation, which synchronizes existing invoice items to the current ledger codes of the selected classes, then confirm. This changes historical classification and can affect data already exported; coordinate the correction with accounting staff and verify resulting reports. Do not use synchronization if you only intend to change the code for future sales.
WarningSynchronization applies each selected item's current ledger code to its existing invoice items. It can replace codes already assigned, as well as fill in missing ones. If a selected item has no ledger code, synchronization clears the codes on its existing invoice items. Check the current assignments before confirming Sync.
Assign a ledger code to a membership
- Open E-Commerce → Memberships and create a membership or open one to edit.
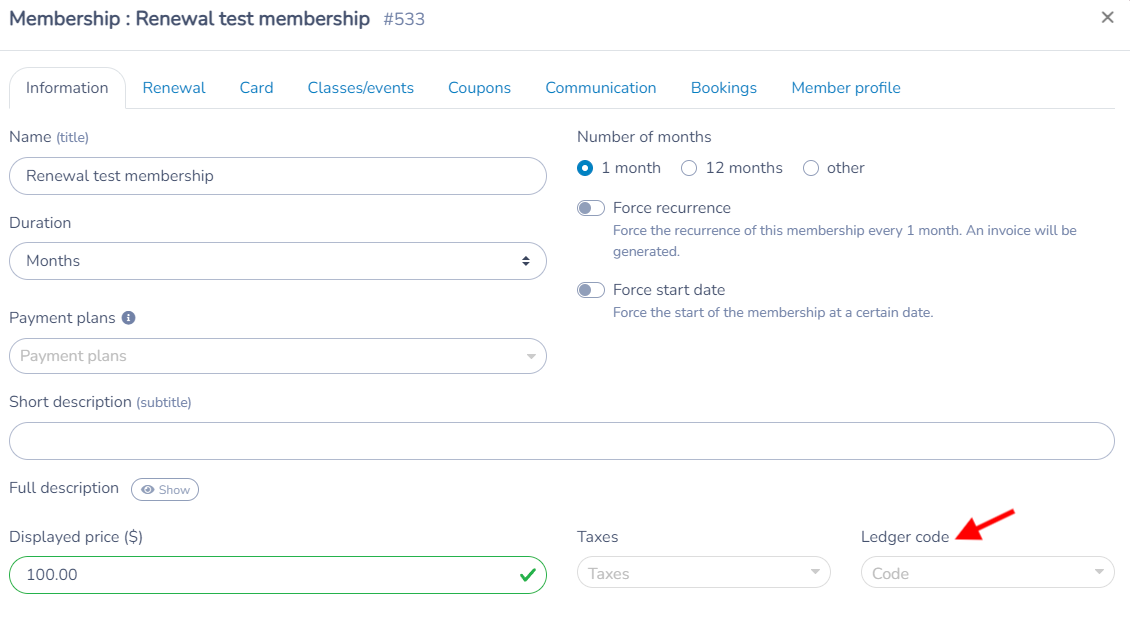
- In the membership’s information and pricing settings, find Ledger code beside the price and tax settings.
- Select the appropriate code and save the membership.
Membership add-ons can have their own ledger code. If you sell add-ons, review their code separately in the membership’s add-on settings.
Assign and synchronize membership ledger codes in bulk
Use this tool when registrations started before you configured the membership codes, or when you need to correct codes on past membership invoices. You need permission to modify memberships; select ordinary Activity Messenger memberships that are not locked.
- Open Memberships → All memberships (or E-Commerce → Memberships, depending on your navigation).
- Open the three-dot menu (⋮) and choose Bulk operations → Ledger codes.
- In the bulk window, select the memberships to update. Review their current ledger codes; use the search or ledger-code filter to narrow the list if needed.
- To set a code, choose it in Code and select Assign this ledger code to [number] selected memberships. To remove a code, leave Code empty and select Unassign ledger codes on [number] selected memberships. These actions update the memberships' settings; existing invoice items remain unchanged until you synchronize.
- To update past invoices, select Sync ledger codes onto invoice items, review the warning, then select Sync. Each selected membership uses its own saved code; selecting a code in the picker without assigning it does not change what synchronization applies.
- Check the affected invoice items and ledger-code reports. Related payment items are synchronized too. Membership add-ons and affiliation billing items are excluded from this membership action.
WarningThis is a full synchronization, not a missing-code-only repair. Existing invoice codes may be replaced, or cleared when a selected membership has no code. It can change historical reports; coordinate corrections to any exports already used by your accountant.
For example, if invoices were created before you configured a Membership revenue code, assign that code to the membership and then synchronize. If two memberships need different codes, assign each code to its corresponding selection first; you can then select both memberships and synchronize together.
Assign and synchronize affiliation billing-item ledger codes
Affiliations use the ledger codes configured on their billing items. You need access to the Federation area and permission to manage the organization.
- Open Federation → Billing items.
- Open the three-dot menu (⋮) and choose Bulk operations → Ledger codes.
- Select the affiliation billing items to update and review their current ledger codes.
- Choose a code in Code, then select Assign this ledger code to [number] selected affiliation billing items. To remove a code, leave Code empty and select Unassign ledger codes on [number] selected affiliation billing items. Assignment and removal update the billing items' settings, without changing past invoice items.
- Select Sync ledger codes onto invoice items, review the warning, then select Sync to apply each selected billing item's saved code to its existing invoice items and related payment items.
Each affiliation billing item uses its own code, including items with no linked membership. If it is linked to a membership, synchronization still uses the billing item's code rather than the membership's code. As with membership synchronization, this action can replace existing invoice codes or clear them when a selected billing item has no code. Check affected invoices and reports after synchronizing.
Assign a ledger code to a product
- Open E-Commerce → Products and create a product or open one to edit.
- In the product settings, find Ledger code and select the appropriate code.
- Save the product.
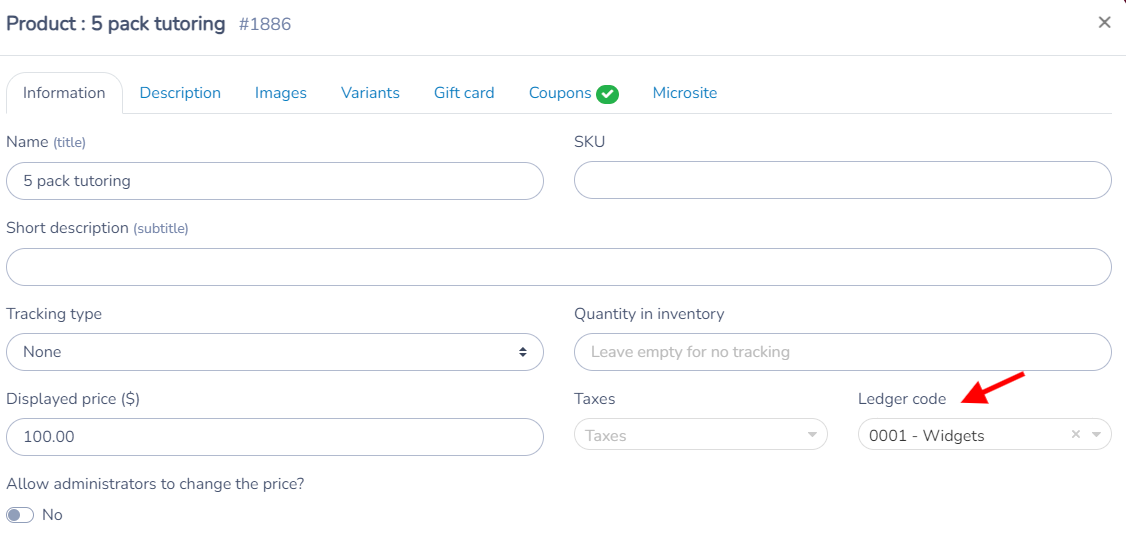
A product selected in a payment form can have its price, quantity, taxes and ledger code overridden for that form; review the form’s product-question settings if you use overrides.
Booking prices can also have a ledger-code assignment when that field is available in the price configuration.
Group codes into reporting categories
Categories are optional groupings for ledger codes, such as Business model, Department, or Revenue stream. Each code can be assigned to one category; the category report then groups sales according to the codes assigned to the sold items.
- On the Ledger codes page, enable Use ledger-code categories.
- Customize the grouping label if desired. The default label is Business model.
- Select Manage categories to create categories. You can rename categories and view their assigned codes. A category cannot be deleted while it is assigned to a code, including an archived code.
- Assign a category in a code’s row or select several codes and use the bulk-assignment bar. Filter the table to find uncategorized codes.
- Open the category sales report from the ledger-code settings link or E-Commerce → Reports.
You can turn on Ledger-code categories are required to require a category when a code is created or edited. This does not automatically categorize existing codes; filter for uncategorized codes and assign them. Disabling categories removes the category-specific report, but does not remove the regular ledger-code sales report.
Choose accounting software and configure codes
On the Ledger codes page, choose QuickBooks or Sage under Accounting software. Activity Messenger then shows the relevant code fields and accounting export format. This selects the format and fields; it does not create a live connection or synchronize accounts.
- QuickBooks: set QB account to the account name in QuickBooks. For a subaccount, use
Parent account: Subaccount. If blank, the export uses the ledger-code name. QB Class is optional and is included as the class in the QuickBooks journal export. - Sage: include the account number in the ledger-code name, such as
4000 - Registration revenue. Activity Messenger extracts the first numeric portion as the Sage account number.
Configure journal-entry reporting accounts
From the ledger-code page, select Journal Entries Setup. These reporting accounts are used only to create journal-entry previews and exports; they are not automatically assigned to sold items.
Configure the accounts that apply to your setup:
- Cash/bank debit account (displayed as the sales revenue account in reporting configuration)
- Accounts receivable
- Tax reporting accounts A and B, and the taxes routed to each
- Stripe fees
- Activity Messenger Stripe fees and the federal and provincial taxes on those fees
The settings screen notes how combined taxes are handled. Filtering the Sales report by a reporting account code returns no results unless that same code is also assigned to sold items. Configure only the mappings relevant to your organization and confirm them with your accountant.
Choose payment or sales posting basis
Each ledger code has a Journal posting basis:
- Payment basis is the default. Entries are based on payments received and are available in the Payments and Stripe Payouts reporting workflows.
- Sales basis posts sales when recorded and uses Accounts Receivable for unpaid balances. Its entries are available in Sales → Journal entries.
This setting chooses the transaction event used for the journal entry; it does not determine when revenue is earned or manage deferred revenue. When importing QuickBooks accounts, the import workflow asks you to choose a basis for the imported codes.
Preview and export journal entries
- Open E-Commerce → Reports and choose a date range.
- Select the Journal entries report. Review the ledger-code setup link if accounts or mappings are missing.
- Check the debit and credit totals in the preview.
- Download QuickBooks (CSV) or Sage (TXT) when the organization’s accounting software is selected.
The QuickBooks output uses the configured QuickBooks account name (or falls back to the code name) and can include a QuickBooks class. Sage output uses account numbers extracted from code names. Payment-based entries can also be reviewed in Payments; Stripe card-payment entries are available by payout in Stripe Payouts. These are file exports, not automatic two-way synchronization.
Payments report and Stripe reconciliation
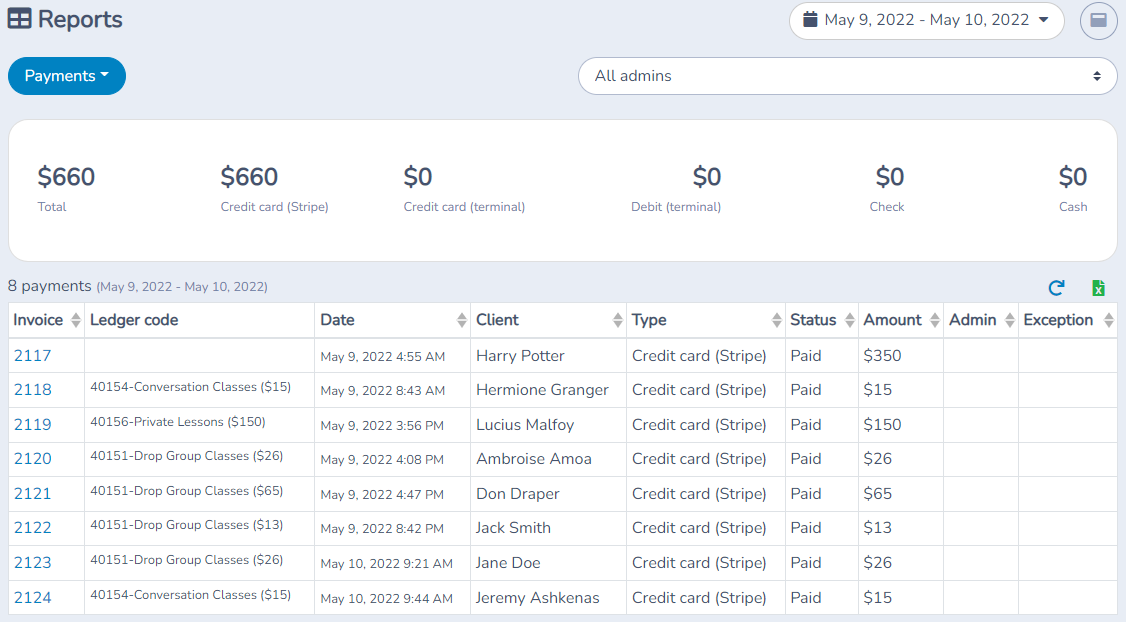
Open E-Commerce → Reports and choose the payments report to review collected payments by ledger code over a selected date range; export the report to Excel when needed. This report answers what was paid. Sales reports reflect recorded sales, while Stripe Payouts report the Stripe transfers. The payment total and Stripe payout amount can differ because payouts may include fees, refunds or timing differences. Compare the Activity Messenger payment report with Stripe’s payout reconciliation report when reconciling bank deposits: Stripe payout reconciliation.