Activity Messenger Help Center
Multiple classes with the use of filters
The setup of the customer journey in a multi-class environment on Activity Messenger helps optimize the user experience by making it easier to search for classes based on specific criteria. By using filters such as location, age, class type, or available days, you provide your clients with a simple and effective way to select the options that best meet their needs. These custom filters improve navigation and ensure that each client quickly finds the class that suits them, while making the entire registration process smoother and more intuitive.
Set up the customer journey
Define the journey:
The goal is to give your clients the ability to filter available options based on specific criteria such as location, class type, age, and days of the week.
Access the multi-class options:
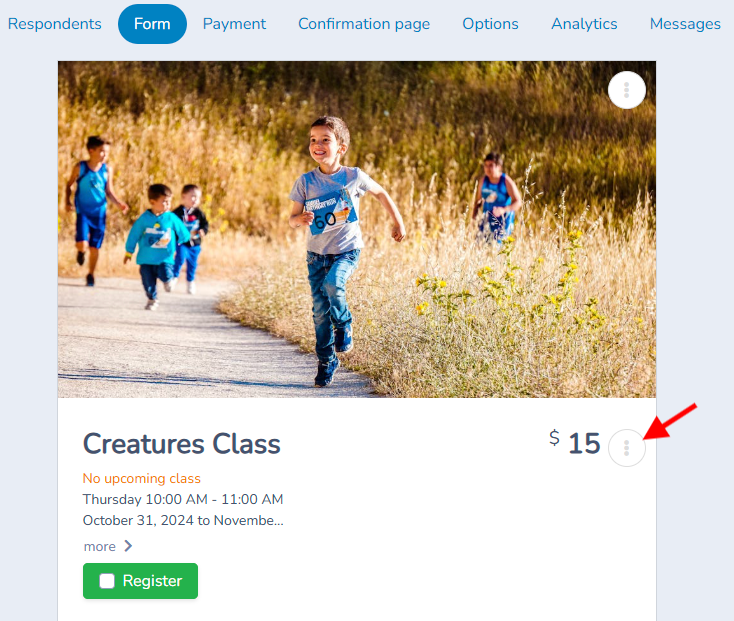
To do this, go to the Multiple Classes block, where you have already added your classes and configured your rules.
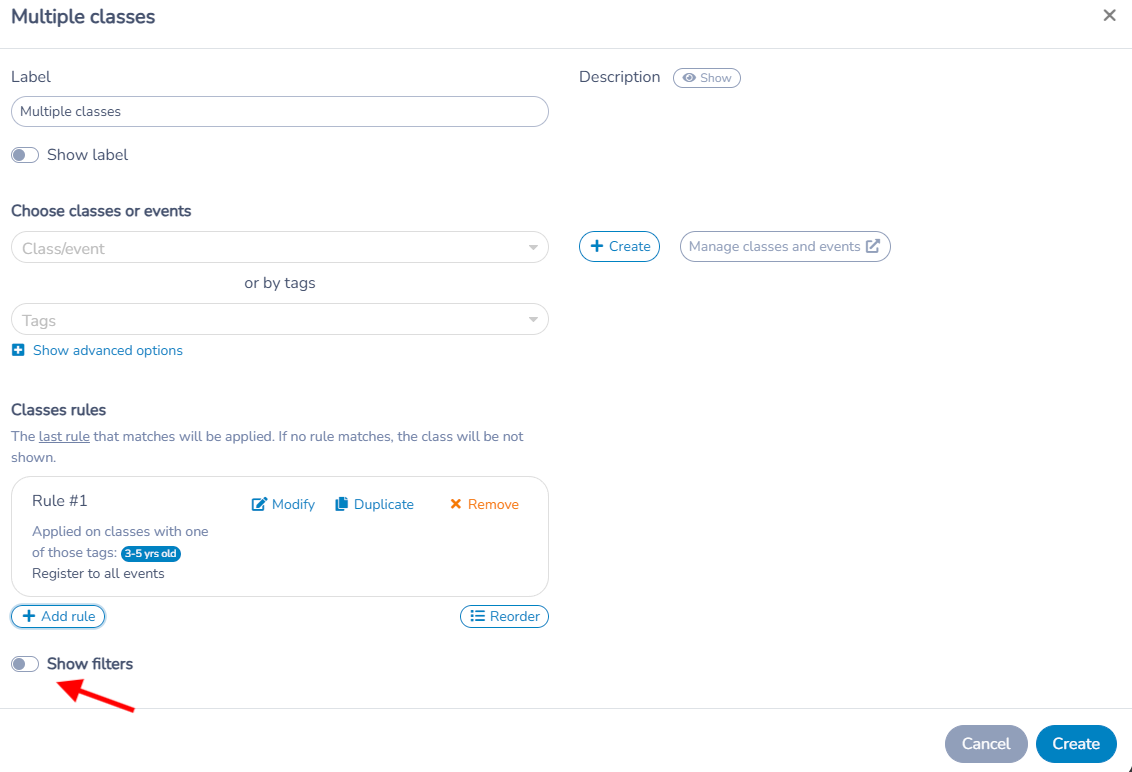
Under the rules of the classes, activate the button to turn on the filters.
Waitlist and Force waitlist are set on each class rule (Class rules › Modify), not on the block. See How registrations reach the waitlist.
Types of Filters:
You can create different types of filters to help clients navigate more easily:
-
Tag filters: Useful for filtering based on characteristics like location or class type.
-
Age filters: Allow filtering of classes by age group (e.g., 4-6 years).
-
Day of the week filters: Filter classes based on available days (Monday, Tuesday, etc.).
Tag Filters:
Example: Create a Location filter with options like Pool A and Pool B.
When the client selects a pool, only the options for that pool will appear.
Add other filters such as class type (swimming, diving, etc.) and link them to the tags.
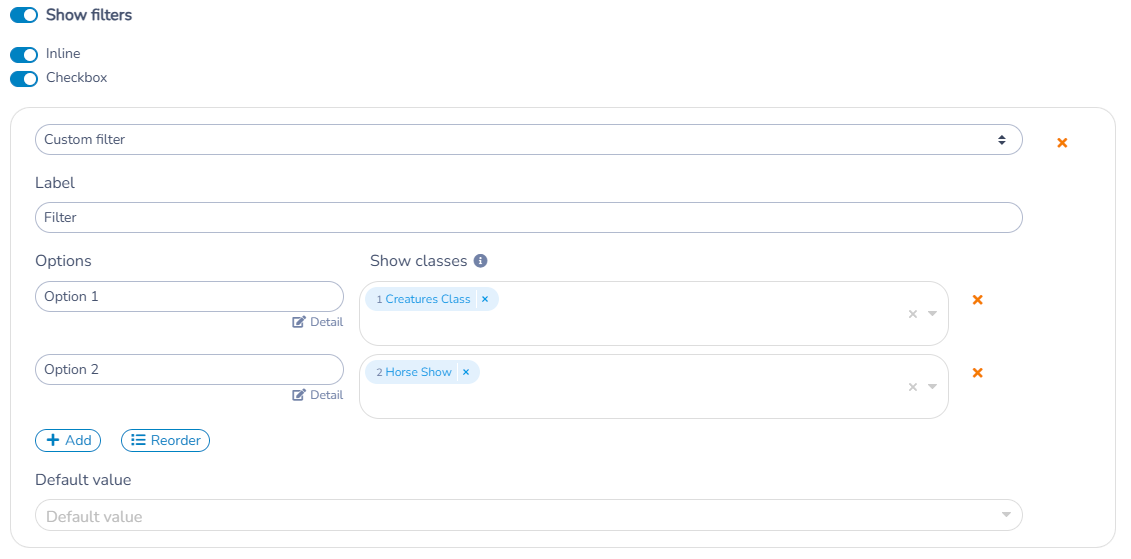
🔔 By selecting the checkbox option, the client will be able to select multiple choices, allowing them to explore all of their possible options.
Age Filters:
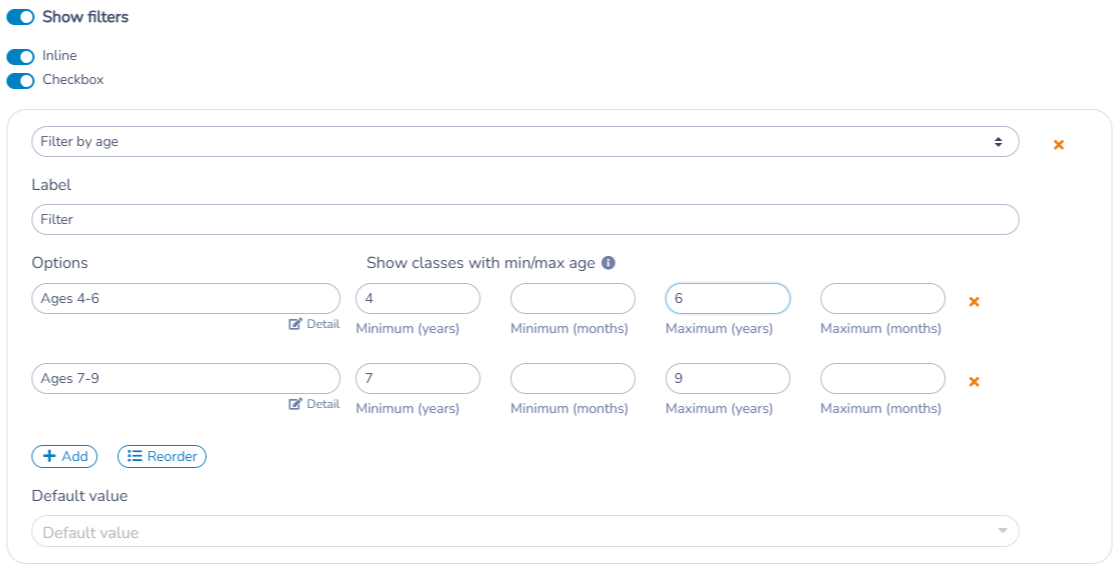
Set up age ranges in the classes (e.g., 4-6 years) and ensure that the minimum and maximum age are defined in the settings of each class.
Example: When a client selects 6 years old, all classes available for children aged 4 to 6 will appear.
Day of the Week Filters:
Simply enable this option, and the days of the week will automatically be available as filters.
Require and automatically add a membership
Membership requirements are configured inside a Class rule of the Multiple Classes question. They apply to the classes matched by that rule; the filters only help clients find classes.
- Open your payment form and edit the Multiple Classes question.
- Under Class rules, select Modify for the rule that applies to the intended classes.
- Under Participant rules, enable Different participant, then Membership. Both are needed to access the participant membership settings in the current rule editor.
- To automatically add and charge a required membership when the participant does not have it, enable Charge the participant for the membership if he doesn't have it and select the required membership.
- Save the class rule, then save the Multiple Classes question. If you use several rules, check the rule that actually applies to each class: the last matching rule is used.
- Preview the form and check the participant, the selected class, the membership and the invoice total before sharing it.
When an adult registers themselves
Keep Different participant enabled even when the participant is the adult filling out the form. The label does not mean that the participant must be a child or someone else: this switch also exposes the membership-rule settings. The participant can be the account owner/respondent. Select that adult when the form offers the choice, or enter the same adult's details in the participant fields.
Leaving Different participant off hides Membership and these participant-level rules. Enabling it can display participant fields or a participant selector; it does not guarantee a checkout without participant selection. Do not substitute a class-level membership link for this automatic-charge setup without verifying that workflow separately.
An age filter controls which classes are shown; it does not choose which required membership to charge. For age-based membership selection, see Select a required membership by participant age. For the membership charging options, see Membership.

Filter classes by the participant's age and gender
The Multiple classes question does not read the participant's date of birth or gender to hide classes automatically. You have two tools instead: an age filter that the customer picks, and eligibility rules that check the participant's date of birth and gender when the form is submitted. There is no gender filter type.
Let customers narrow the list by age
- Set the age range on each class. Go to Classes, open the class and, on the Information tab, click the edit icon next to Age constraint. Enter Minimum age and Maximum age less than in years and months. You can also check the age on the day of the first class, at the end of the current year or on a date you choose, or use a date of birth range.
- Edit the Multiple classes question and switch on Show filters.
- Click Add filter and choose Filter by age.
- Under Show classes with min/max age, add one option per age group. Give each option a name, for example "4-6 years", and fill in Minimum (years), Minimum (months), Maximum (years) and Maximum (months).
An option lists every class whose age range overlaps the option's range. A class with no Age constraint is not attached to any age option. The customer chooses the option; the form does not select it from the participant's date of birth.
Check the participant's date of birth and gender
Use this to refuse a registration when the participant is not eligible.
- Edit the Multiple classes question, and under Class rules click Modify on the rule that covers the classes.
- Under Participant rules, switch on Different participant. Date of birth and gender are available only with this switch on, even when the participant is the person filling out the form.
- Set Date of birth to Required, then click the edit icon next to Age constraint to set the age limits for this rule.
- Set Gender to Required. Click the edit icon next to Gender identity choices to choose which genders the form offers, and the edit icon next to Gender constraint to choose which genders may register.
- Save the rule, then the question.
When the form is submitted, a participant who does not match gets an error and the registration is not accepted. For a gender mismatch, the error names the gender that is allowed. If the rule has no age limits of its own but the class has an Age constraint, the class's age limits are checked instead.
Because each rule can cover specific classes, you can create one rule for the classes that are for girls only and another for the classes that are for boys only. The last rule that matches a class is the one applied.
To let customers narrow the list by something other than age, such as gender, give those classes a tag and add a Filter by tag. The customer picks the option, and nothing prevents a participant from choosing a class meant for another group unless you also set the Gender constraint above.
Rearrange filters and questions
Filter Order:
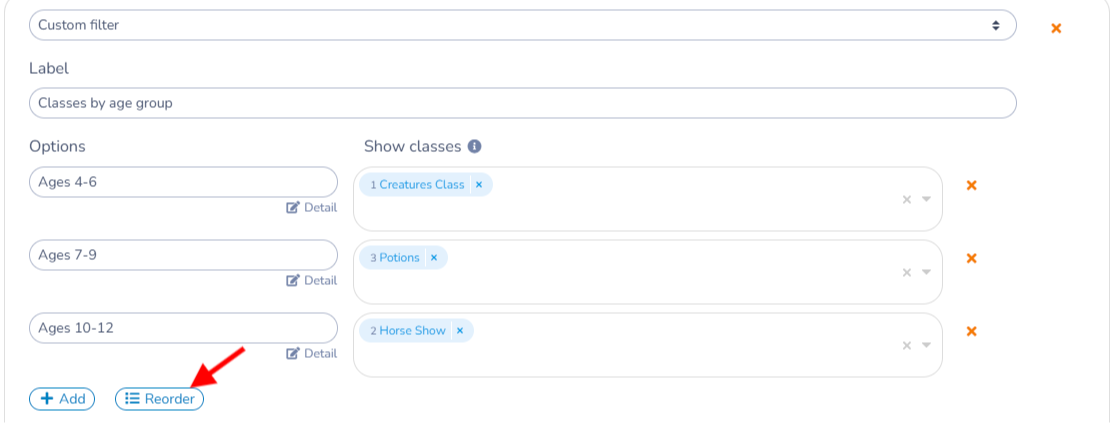
You can adjust the order in which the filters appear. For example, you can choose to ask for the location or the day of the week first.
Rearrange Questions:
Similarly, you can rearrange the order of questions in the form to optimize the user experience.
Generate Pre-filtered links
Create Pre-filtered Links:

If you want to share a specific link that pre-filters the options, such as in a Facebook promotion, you can do so.
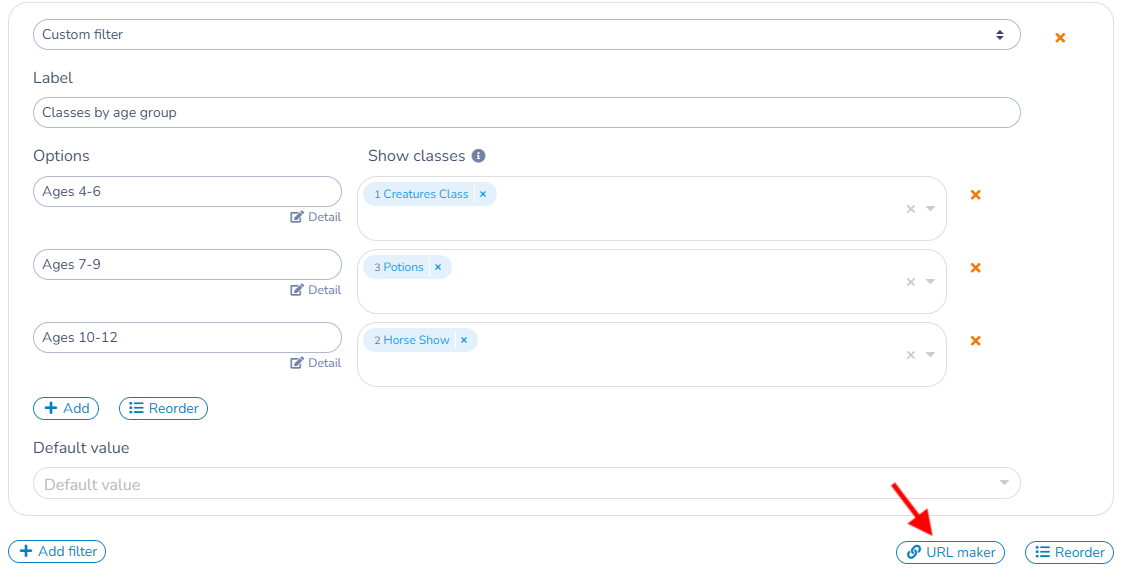
Example: A link for diving classes at Pool B can be shared, and when a client clicks on it, the options will already be filtered to display only the relevant classes.
Settings reference
| Setting | Where | Default | Effect |
|---|---|---|---|
| Show filters | Multiple classes question | Off | Shows filters to the customer. Turning it on adds a first filter. |
| Dynamically disable unavailable filter options | Multiple classes question › Show filters | Off | Each filter is limited by the selections made in the filters above it, so filter order matters. |
| Inline | Multiple classes question › Show filters | On | Shows the filters on the same line. |
| Checkbox | Multiple classes question › Show filters | Off | Lets the customer select several options in a filter. |
| Add filter | Multiple classes question › Show filters | None | Filter types: Custom filter, Filter by tag, Filter by day of the week, Filter by age. |
| Label | Each filter | Empty | Name of the filter shown to the customer. |
| Display as | Each filter | Standard filter | Or Grouped activities. |
| Selection type | Each filter | Use block setting | Or Single selection, Multiple selections; overrides the block setting for this filter only. |
| Show tags of classes | Filter by tag options | None | Tags that select the classes shown for the option. |
| Show classes with min/max age | Filter by age options | None | Minimum (years), Minimum (months), Maximum (years), Maximum (months). The option lists the classes whose Age constraint overlaps this range. |
| Default value | Each filter | None | Option selected when the form opens. |
| Reorder | Each filter | None | Changes the order of the options. Filters can be reordered too. |
| Age constraint | Classes › class › Information tab | None | Minimum age, maximum age less than, and when the age is checked. Used by the age filter and checked at registration. |
| Class rules › Modify | Multiple classes question | At least one rule is required | The last rule that matches a class is applied. If no rule matches, the class is not shown. |
| Waitlist, Force waitlist | Class rules › Modify | Off | See How registrations reach the waitlist. |
| Different participant | Class rules › Modify › Participant rules | Off | Needed to access Membership, Date of birth and Gender rules. |
| Date of birth › Age constraint | Same | Off | When Required, asks for the date of birth and refuses participants outside the age limits. |
| Gender › Gender identity choices, Gender constraint | Same | Off | When Required, Gender constraint limits which genders can register. Empty means all. |
| Membership, Charge the participant for the membership if he doesn't have it | Same | Off | See Require and automatically add a membership. |
Common questions
How do I show only the classes a child is old enough for? Set an Age constraint on each class (Classes › class › Information tab), then add a Filter by age with one option per age group. The customer picks the age option and sees the classes whose age range overlaps it. See the section Filter classes by the participant's age and gender above.
Does the form pick the age option from the child's date of birth? No. The customer chooses the option. To refuse a registration outside the age limits, set Date of birth to Required with an Age constraint under Participant rules.
Can I filter classes by gender? There is no gender filter type. You can tag the classes and add a Filter by tag, which the customer chooses, and set a Gender constraint under Participant rules to refuse participants of other genders at submission.
Why can't I see Date of birth or Gender in the class rule? Switch on Different participant under Participant rules. The participant can still be the person filling out the form.
What happens to a class without an Age constraint under an age option? They are not listed under any age option. Add an Age constraint to the class.
What if the participant's age or gender does not match? The form shows an error when it is submitted and does not accept the registration.
Which rule applies if several rules match a class? The last matching rule. If none matches, the class is not shown.
Can I link directly to a pre-filtered list? Yes. See Generate pre-filtered links.