Activity Messenger Help Center
Recipients and sending options
Use this reference when a message needs more than the basic first-send workflow: a contextual audience, both parents, copies to staff, a template or an attached resource. If you have not sent a message yet, start with Send your first email or SMS.
Choose the right starting point
| Starting point | Intended audience | Check before sending |
|---|---|---|
| New message | A list, people, users or another available audience choice | The To selection, filters and counts |
| A recipient list | Contacts in that list | Source, refresh state and exclusions |
| Form respondents | The relevant responses | Selected rows versus the broader form audience |
| Class or attendance list | Participants in the relevant class/date context | Occurrence, filters and parent/contact selection |
| Membership records | The selected membership audience | Membership and member-selection context |
| A client or invoice | The client concerned by that record | Actual destination and relevant attachments |
| A template’s Send action | The audience you choose for that message | Template content plus the new recipient selection |
Available choices depend on your permissions, organization settings and starting point. Do not assume that leaving all checkboxes clear means “send to nobody,” or that selecting a page selects every result. Inspect the audience carried into the composer before sending.
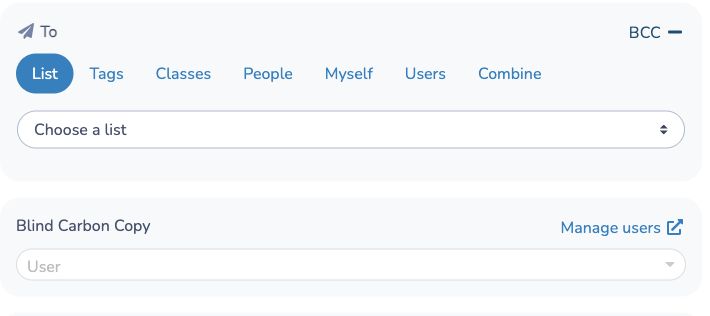
The composer can offer List, Classes, People, Myself, Users, and Combine, plus other choices enabled for the organization. Use Myself only for a send to your own details. An audience choice and a channel choice are separate decisions.
Instructor recipients
An Instructor with messaging access can email or text themselves, other active users in the same organization, and contacts in lists, forms and classes assigned to them. Use Myself for your own contact details or Users for colleagues. Choosing People or entering contact details does not grant access to an unassigned client.
If a send is refused because recipients are outside your permitted audience, Activity Messenger shows an explanation. Review all selected people, lists, classes and attached form context. Remove the unavailable recipients or ask an administrator to review your assignments before trying again. When sending both email and SMS, both contact destinations must be permitted. Instructor (without messaging) still cannot send messages.
Choose channels and communication type
Email, SMS, and SMS and email explicitly select channels. Client preferences, when enabled, follows the client’s selected channel, with email as the default without a preference. Missing or invalid contact details can still prevent delivery; do not assume the system will switch to another channel after a delivery failure.
Choose Marketing for promotional content and Non-marketing for operational communication. A marketing opt-out is not the same as an invalid address or another delivery suppression. Non-marketing does not guarantee delivery and should not be used to bypass marketing preferences.
Include the other parent or contact
When the selected workflow offers Send to both parents, enable it below To in the message composer to include the additional parent/contact information available in the underlying registration or list. For messages started from a class attendance list, choose participants and open Message first; then look for this option in the composer. It is not a pre-composer recipient choice. For imported contacts, the additional contact can be the second contact mapped during import.
The option does not create missing contact information. Check that the selected records have usable details for the chosen channel. To update an existing class registration, open its invoice from E-commerce → Invoices, or select its response in the form’s Responses tab to open Client billing. Edit the customer’s email and the form answers, including the Other parent answers where applicable. See Invoices and client billing.
Add BCC users
Open BCC to select users who should receive a copy. The expanded panel is labeled Blind Carbon Copy.
The copy is prepared for the selected user; it is not necessarily an exact example of every participant’s personalized message. Its registration and placeholder context can differ by workflow and audience. Do not promise that all participant fields will always be present or always be empty. Preview context-sensitive content and use a suitable controlled test before a broad send.
BCC users are additional recipients. Clear them before a test intended only for yourself.
Check sender and reply settings
Open Sender & Reply settings. Email sender identity, email Reply-To, SMS sender number and SMS reply destination are different settings.
- Verify your own email domain when configuring branded email sending.
- Choose an email Reply-To address for responses.
- Check SMS sender and reply numbers. Entering a reply-to mobile does not change the outgoing sender.
When Reply-To is your own email, the Replies to your email badge displays the address above the message controls. Enable this default in your account or ask an administrator to change your user preference. You can override it for one message under Sender & Reply settings; see Choosing a Reply-To email address.
Use templates, placeholders and attachments
Use an HTML Template applies designed content to the message. A one-time edited copy should be checked separately from the reusable template. For email, review the subject and any preview text offered by the template workflow. For SMS, review the text and the link to the hosted message.
Quick messages supply reusable text. Placeholders can use recipient, form or class information, but only when that information exists in the send’s context. Preview the result instead of relying on the appearance of the placeholder name in the editor.
Use Attachment or the editor’s link tools for supported forms, URLs, documents, images, videos and certificates. The options vary by context. Check the actual destination and whether the recipient can open it. In standard SMS delivery, media is accessed through a link, not an MMS file. A thumbnail in an email or editor preview does not guarantee a thumbnail on the recipient’s phone.
For an attached form, distinguish the people you selected from conditions such as whether they have already answered it. Review any recipient-filter options displayed for that workflow.
Review length, counts and scheduling
The displayed SMS usage and recipient cost are estimates. Personalization, links, marketing identification/opt-out text, contact validity and actual delivery processing can affect the final result. See SMS, images and message length.
Use Preview before sending. A first test to yourself confirms a useful baseline, but does not validate all recipient-specific placeholders or eligibility rules.
For a later send, use Scheduling messages. Do not assume editing the reusable template will update an already prepared or scheduled send. Inspect the scheduled message itself and follow its available management actions. For a recurring business trigger, use Automation.
After sending, review delivery and engagement before deciding whether a follow-up is needed.
Settings reference
| Setting | Where | Default | Effect |
|---|---|---|---|
| To › List | Communications › New message, To | List when you start from a list or a blank message | Sends to the chosen list. The Exclude link under the list removes selected recipients from this send only. |
| To › Tags | To, only when Allow clients to choose their communication preferences is on and tags exist | Not shown | Sends to clients who selected the chosen tags in My preferences. With several tags, choose Any selected tag or All selected tags. At least one tag is required. |
| To › Classes | To, only in workflows that offer it | Not shown | Sends to the participants of the classes or events you choose. |
| To › People | To | Not applicable | Sends to the individual people you search for and add. |
| To › Myself | To | Not applicable | Sends to your own email and mobile number. |
| To › Users | To | Not applicable | Sends to users of your organization. |
| To › Combine | To, only in workflows that offer it | Not shown | Sends to a combination of lists chosen with Choose lists. |
| Filter respondents | To when the list is a form's respondents | All completed respondents | Adds conditions on form answers. The matching audience is refreshed when the message is sent. |
| Send to both parents | Below To, only for some audiences (such as class participants, uploaded lists, form lists and some automations) | Off | Also sends to the second parent or contact on the record. It does not create missing contact details. |
| Allow sending duplicates | Below To, for list audiences | Off | By default, an email address that appears several times in the list receives one email. Turn on to send to every occurrence. |
| BCC | To row, BCC link | None | Adds users who receive a copy. Clear them before a test meant only for you. |
| Email / SMS and email / SMS / Client preferences | Top of the composer | Default type of message in Organization settings › Messaging | Chooses the channel. Missing or invalid contact details can still prevent delivery. |
| Marketing / Non-marketing | Communication type | Default type of communication in Organization settings › Messaging (Marketing unless changed) | Marketing skips people who unsubscribed from marketing. Non-marketing does not, but bounced addresses are still skipped. |
| Sender & Reply settings | Link at the top of the composer | Collapsed | Shows the sender (From), Reply to and Suppress automatic email replies. |
| Use an HTML Template | Below the message | Off | Applies a saved template. Choose Edit to adapt a copy for this message only; the original template is not changed. |
| Attachment › Attach a form (waiver) | Below the message | None | Adds a form button or link. The checkbox Only send to people who have NEVER filled this form restricts the audience. |
| Attachment › Link to a URL, a document or a page | Below the message | None | Adds a link or a button. Button text left blank inserts a plain link. |
| Attachment › Attach a video, an image or a certificate | Below the message | None | Adds media as a link. These three are unavailable while an HTML template is selected. |
| Attach the invoice PDF? / Attach the filled form PDF? / Attach the tickets PDF? | Below the message, only when sending from an invoice, a form list or tickets | Depends on the starting point | Attaches the PDF to the email. |
| Freeze the message | Schedule window, when a saved template is used without a one-time edit | On | Later edits to the template do not change the scheduled message. Uncheck to use the updated template. |
| Preview | Bottom buttons | Not applicable | Shows the message as email and SMS before sending. |
Common questions
Why does my recipient count change after I click Send? Some audiences are calculated at send time. A form-respondent filter and Only send to people who have NEVER filled this form are applied when the message goes out, so the final count can differ from the number shown while composing. See Choose the right starting point.
How do I send to both parents? Turn on Send to both parents below To. It appears only for audiences that can hold a second parent or contact, such as class participants, uploaded lists, form lists and some automations. If the option is missing, the audience does not support it. See Include the other parent or contact.
Why did someone receive the message only once when their address is in the list twice? By default Activity Messenger sends one email to an address that appears several times in a list. Turn on Allow sending duplicates when you want one email per occurrence. See Choose the right starting point.
Can I exclude a few people from a list for one send? Yes. With List selected, open Exclude under the list and pick the recipients to leave out. The list itself is not changed. See Choose the right starting point.
Can I add a video, image or certificate when I use an HTML template? No. Video, image and certificate attachments are unavailable while a template is selected; remove the template to use them. A form or a link can still be attached. See Use templates, placeholders and attachments.
Does BCC send an exact copy of each client's message? No. The copy is prepared for the selected user, and its participant-specific fields can differ from what each client received. BCC users are extra recipients, so clear them for a test only to yourself. See Add BCC users.
If I edit the template, does my scheduled message change? Not when Freeze the message is on in the Schedule window: the scheduled message keeps the template as it was. Uncheck it to use the latest version of the template. See Review length, counts and scheduling and Scheduling messages.
Will Activity Messenger switch to email if an SMS fails? No. Missing or invalid contact details can prevent delivery, and the system does not fall back to another channel. See Choose channels and communication type.