Activity Messenger Help Center
Send Activity Messenger form responses to another application using a webhook
Activity Messenger forms can send completed form submissions to other applications using a webhook. This can be used to automatically send registration or form data to tools such as Google Sheets, Zapier, and other applications that can receive webhook data. The two most common approaches are Zapier and Google Apps Script.
| Method | Best for | Difficulty | Additional service |
|---|---|---|---|
| Zapier | Connecting AM to Google Sheets or many other apps | Easy | Paid Zapier plan that supports Webhooks by Zapier |
| Google Sheets + Apps Script Extension (free) | Sending AM form submissions directly to a Google Sheet | More advanced | None |
Option 1 — Connect using Zapier
Before you begin
You need:
- Permission to edit the Activity Messenger form.
- A Zap with Webhooks by Zapier as its trigger.
- A form or payment form. Contract forms do not expose the webhook option.
Treat the Zapier Catch Hook URL as a secret. Anyone with the URL can send data to the Zap.
Create the Zapier trigger
- Create or open a Zap.
- Select Webhooks by Zapier for the Trigger step.
- Select Catch Hook as the event.
- Continue to the Test tab and copy the webhook URL.
Use Catch Hook, not Retrieve Poll. Activity Messenger sends an HTTP POST with a JSON request body.
Add the webhook to the form
- In Activity Messenger, open the form you want to connect.
- Select the Options tab.
- In the Confirmation section, enable Enable webhook.
- Paste the Zapier Catch Hook URL into the webhook URL field.
- Click Save.
Watch: Use webhooks with Zapier and Google Sheets
Learn how to connect Activity Messenger to Zapier using webhooks and automatically send your data to other applications, such as Google Sheets.
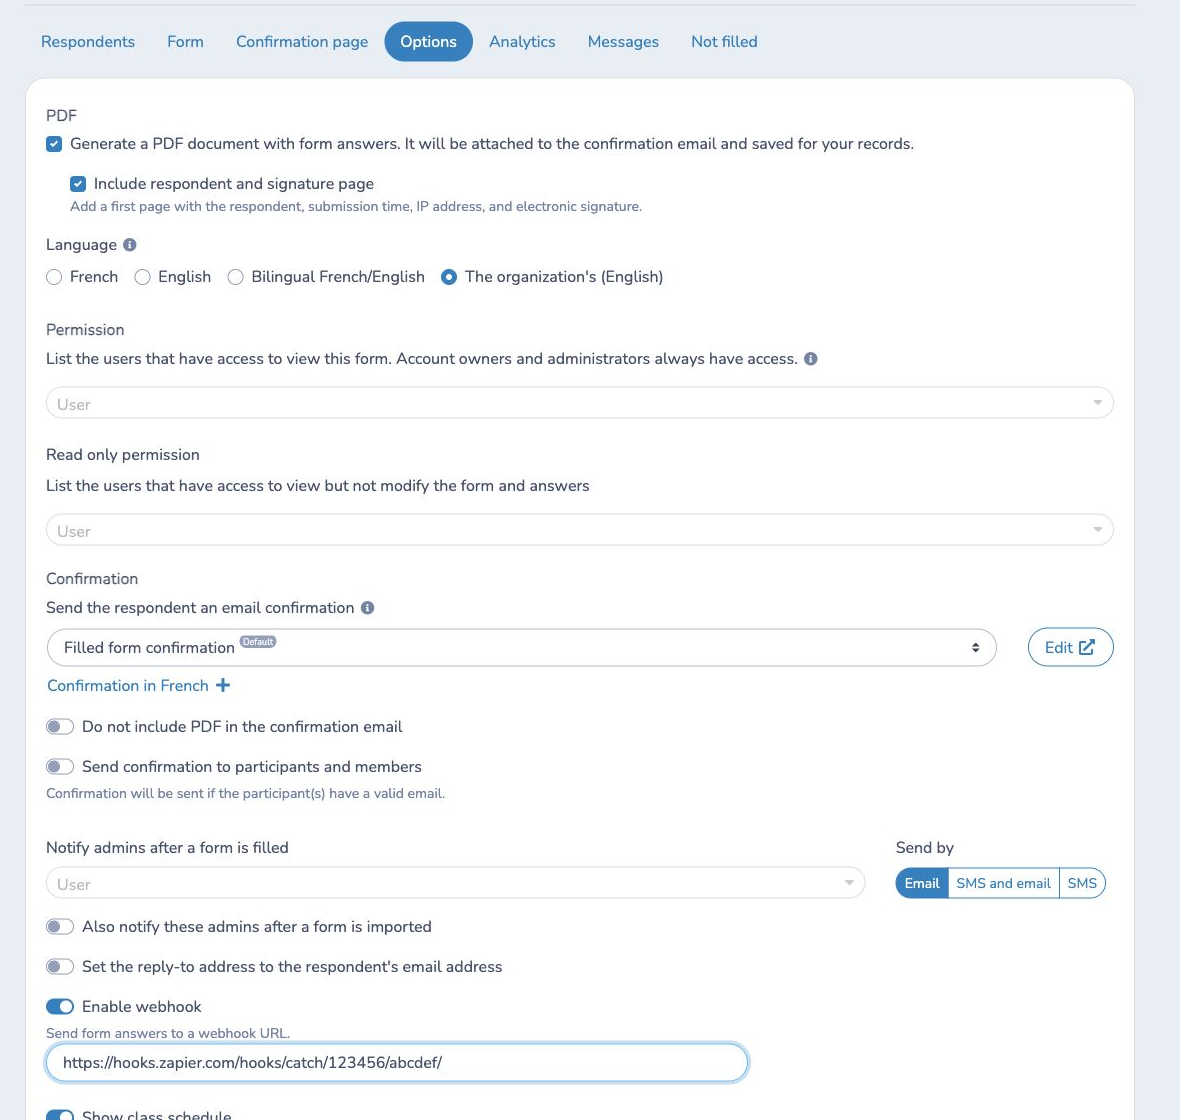
The setting belongs to this form. Repeat these steps for every form that should trigger a Zap.
Test and finish the Zap
- Keep Zapier's trigger test open.
- Complete and submit a new test response in the Activity Messenger form.
- For a payment form, complete the payment-form workflow.
- Return to Zapier and test the trigger.
- Map the received fields to the actions in your Zap.
- Test the actions, then publish the Zap.
The payload includes:
idemailmobilefirst_namelast_namecreated_atform_answers
form_answers contains the answers collected by the form. Submit a realistic
test response so Zapier can discover the answer fields you plan to use.
Important behavior and limits
- The webhook is sent after a completed form submission. Payment forms send it after the form's invoice processing is finalized.
- Activity Messenger sends the webhook in the background, so the respondent does not wait for Zapier to finish.
- A form stores one webhook URL.
- Contract forms do not show the webhook setting.
- Activity Messenger does not sign the request or add a custom authentication header. Keep the unguessable Catch Hook URL private.
- If Zapier changes the Catch Hook URL, update the URL in the Activity Messenger form.
Example
To add every registration to a spreadsheet, create a Catch Hook trigger, paste
its URL into the registration form, and submit a test registration. In the next
Zap step, map first_name, last_name, email, and the required
form_answers values to spreadsheet columns.
Related resource
Option 2 — Send responses directly to Google Sheets using Apps Script
Google Sheets exposes Apps Script through Extensions → Apps Script. A script can be deployed as a web app with a doPost(e) function that receives an HTTP POST; the deployed web-app URL can then act as the webhook URL.
Step 1: Create your Google Sheet
Create the spreadsheet where you want Activity Messenger form responses to appear.
Step 2: Add the Activity Messenger script to Google Sheets
Open the Google Sheet where you want Activity Messenger form responses to be saved.
From the top menu, go to:
Extensions → Apps Script
Google will open the Apps Script editor in a new tab.
Delete any code that is already in the editor, then paste in the following script:
function doPost(e) {
  const sheet = SpreadsheetApp.getActiveSpreadsheet().getActiveSheet();
  const data = JSON.parse(e.postData.contents);

  const row = [
    data.created_at || '',
    data.first_name || '',
    data.last_name || '',
    data.email || '',
    data.mobile || '',
    JSON.stringify(data.form_answers || {})
  ];

  sheet.appendRow(row);

  return ContentService
    .createTextOutput('Success')
    .setMimeType(ContentService.MimeType.TEXT);
}
This script receives the information sent by Activity Messenger when somoene submits your form and adds it asa. new row in your google sheet.
In your Goolge Sheet add these headings in Row 1 before testing:
Submitted at | First name | Last name | Email | Mobile |Form answers
To avoid having all form answers in one cell you may need to adjust the script and row headings for each data point. ie.
"form_answers": {
  "Participant name": "Jane Smith",
  "Date of birth": "2015-03-12",
  "Program": "Beginner Gymnastics"
}
Step 3: Deploy the script as a web app
In Apps Script:
- Click Deploy in the upper-right corner.
- Select New deployment.
- Under Select type, choose Web app.
- For Execute as, select Me.
- Under Who has access, select the option that allows the webhook to access the web app.
- Click Deploy.
- Google may ask you to authorize the script. Follow the prompts to allow it to access your spreadsheet.
- Copy the Web app URL that Google provides.
Step 4: Add the web app URL to your Activity Messenger form
In Activity Messenger:
Forms → Open your form → Options → Confirmation
Enable the webhook option and paste the Google Apps Script Web app URL into the webhook URL field.
Save your changes.
Step 5: Test the connection
Submit a test response through your Activity Messenger form.
Open your Google Sheet and confirm that a new row has been added.
If the connection is working, each new form submission will automatically create a new row.
Next: API