Activity Messenger Help Center
Configure waitlists in class registration forms
Enable a waitlist in the form that offers your classes so customers can request a place when a class is full. Collect their details, confirm receipt of their request and choose how to invite them when space becomes available. The Classes → Waitlist module then centralizes follow-up.
Choose the right screen
| You want to… | Open… |
|---|---|
| Show a class’s waitlist button. | The registration form, then the relevant class block. |
| Enable waitlisting for several classes in one block. | The Multiple classes block, then Class rules → Modify for the relevant rules. |
| Change questions asked of a waitlisted person. | Classes → Waitlist → Form settings. |
| Track or clean up requests. | The Waitlist module. |
| Add someone, reorder or trigger a specific queue. | Manage waitlist queue in the module, or the Waitlist column in the class table. |
You need permission to edit the relevant forms. Managing class queues and viewing current registrations also requires appropriate class management, attendance and client-information access.
Enable waitlisting for an individual class
- Open Forms and select the registration form that offers the class.
- On the Form tab, find the class block and open ⋮ → Edit.
- Check the linked class, its capacity and session dates.
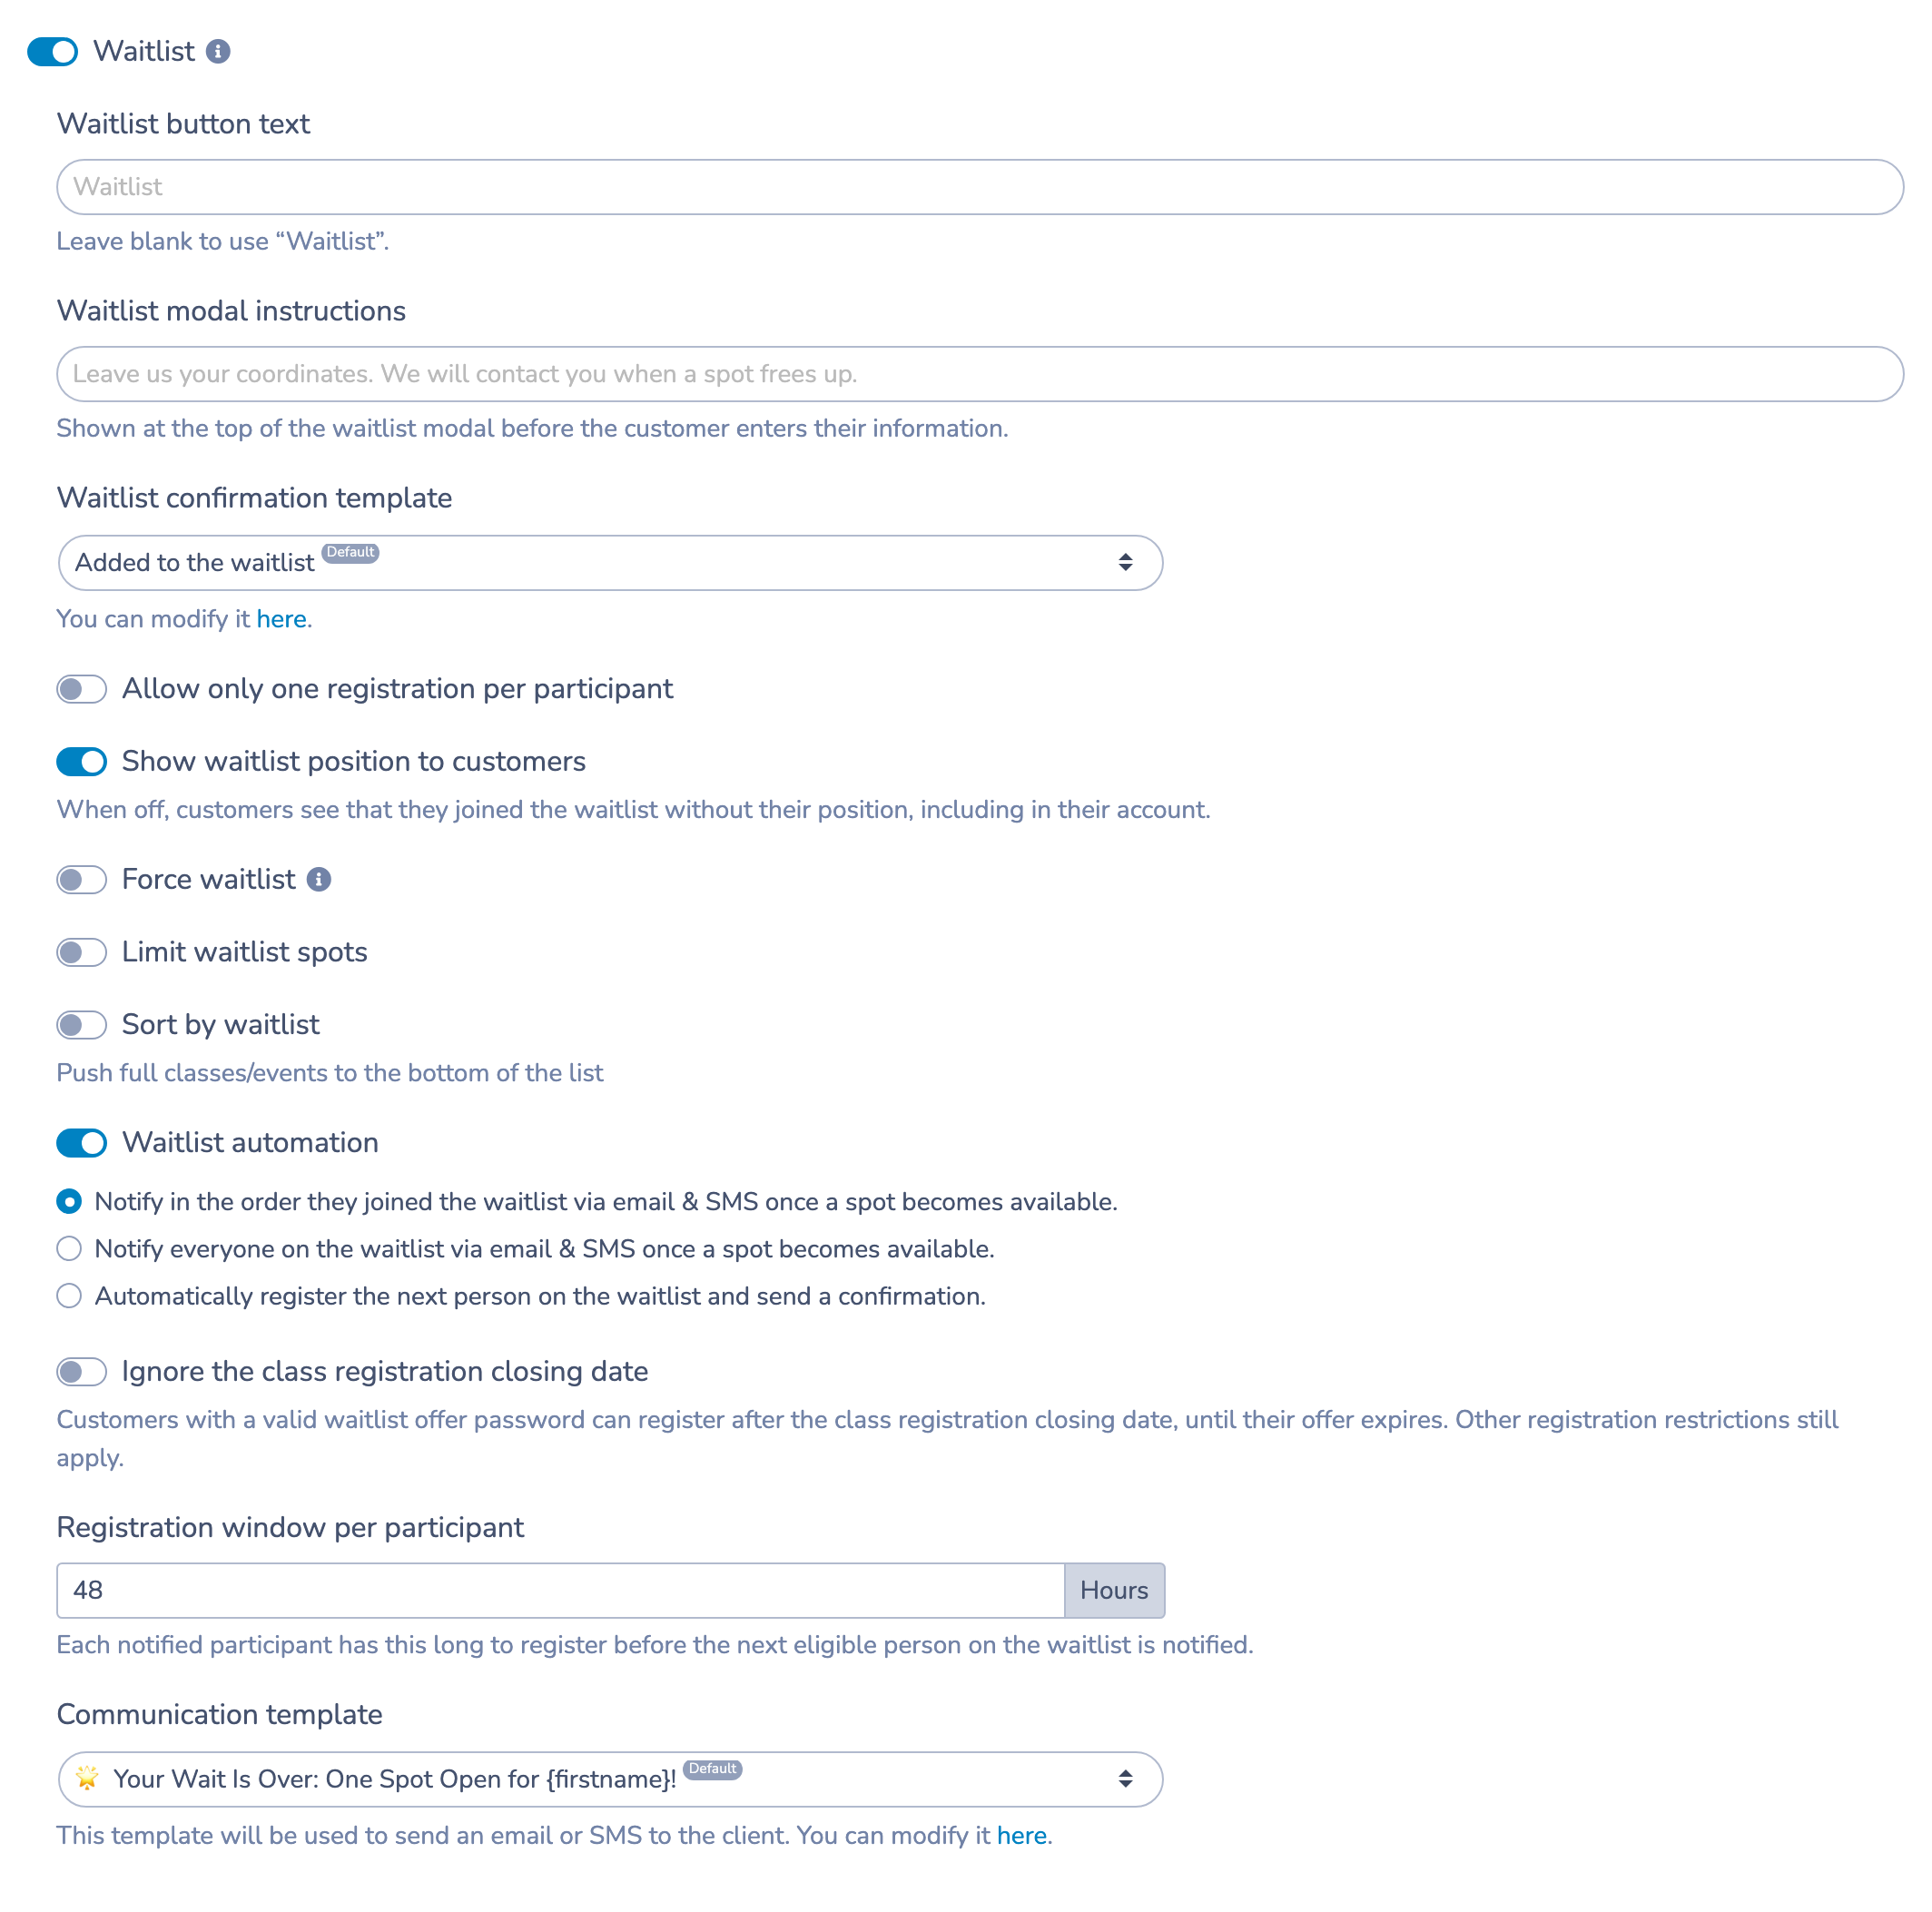
- Scroll to Waitlist and turn it on.
- Adjust button text, instructions and other useful settings described below.
- Save the block.
- Test the customer-facing form. When the class is full and the selection is eligible, its waitlist button opens a request window.
Turning on Waitlist does not automatically allocate a place. You can manage requests manually or enable automation separately.
Enable waitlisting in a Multiple classes block
- Open the registration form, then ⋮ → Edit on the Multiple classes block.
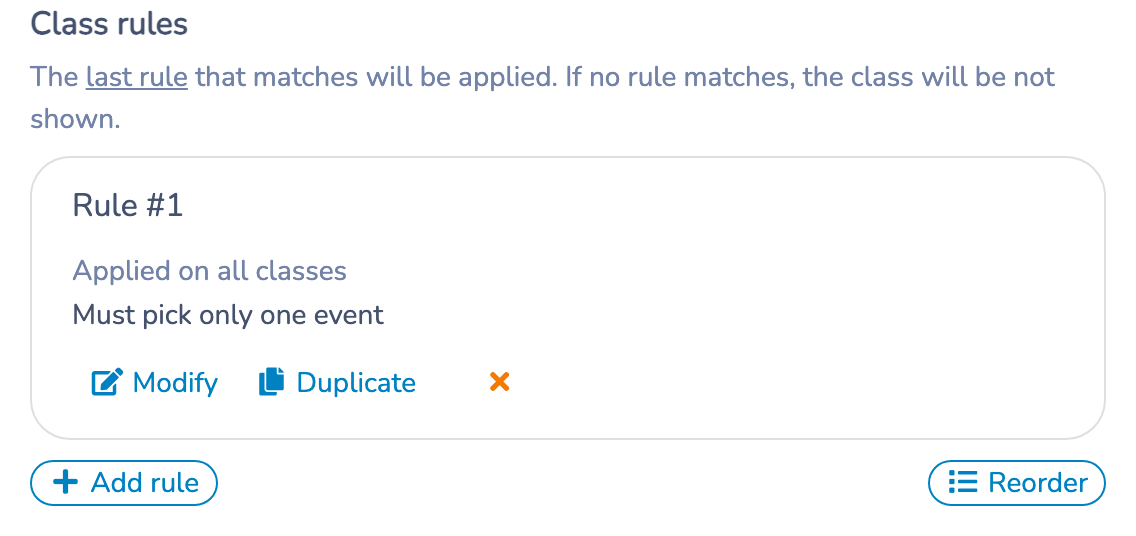
- Check its offered classes and scroll to Class rules.
- Click Modify for the rule that applies to the class, or add the required rule.
- Check its scope: all classes, one specific class or classes selected by tags.
- Inside that rule, enable Waitlist and configure its settings and automation.
- Save the rule and the Multiple classes block. Repeat for other applicable rules.
- Test a class from each group to check the result.
The last matching rule is used. A later rule can override settings from an earlier one. If no rule applies to a class, it is not displayed. If a class has no waitlist button, check the rules actually applied to it rather than only the block’s first rule.
For individual occurrences or selected dates, also check the purchase mode and available dates. Requests retain the class and selected-date context. Do not assume that requests for two different occurrences are duplicates.
Configure what customers see
| Setting | Purpose |
|---|---|
| Waitlist button text | Customizes the button. Empty uses “Waitlist.” |
| Waitlist modal instructions | Adds instructions before the input fields. |
| Waitlist confirmation template | Selects the request-receipt confirmation for this class or rule. |
| Allow only one registration per participant | Limits repeated requests through the supported checks. It does not replace reviewing existing possible duplicates in the module. |
| Show waitlist position to customers | Controls whether customers see their position. |
| Force waitlist | Routes customers to the waitlist even when places remain. Ordinary registration for that selection is unavailable while this is enabled. |
| Limit waitlist spots | Sets the waitlist’s capacity, separately from the class’s actual capacity. |
| Sort by waitlist | Pushes full classes to the bottom of the presentation. It does not reorder people in the queue. |
If the registration form restricts who may fill it, also review how those restrictions apply to its waitlist. A visible button does not waive applicable eligibility requirements.
Change information collected from customers
Under Classes → Waitlist, click Form settings. The common form opens on its Form tab. Edit the required blocks using ⋮ → Edit, then save. You can adjust account-owner details, participant details and additional questions offered by the designer.
The account owner may be the parent and the participant the child. The Class field is automatically populated and hidden in the signup window. It tracks the request; customers do not choose the class again. Older forms may have other fields or an older warning attached to this question.
The public window may use this customized form or the standard workflow, depending on the organization’s setting. Editing questions does not by itself enable personalized public capture. Always check the result from the class registration form. The module and Form settings guide includes detailed steps and explains answers shown in the table.
Distinguish the two communication stages
Request confirmation acknowledges that the person joined the waitlist. It does not confirm class enrollment. A specific template can be selected in the class block, and the common form also has confirmation settings. For manual additions, Send confirmation email is a separate choice.
An invitation or enrollment confirmation following an available place depends on the class’s automation. Editing the request confirmation does not disable that automation. Leaving a manual addition’s confirmation checkbox unchecked does not disable it either.
Choose automation behavior
In the class block or class rule, turn on Waitlist automation and choose the available mode that matches your process:
| Mode | Behavior |
|---|---|
| Notify in queue order | The next eligible person receives an invitation. The configured window lets them complete registration before the queue moves on. |
| Notify everyone | Eligible people in the queue are notified when a place opens. Notification does not guarantee a place for each person. Review the available password-protection and template settings. |
| Automatically register the next person | For compatible class blocks, uses dates and add-ons retained with the request and creates an enrollment with an invoice, even when the total is zero. If required information is missing, the person receives an invitation to finish registration instead. |
Automatic enrollment is not available in every context. If the option is disabled, choose an available invitation mode and review the block and form type.
For password-protected invitations, set Registration window per participant or Waitlist registration window, depending on the mode. For example, a 48-hour window gives the recipient that time to claim the place. Choose the Communication template and check its content and channels. Do not assume both email and SMS will be sent without checking configuration and available contact details.
Ignore the class registration closing date lets a person with a valid password-protected waitlist offer register after the class registration closing date, until the offer expires. Other restrictions still apply. This does not permit invitations for an already ended course or occurrence. It is distinct from other block options for ignoring a registration period.
Save the rule and block after making changes.
When is the queue checked?
For an active class with automation configured, availability may be checked following:
- removal of an enrolled participant, releasing an actual class place;
- addition to the waitlist while space is available;
- Trigger automations in the class queue.
Automation checks availability before sending an invitation. If you increase class capacity, open its queue and click Trigger automations to start the check. Declining an offer or removing a request for an active course can also move the queue forward.
Refresh reloads data. Trigger automations starts processing that can send communications or enroll a person, depending on the selected mode. These are different actions.
Clean up old waitlists without availability invitations
In the module, use Expired → Expired — course ended for past sessions, or check requests under Deleted or missing courses to identify deleted courses.
Removing and archiving requests for an ended or deleted course does not send email or SMS availability invitations to the other people waiting. Previously scheduled invitations for those courses are also blocked when they execute. The module’s removal action does not send the archived person a removal notification either.
However, Invitation expired for a still-active course can be followed by another invitation. Check the course or occurrence end, not only the offer’s expiration. Course not found is not necessarily confirmed deletion.
Archiving a request does not remove a confirmed class enrollment. The module guide explains filters, page-based selection, individual removal and bulk archival.
Check your configuration
- Test a full class and confirm its waitlist button appears.
- If using Force waitlist, confirm it also appears when space remains.
- Open the window and check account-owner details, participant details and additional questions.
- If submitting a test request, use contact details you control and check confirmation and automation settings first.
- Find the request under Classes → Waitlist, filter its source form and class, then open its details.
- For a check without sending anything, review settings and details without submitting requests or clicking Trigger automations.
Troubleshooting
| Problem | What to check |
|---|---|
| The button does not appear. | Correct question/rule, waitlist enabled, class full or waitlist forced, waitlist capacity not reached, visibility and eligibility conditions. |
| Only some classes in a Multiple classes block offer a waitlist. | Rule scope and order; check the last matching rule for each class. |
| No invitation is sent. | Automation enabled for the correct class, available place, dates not ended, queue status, template and contact details. Review queue logs if there is an error. |
| Added class capacity is not offered. | Review the settings, open its queue and use Trigger automations. |
| New questions do not appear for customers. | Correct common form and organization’s customized-window mode. Test from the original registration form. |
| Customers confuse confirmation with enrollment. | State clearly in the receipt template that the request is waiting; use enrollment confirmation for the appropriate registration workflow. |