Activity Messenger Help Center
Building a list of recipients from an Excel or CSV uploaded file
Import an Excel or CSV file when your contacts, registrations or memberships are managed outside Activity Messenger. Map the columns carefully: the data you import determines who you can reach and which details you can personalize.
- To import contacts from your previous system (i.e. Mailchimp or Constant Contact) and run a marketing campaign.
- To import camp or class registrations from another system (i.e. iClassPro, Active Network or Amilia) and message them about their class, ask them to fill in a waiver or to send them a survey at the end of the session.
- To import members and expiration dates from another system (i.e. iClassPro or Amilia) to send them renewal reminders or to upsell them.
CSV stands for Comma Separated Values. It is a text format often used with tabular data and is supported by all major applications like Excel.
To build your own Excel or CSV, you can use one of these samples:
Consider each Uploaded Excel/CSV list to be a unique customer database. You can create different lists for different purposes (i.e. Winter session participants vs Summer session participants).
To get started, click on the Lists menu and choose Create a new list.

Give it a name and choose Upload as the type. You will then land on the Upload list page.
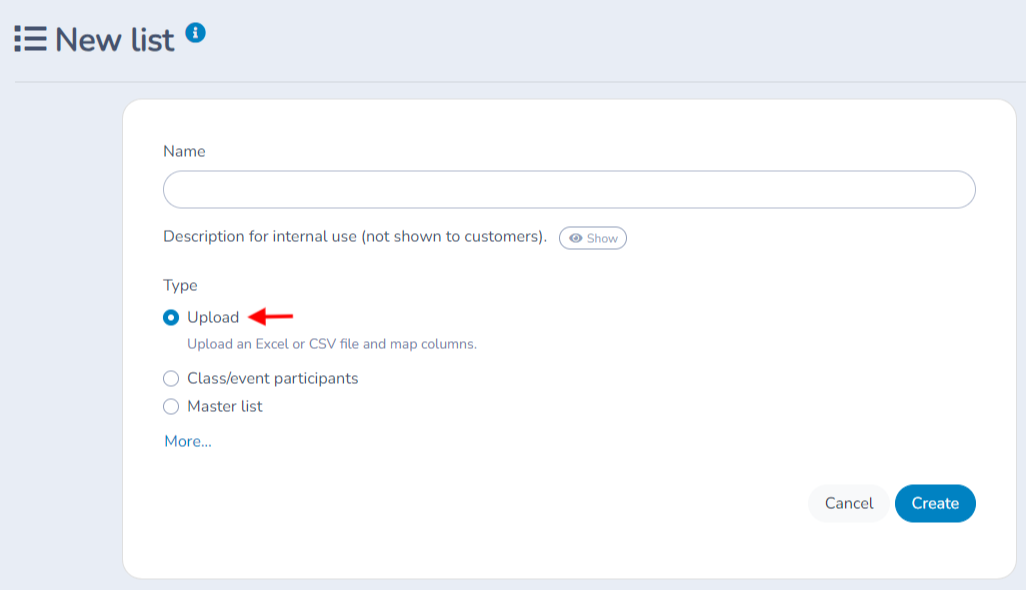
Click on the Create button (bottom righthand corner of the page) and you can then import recipients from an Excel or CSV file by clicking on Import.
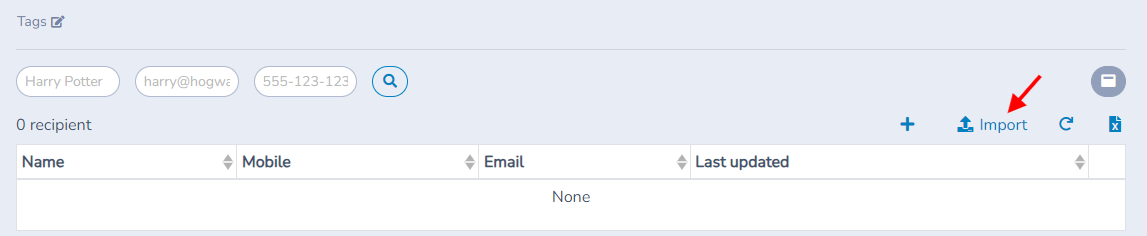
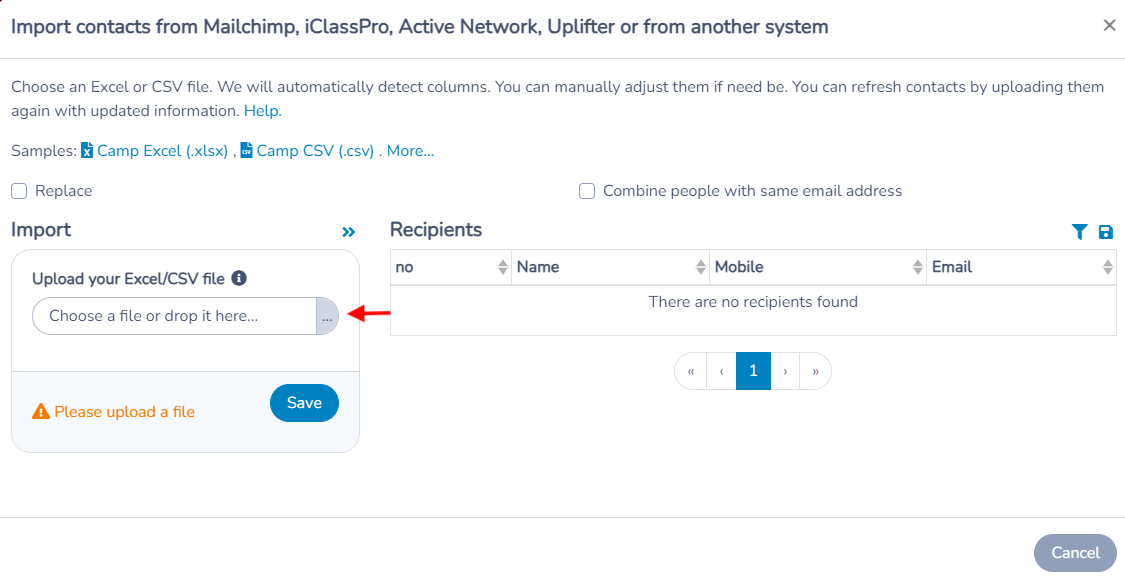
Upload an Excel/CSV file
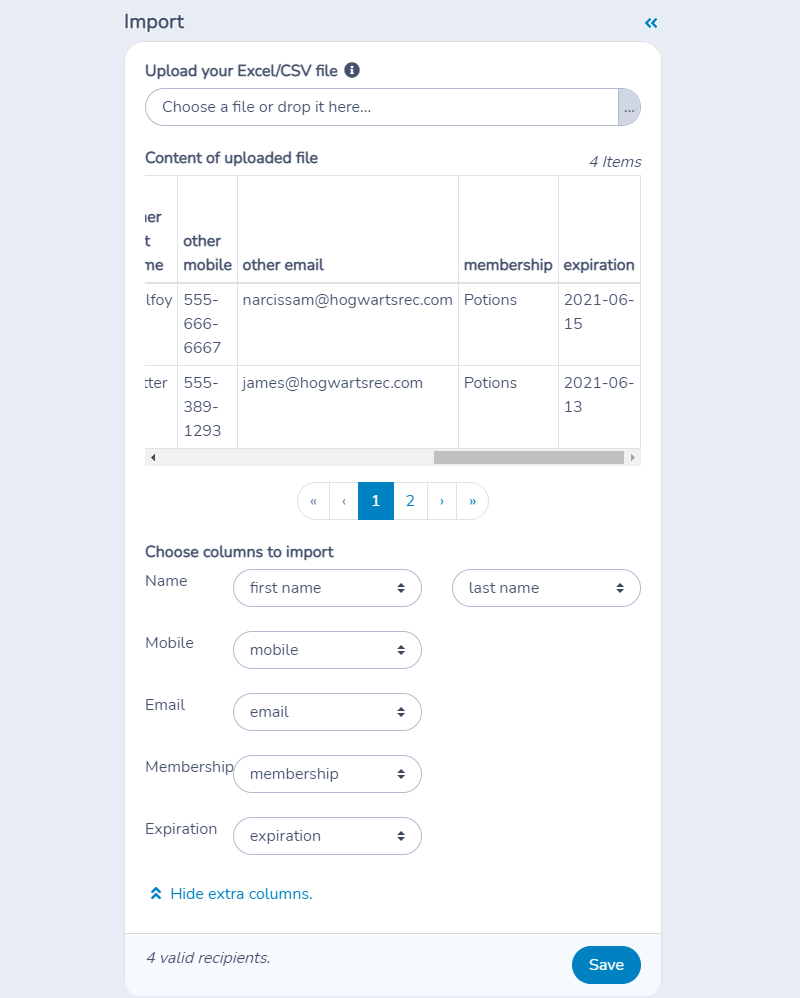
Click on Upload your Excel/CSV file. Activity Messenger will let you choose the columns to import. The minimum column to import is the email address. It is recommended that you also import the name and mobile phone numbers. The mobile column will allow you to send text messages to those recipients as well as emails.
Click on Save to import recipients. Activity Messenger will add them to the list of recipients.
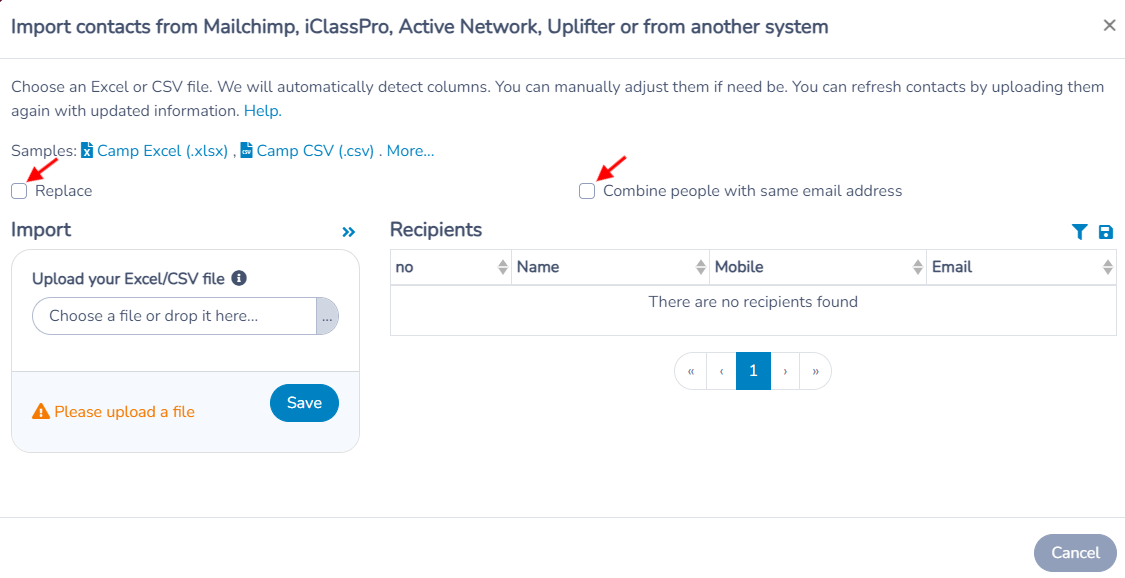
You can also choose to replace an existing list and merge recipients with the same address.
Columns
The first row of your Excel/CSV file must be the column header. Each column header should be separated by a comma. Activity Messenger will import supported columns. Other columns may be specified but will be ignored.
Columns are all optional. You should at least have either mobile or email. Column name is useful for you to identify who the person is.
Note that you may use a mix of upper or lower case. For example "name", "Name" or "NAME" are equivalent.
- Recipient name*: Name of the recipient. For children, this is the account owner or the primary guardian.
- Email*: Email of the recipient. For children, this is the account owner or primary guardian.
- Mobile*: Mobile number of the recipient. For children, this is the account owner or primary guardian.
- Other name: Name of the second parent or guardian. Used when importing children.
- Other email: Email of the second parent or guardian. Used when importing children.
- Other mobile: Mobile number of the second parent or guardian. Used when importing children.
- Contact name: Name of the first emergency contact. Used when importing children.
- Contact email: Email of the first emergency contact. Used when importing children.
- Contact mobile: Mobile number of the first emergency contact. Used when importing children.
- Contact 2 name: Name of the second emergency contact. Used when importing children.
- Contact 2 email: Email of the second emergency contact. Used when importing children.
- Contact 2 mobile: Mobile number of the second emergency contact. Used when importing children.
- Child name: Name of the child. Used when importing children.
- Child gender: Gender of the child. Used when importing children.
- Child date of birth: Date of birth of the child. Used when importing children. Useful to automate happy birthday wishes sent by email or text message.
- Custom: Custom value. Useful to import your own information. You can filter on this value after import.
- Activity: Name of the activity or class. Useful to import class attendance.
- Activity date**: Start date of the activity. Useful to import class registrations.
- Activity time**: Start time of the activity. Useful to import class registrations.
- Activity location: Location of the activity. Useful to import class registrations.
- Activity staff: Staff or instructor of the activity. Useful to import class registrations.
- Day # or Week #**: Occurrence dates of the activity/class. For example you can import 5 days of the week with columns Day 1, Day 2, Day 3 and Day 4. The cell values should be the date and time of each activity/class. Useful to import class attendance.
- Group name
- Allergies: Any allergies (i.e. peanuts).
- Medical conditions: Any medical conditions (i.e. asthma).
- Pickup authorized: Person authorized to pickup the child.
- Allow sunscreen: Authorized to apply sunscreen. Yes or no.
- Allow photo: Authorized to take photos. Yes or no.
- Allow leave: Authorized to leave alone. Yes or no.
- Can swim: Child can swim. Yes or no.
- Life vest: Requires a life vest to swim. Yes or no.
- Daycare: Space separated keywords for day care. For example "am pm" says the child has daycare before and after camp.
- Pickup password: Password to release custody of the child.
- Friend: Pairing with a Friend.
- Membership: Name of the membership.
- Expiration: Expiration date of the membership. Useful to build a list of renewals.
* Name and either Email or Mobile are required. All other fields are optional.
** Supported date and time formats are international format "YYYY-MM-DD hh:mm" or US format "MM/DD/YYYY h:mmA". For example "2021-04-23 17:00" or "04/23/2021 5:00PM".
Once your list is imported, you can search by name, email address, or mobile phone number. If you have imported additional columns (such as activity name/date and custom value), additional filters will be available.
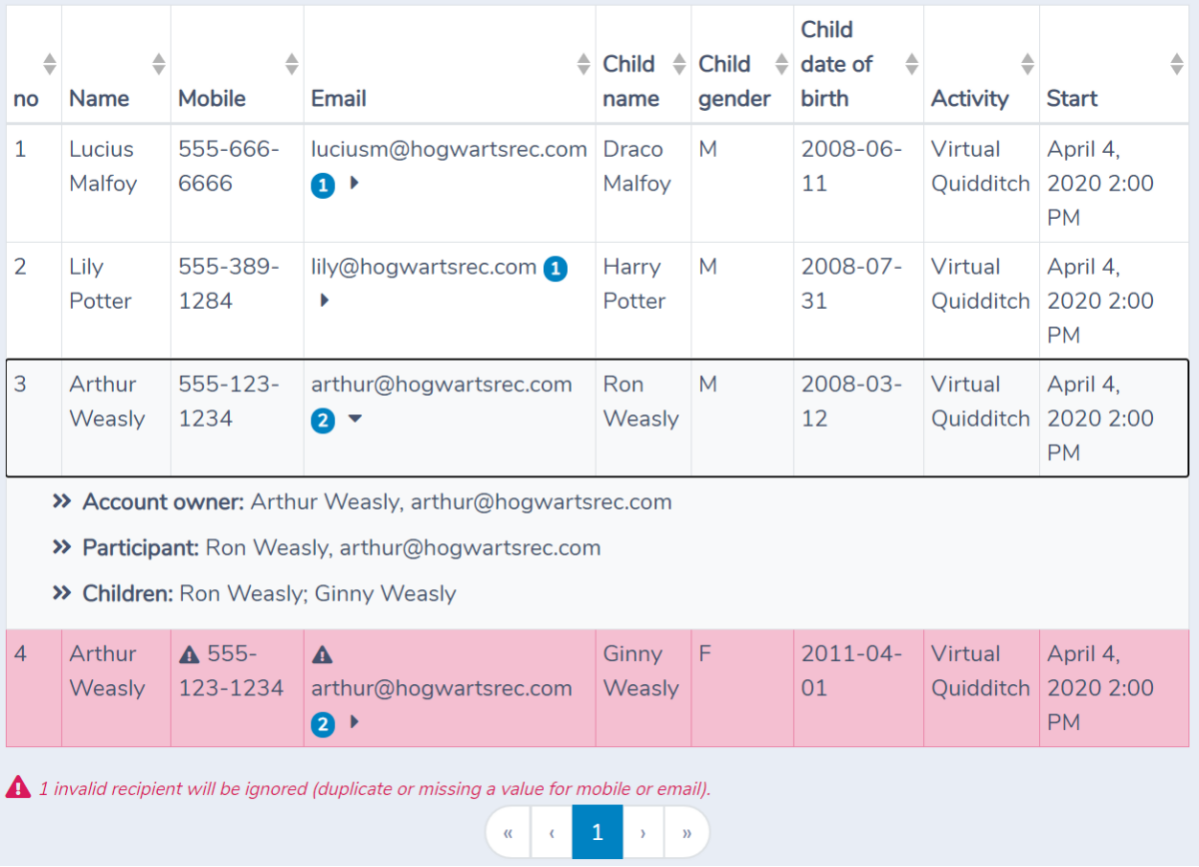
If you import children's information, they will be grouped by family under the parent's name and email address. This way, Activity Messenger will not send the same email multiple times to the same family.
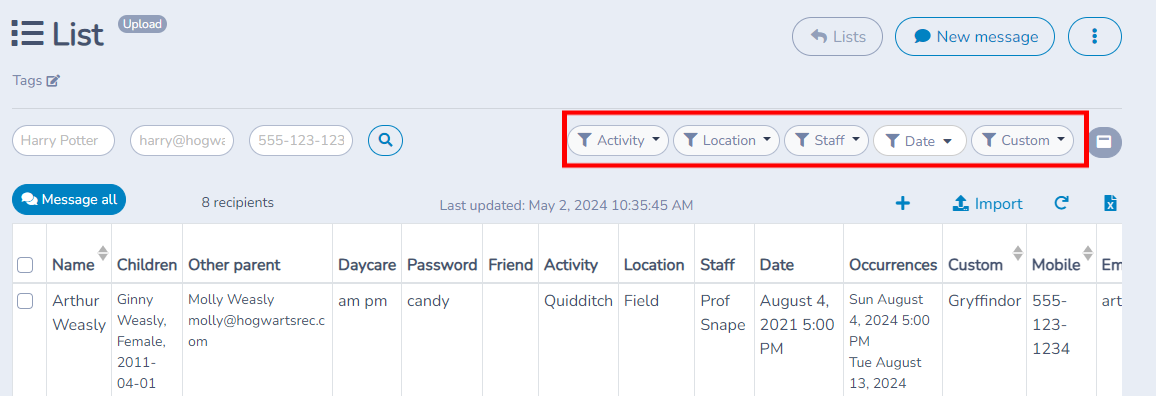
Updating multiple recipients
To update contact information of recipients, click on Import and upload a file again. Activity Messenger uses the email address and the mobile phone number as the keys. Existing recipients will be updated. New recipients will be added. Recipients not in the newly uploaded file will remain.
Replacing all recipients
To replace the entire list of recipients, click on Import and check the Replace option. Activity Messenger will replace all recipients. Activity Messenger uses the email address and the mobile phone number as the keys. Existing recipients will be updated. Recipients not in the newly uploaded file will be removed. New recipients will be added.
Manually adding a recipient
To add one person manually, click the add-recipient button. In the dialog, enter a valid email address, a valid mobile phone number, or both; the name is optional. Which contact method is required depends on the list: email lists require an email address, SMS/mobile lists require a mobile number, and lists that support both can be saved with either a valid email address or a valid mobile number. Save the entry to add the person to the list.
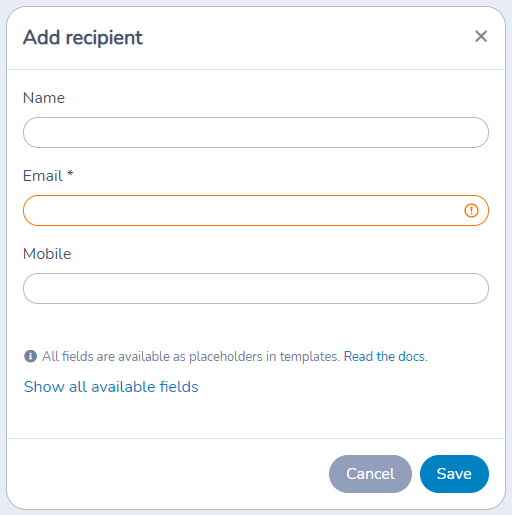
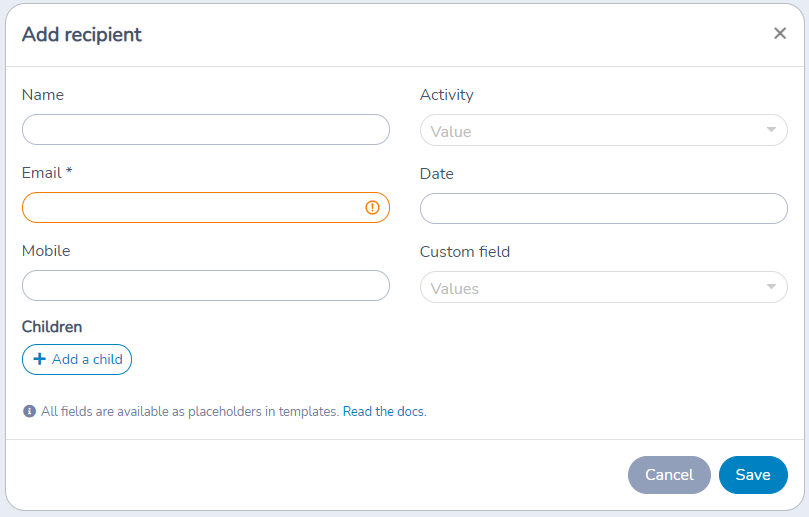
You can add extra fields as well. Click to show them. You will be able to add children, activity and custom values.
Update a recipient
To update a recipient, simply click on a row. You will be able to change their information.
Removing a recipient
To remove a recipient, click on the red trash icon at the end of its row and confirm.
Importing registration information
Your Excel or CSV file can contain columns for registration information. Supported columns are: parent name, parent email, parent mobile, child name, child gender, child date of birth, activity name, activity start date, activity start time and custom. Activity Messenger will attempt to automatically detect those columns. Alternatively you can specify the names of those columns to import.
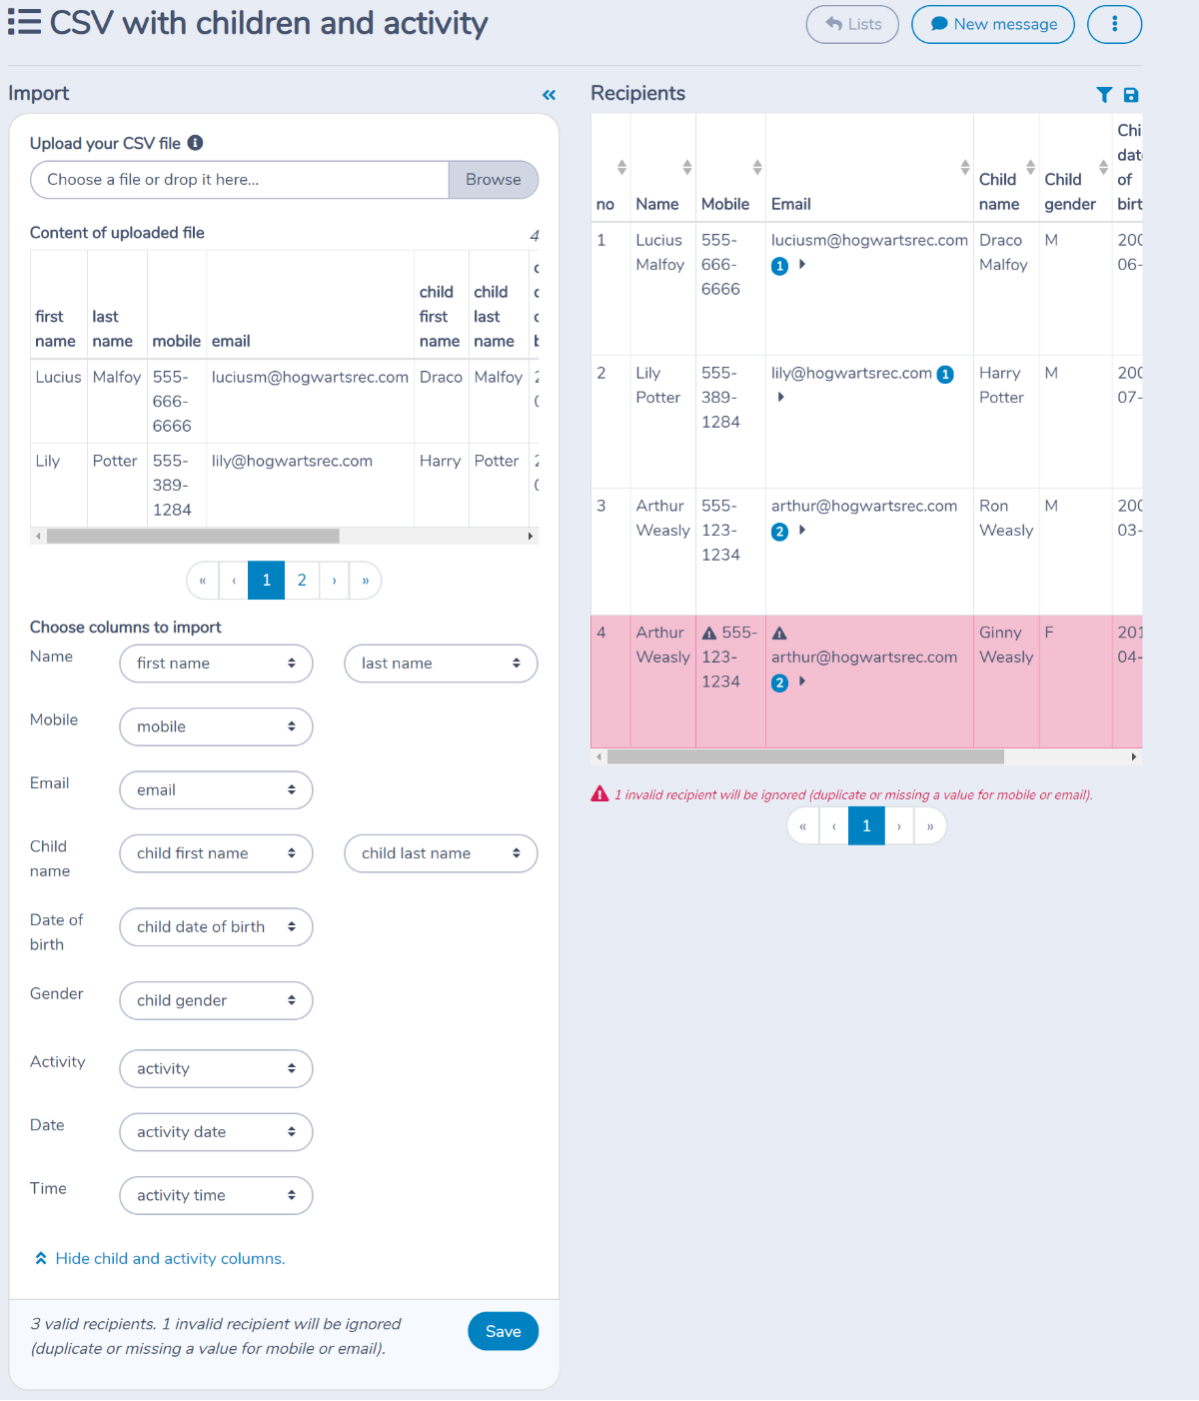
All imported columns become available as placeholders in emails and SMS you send.
Activity Messenger will detect siblings of a same family by looking at the email and child name columns. In such a case two rows with the same email and different children would exist. Activity Messenger will only import one row yet include both children. You can then use the "Children names" placeholder in email or SMS messages.
Importing occurrences (class dates)
If your activity or class contains multiple occurrences, you can import each of those dates as extra columns. If you label them "Week 1", "Week 2", etc, Activity Messenger will automatically detect them. You can pick the columns too.
The values should be the date for each week. Leave a blank if a participant is not registered for a certain day. Once imported, you can even use them in template placeholders to inform recipients of the dates of their class.

Rows
Subsequent rows are considered to be recipients. There should only be one person per row. Values should also respect the column order you have specified in the column header. If you are missing a value, simply put in a space or no value at all.
Importing members with expiration dates
Your Excel or CSV file can contain columns for membership and subscription information. Supported columns are: parent name, parent email, parent mobile, child name, child gender, child date of birth, membership, expiration and custom. Activity Messenger will attempt to automatically detect those columns. Alternatively you can specify the names of those columns to import.
Parsing phone numbers and email addresses
Activity Messenger will parse emails and phone numbers removing white spaces and formatting phone numbers. Activity Messenger will also validate emails and phone numbers. Invalid emails or phone numbers will be highlighted in red. When neither a valid phone number or a valid email is found, the entire row will be shaded in blue, and a message below the table gives the number of rows that will be ignored. Activity Messenger will not import those rows.
Sending a message
From here, you can click on the New Message button to send an SMS and/or email to the list of recipients you have imported.
Settings reference
The import window opens from Import on the list page. Settings in the first part of the table are in that window; the others are on the list itself.
| Setting | Where | Default | Effect |
|---|---|---|---|
| Type: Upload | Lists › New list | None selected | Creates a list you fill from an Excel or CSV file. |
| Upload your Excel/CSV file | Lists › list › Import | No file | Accepts .csv, .txt, .xls and .xlsx files. For a CSV, use "CSV UTF-8 (.csv)" or "Unicode Text (.txt)" to keep accents. |
| Replace | Lists › list › Import | Off | Adds new recipients and updates existing ones. Recipients not in the new file are deleted. |
| Combine people with same email address | Lists › list › Import | Off | Combines family members who share an email address to avoid sending duplicate emails. A row that repeats both an email address and a mobile number already in the file is not imported. |
| Create client accounts | Lists › list › Import | Off | Creates a client account for each recipient, and the client can log in to it. |
| Recipient name (First name, Last name) | Lists › list › Import › Choose columns to import | Detected from your column headers when they match | Picks the file columns that hold the recipient's name. For children, this is the account owner or primary guardian. |
| Mobile | Lists › list › Import › Choose columns to import | Detected from your column headers when they match | The column for mobile numbers. A number is valid with 10 digits (a leading 1 is ignored) and is formatted automatically. |
| Lists › list › Import › Choose columns to import | Detected from your column headers when they match | The column for email addresses. Invalid addresses are highlighted. | |
| Company | Lists › list › Import › Choose columns to import | Detected from your column headers when they match | The column for the recipient's company. |
| Tags | Lists › list › Import › Choose columns to import | Detected from your column headers when they match | Creates the tags and attaches them to the corresponding clients. |
| Import extra columns / Hide extra columns | Lists › list › Import | Hidden | Shows or hides more columns to map, such as child, second parent, emergency contacts, activity, health and pickup details, membership, expiration and a custom value. |
| Import subscription column? | Lists › list › Import | Off | Lets you select a column that says whether each recipient is subscribed or unsubscribed. Recipients marked Unsubscribed or Inactive are added to the Unsubscribed list and flagged for exclusion from marketing communications. |
| Save | Lists › list › Import | Disabled until a file is loaded | Imports the valid recipients into the list. |
| Filter: All, Valid, Invalid, Warnings | Lists › list › Import, recipients preview | All | Shows only the rows in that state before you save. |
| Download CSV file / Copy as CSV | Lists › list › Import, recipients preview | None | Saves the previewed recipients to a CSV file, or copies them as CSV text to paste in Excel or another application. |
| Add | Lists › list | None | Adds one recipient by hand. Only the email address is required. Show all available fields reveals the children, activity and custom fields. |
| Recipient row | Lists › list | None | Click a row to change that recipient's information. |
| Remove (trash icon on a row) | Lists › list | None | Removes the recipient from the list after you confirm. |
| Archive selected / Archive all | Lists › list, trash menu | None | Archives the selected recipients or every recipient of the list. Choose Status: Archived to review them and Restore selected to bring them back. |
| Status | Lists › list | Active | Switches between Active and Archived recipients. |
Common questions
What is the minimum a file needs? A row is imported when it has a valid email address or a valid mobile number; the recipient's name is recommended so you can recognize people. With only an email you can send emails; add a mobile column to send texts too. A row with neither a valid email nor a valid mobile number is ignored. See Columns and Parsing phone numbers and email addresses.
Why is my mobile number marked invalid? The importer accepts 10-digit mobile numbers and ignores a leading 1. Other formats, including numbers with a different number of digits, are flagged as invalid. An invalid mobile number does not block the row if the email address is valid. See Parsing phone numbers and email addresses.
How do I update a list without losing anyone? Click Import and upload the new file with Replace off. Existing recipients are updated, new ones are added and recipients missing from the file stay. Turn Replace on only when you want recipients absent from the file to be deleted. See Updating multiple recipients and Replacing all recipients.
Does the list stay connected to my spreadsheet? No. Each import is a one-time copy of the file, so later changes in your spreadsheet do not reach the list until you import it again. Treat each uploaded list as its own customer database, as described at the top of this guide.
Why do accented letters look wrong after the import? Your CSV was probably not saved as UTF-8. Save it as "CSV UTF-8 (.csv)" or "Unicode Text (.txt)", or upload an Excel file, then import again. See the note on file formats in the Upload an Excel/CSV file section.
Can I bring in people who already unsubscribed in my old system? Yes. Turn on Import subscription column? and select the column that holds each person's status. Recipients marked Unsubscribed, Inactive, No, False or 0 are added to the Unsubscribed list so they are excluded from marketing communications. See Migrating from Mailchimp or Constant Contact.
Does importing create client accounts for these people? Not unless you check Create client accounts in the import window, which is off by default. Without it, the people are recipients of the list only. See Understand clients, forms and recipient lists.