Activity Messenger Help Center
Selling classes and events
Sell classes and events through a form that includes the relevant Class/Event selection. The class record holds its schedule and capacity; the form’s Class/Event question selects which class or events to offer and sets the registration options. Adding 2027 dates to an individual class does not by itself confirm that those dates are included in the form. Before reusing a form, check its Class/Event selection and any date-range or booking-window settings, then preview it with Visit or fill. Create a separate form if you want a different registration experience or a separate checkout.
The Class/Event question allows you to capture registration to a class, a summer camp or any activity with a schedule. For example for 3 tennis lessons taking place at 6PM on Sept 6, 7 and 8. An Attendance list will be automatically created for the class. To sell a camp add-on, such as a bus or a meal, as its own class registration and capacity, see Link camp add-ons to class attendance and capacity.
Find and edit an existing registration form
- In the administrator dashboard, open Forms and select your class registration form.
- Open the Form tab. This is where you edit the form's questions and content.
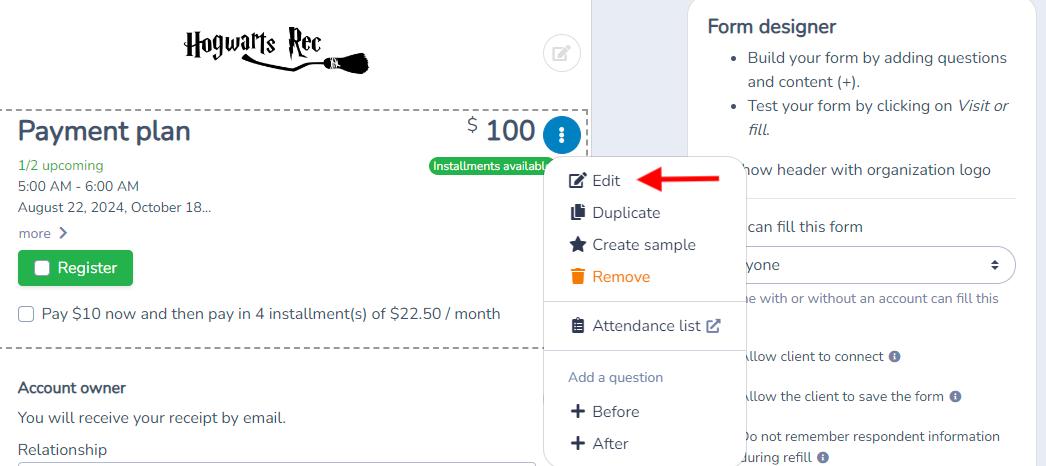
- Find the Class/Event question (it displays the selected class), open its three-dot menu, and choose Edit.
- Under Participant rules, enable Different participant when the person attending is different from the respondent or account owner, such as a child, colleague, player, teammate, or guest.
- By default, each person is saved as an account member. Enable Save as an occasional participant only for an occasional player, teammate or guest. Enable Multiple if one submission should register more than one person, choose the participant information to collect, then save the question.
- Use Visit or fill to check the client-facing form. With multiple participants enabled, the client can use Add participant for each additional person.
Don't see a Design tab? The current form editor calls this tab Form. There is no separate Design tab. The Form designer helper text appears inside the Form tab; it is not another tab to open.
Don't see the Form tab either? Make sure you opened the form in the administrator dashboard, rather than its public Visit or fill page. Ask your organization's administrator to check your form-editing access if the tab is still unavailable.
If several Class/Event questions must share the same participant information, use a separate Participant/member/student question with Multiple enabled instead, and leave Different participant off in the Class/Event questions. See the multiple-participant guidance below for this alternative.
Can I change the colour of the Reserve button?
The form’s button colour setting does not currently control the Reserve or Register control inside a Class/Event or Ticket question. The standard registration control uses a fixed green style. Some layouts have their own fixed styling; this is separate from the form’s button colour setting.
To change the colour of the regular form button, such as the submit button:
- Open your form in the administrator dashboard and select the Form tab.
- Expand Color options in the form editor.
- Change the Button colour.
- Use Visit or fill to check the public form. The submit button can use your chosen colour, while the Class/Event or Ticket registration control keeps its own styling.
For example, selecting blue for the form button does not make the standard green Reserve control blue. This is expected behaviour, not an indication that the colour setting failed to save.
There is currently no normal form setting to recolour this particular Reserve control. Changing it requires a product styling change. You can contact support to request that capability; changing the form’s branding is not a workaround for this control.
Offer full-session and selected-date registration
To offer both full-session registration and registration for selected dates, use two separate forms connected to the same class. Configure the Class/Event question in one form to register for all events. In the other form, allow clients to choose multiple events; this lets them select the dates they want. Share the appropriate form link for each option.
A Class/Event question is configured for one registration rule at a time. Do not add a second question for the same class expecting clients to choose between full-session and selected-date registration in a single form. If everyone may choose either all dates or selected dates within one registration question, use the multiple-event option and explain the choices to clients; the form does not provide a separate full-session-versus-drop-in choice through two questions for the same class.
Create a new form
Go to the top menu and click on Forms, then select Create.
You can start from a template or from scratch by clicking on Create from scratch.
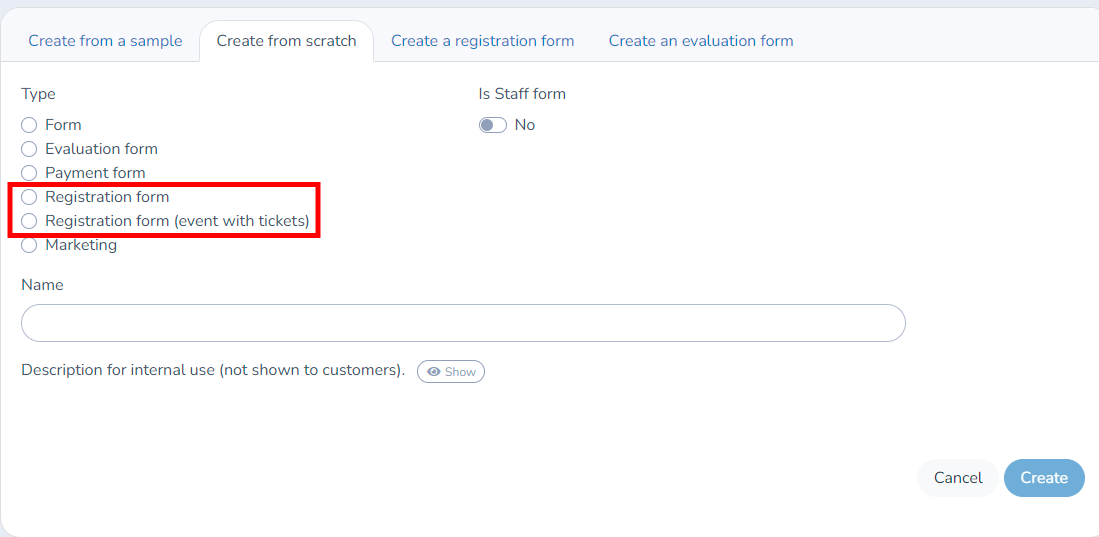
Choose a registration form. You can select a form with or without a ticket.
Open the Form tab, find the Class/Event question, open its three-dot menu, and click Edit.
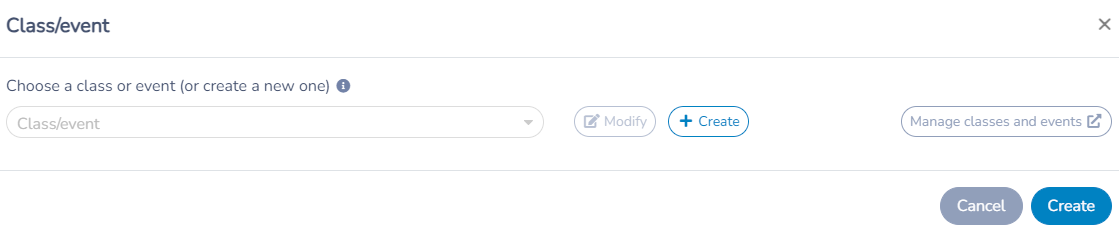
Select the class of your choice. If you don't have any classes in your account, click on Create to add the name, price, number of spots, location, schedule, etc.
After selecting a class, the window will display the class sale settings on the left. On the right, you will have a summary of the question based on the chosen settings.
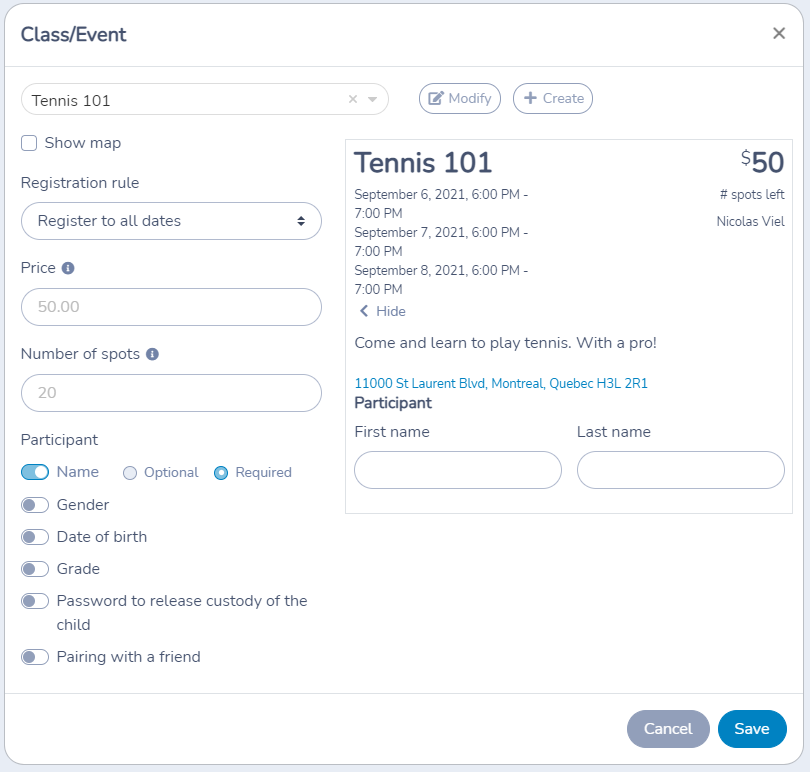
Configure Registration Rules
Registration Options: - Register for all events at a fixed price. - Choose a single event with a price for each date. - Choose multiple events with billing per event.
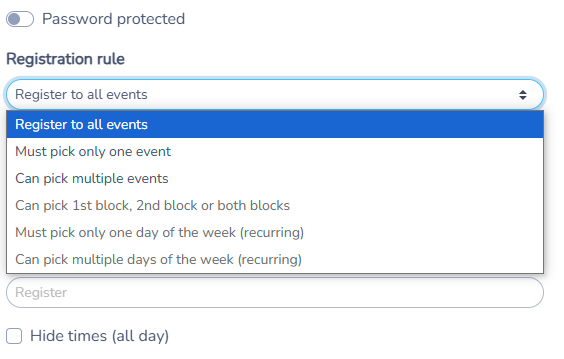
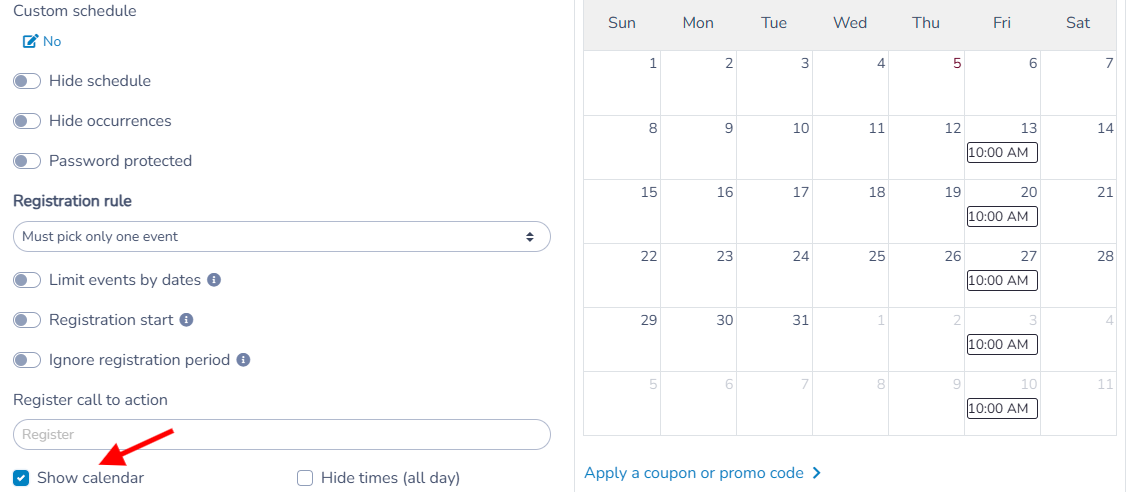
Display Calendar and Day Limit Options: - Show a calendar for multiple events. - Hide daily times if necessary. - Limit the number of future events a customer can register for.
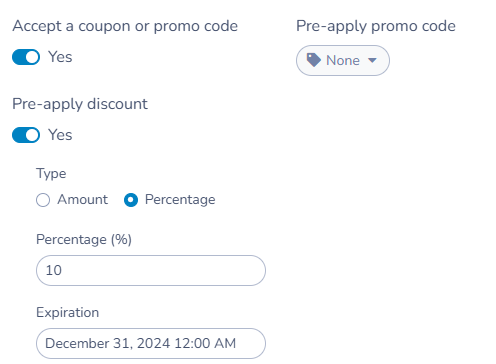
Add Additional Questions and Options
- Include promotional codes, waiting lists, etc.
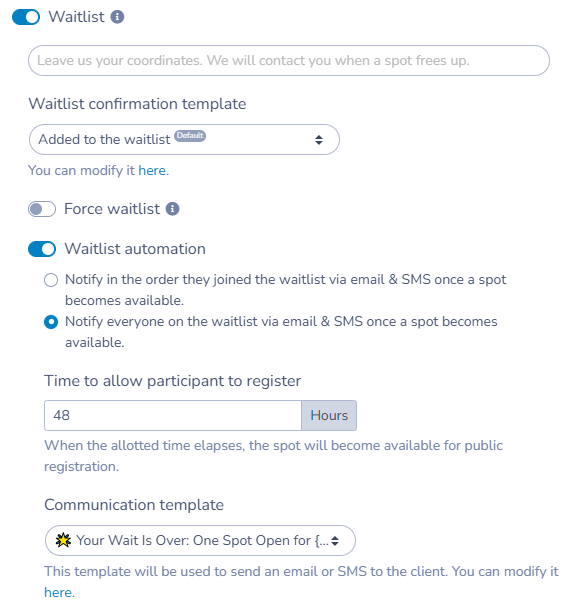
- Integrate waitlists and automate the entire process to simplify management.
- When someone is registering another person, enable Different participant, then enable Multiple if the client can register several people for the same class.
- By default, each participant is saved as an account member permanently linked to the account owner, such as their child. Enable Save as an occasional participant only for someone added for an activity, such as a player, teammate, colleague or guest. An occasional participant must provide an email address and can pay their own portion.
- Customize the heading, description, and add-button text when helpful, then select the information to collect for each participant.
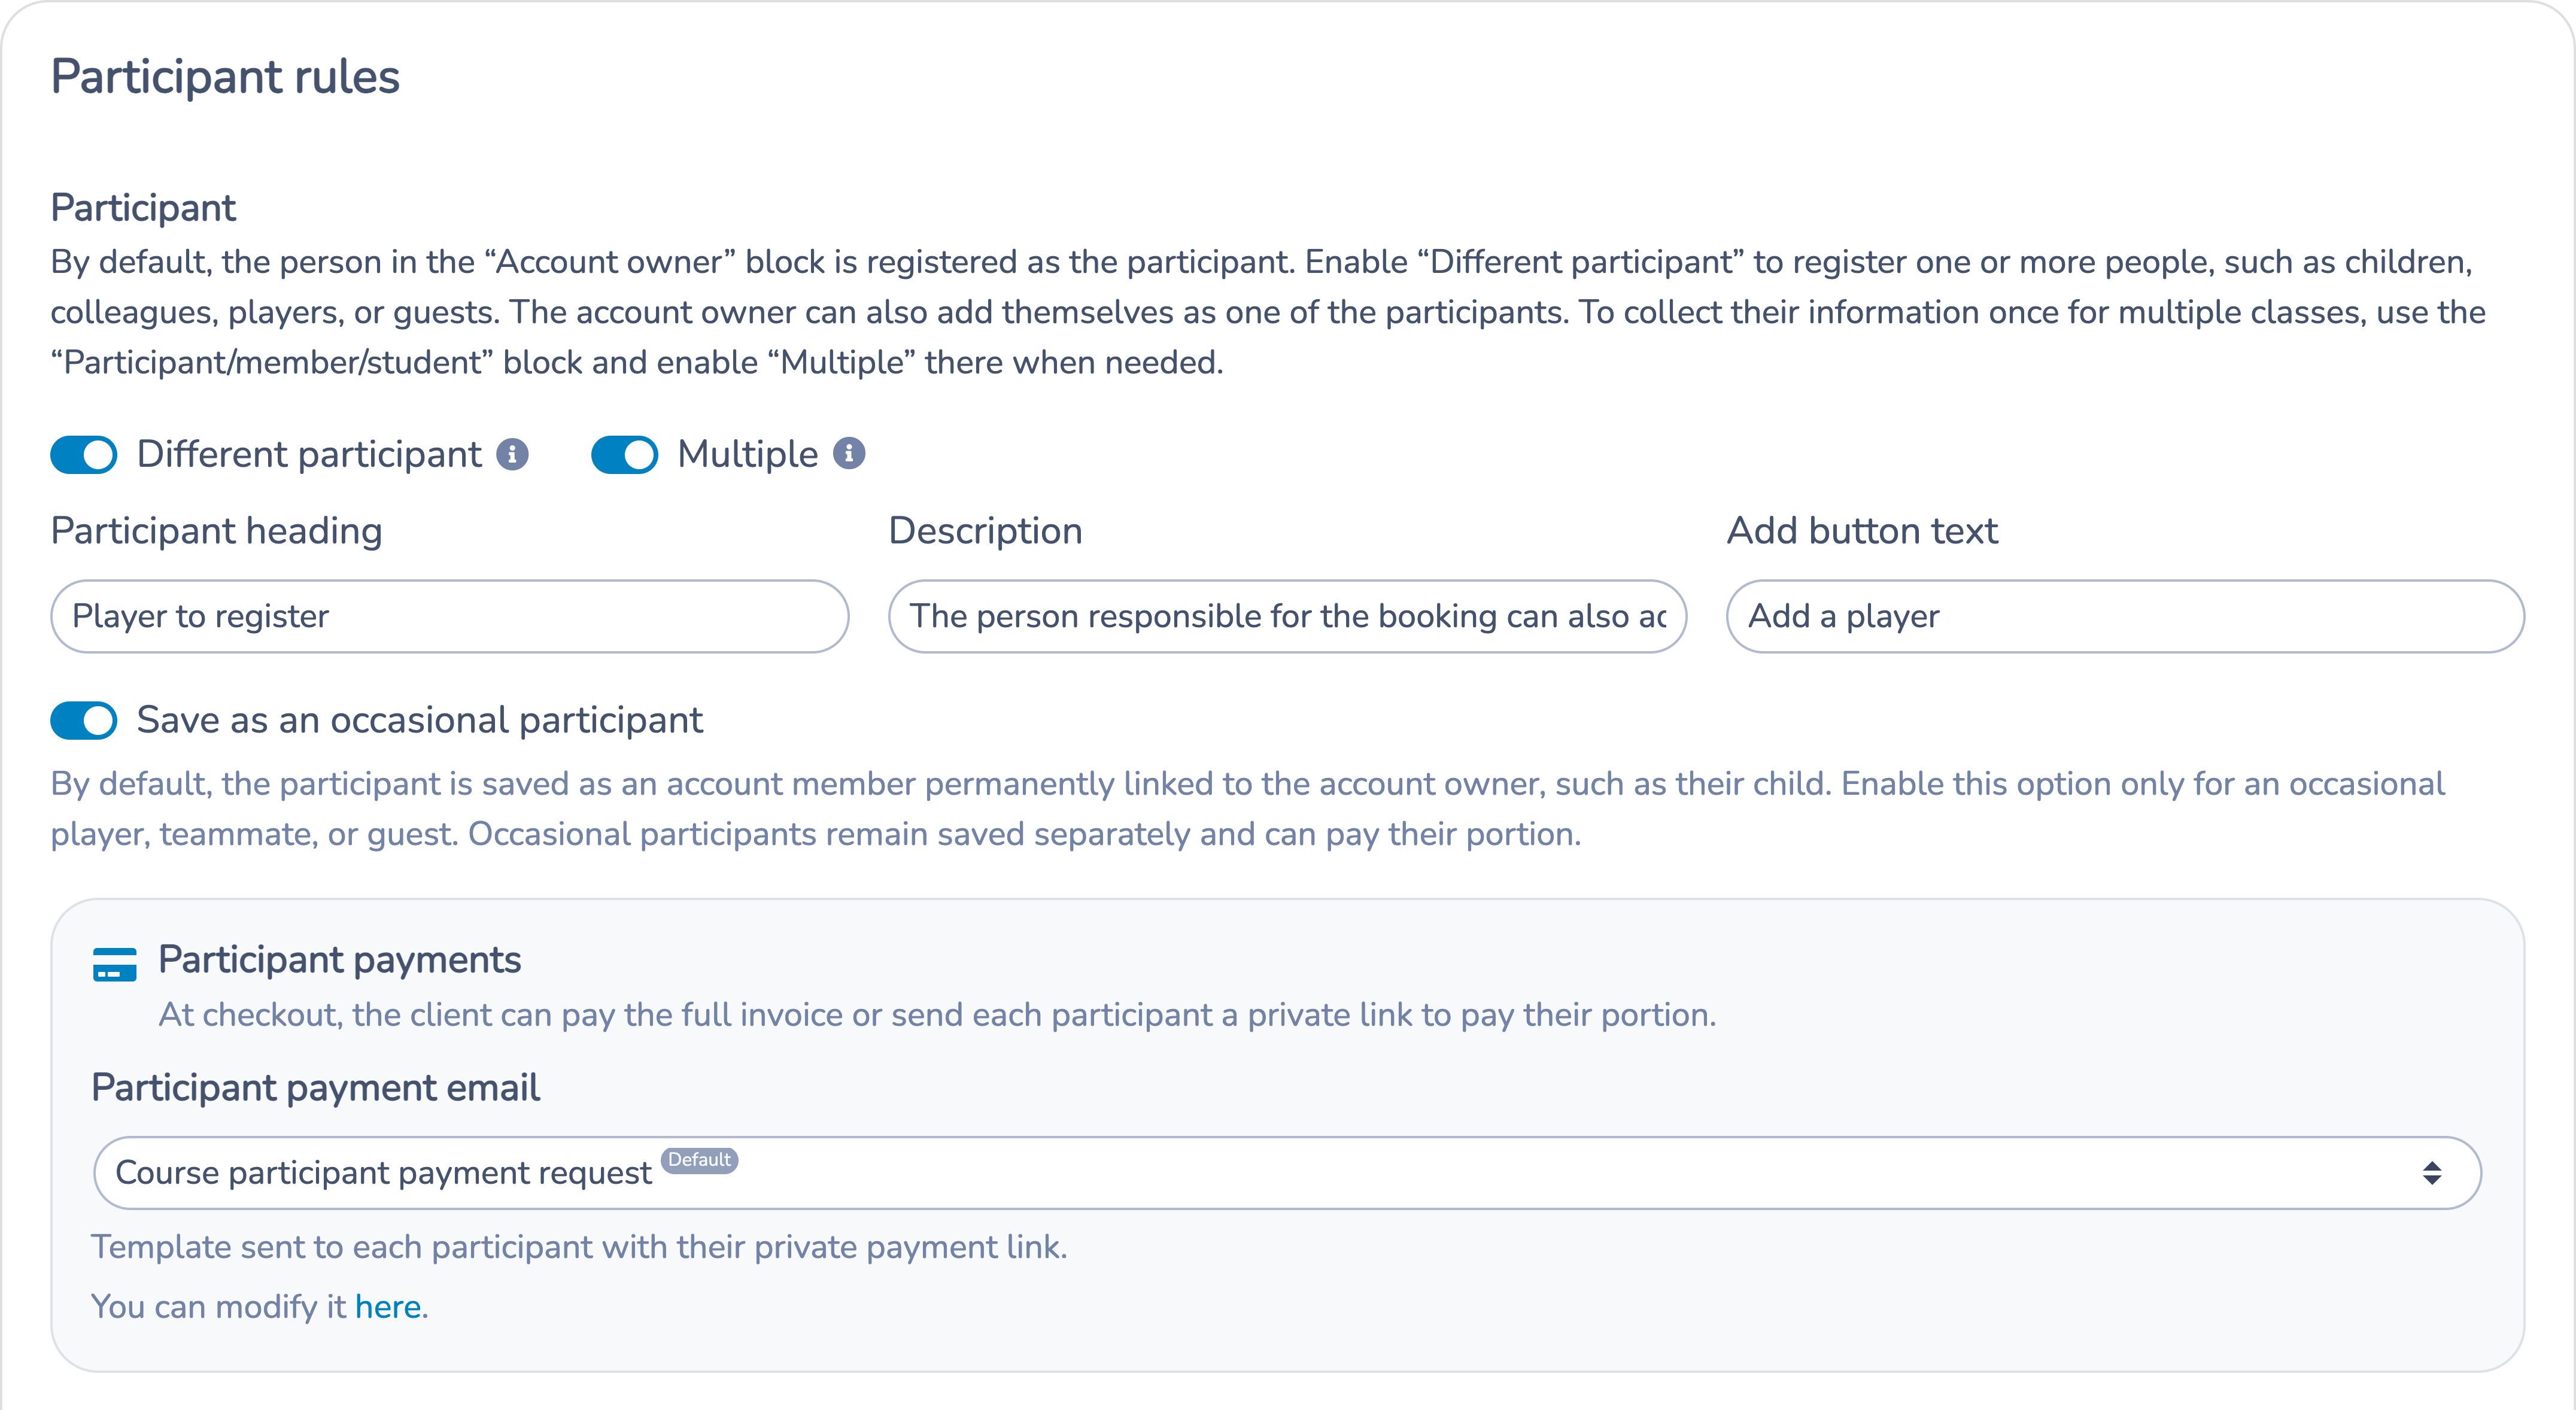
This example enables Save as an occasional participant, which reveals the participant-payment settings. Leave the switch off when the person should be saved as an account member.
Class Sale Settings:
- Sell the class by session or as a package.
- Adjust the sale price. For example, a class sold at $50 per session can be sold at $20 as a package.
- Modify the number of spots available. For example, allow only 5 spots for the package.
- If a location is set, you can display a Google Maps view.
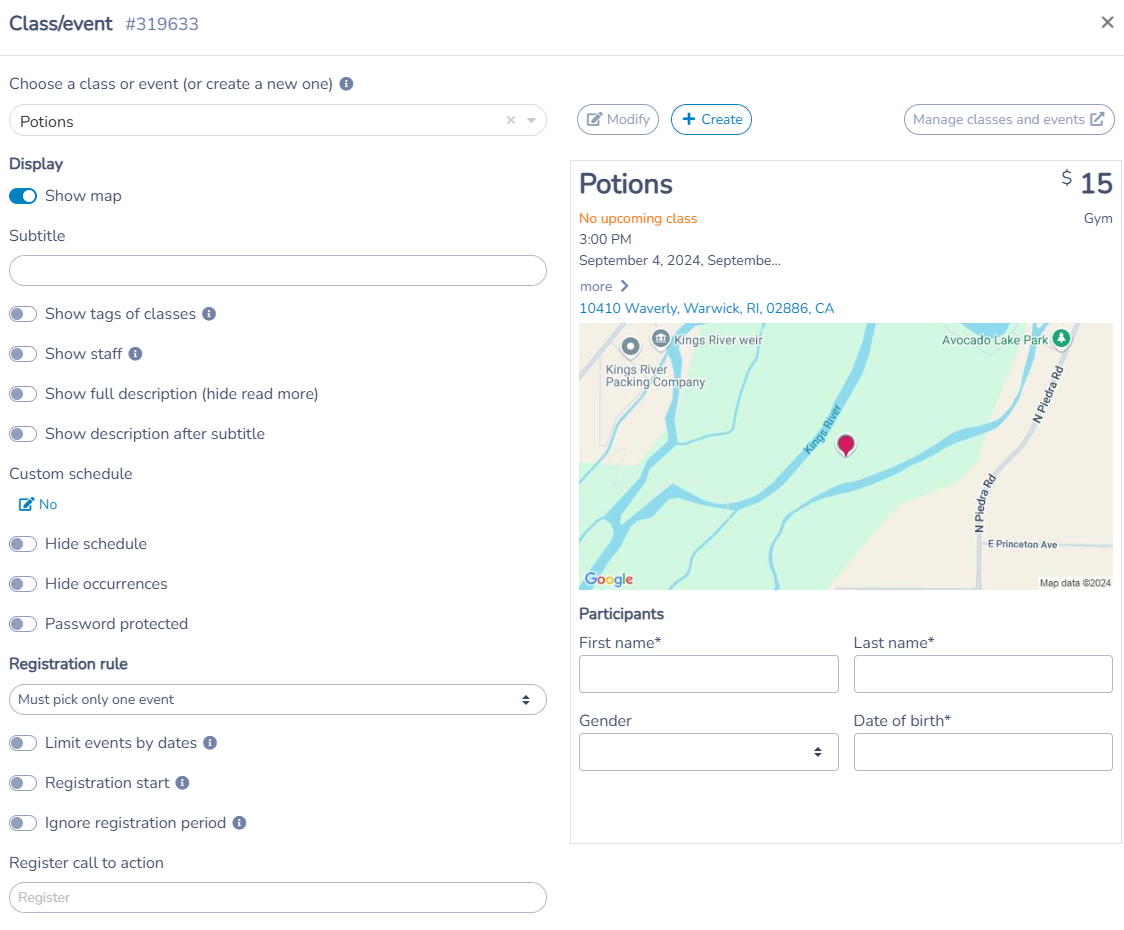
The Class/Event question type also allows you to collect participant information. By default, the participant's name is required. You can make other fields, such as gender and date of birth, mandatory or recommended. A school might ask for the student's grade level, while day camps may require a password for child pickup and information about pairing with a friend. You also have the option to add other types of questions, for example, to gather information about a second parent.
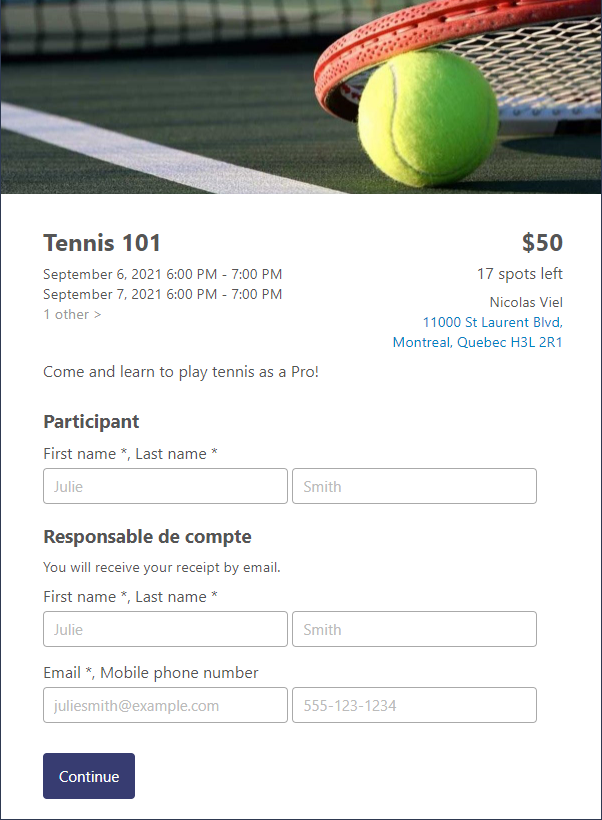
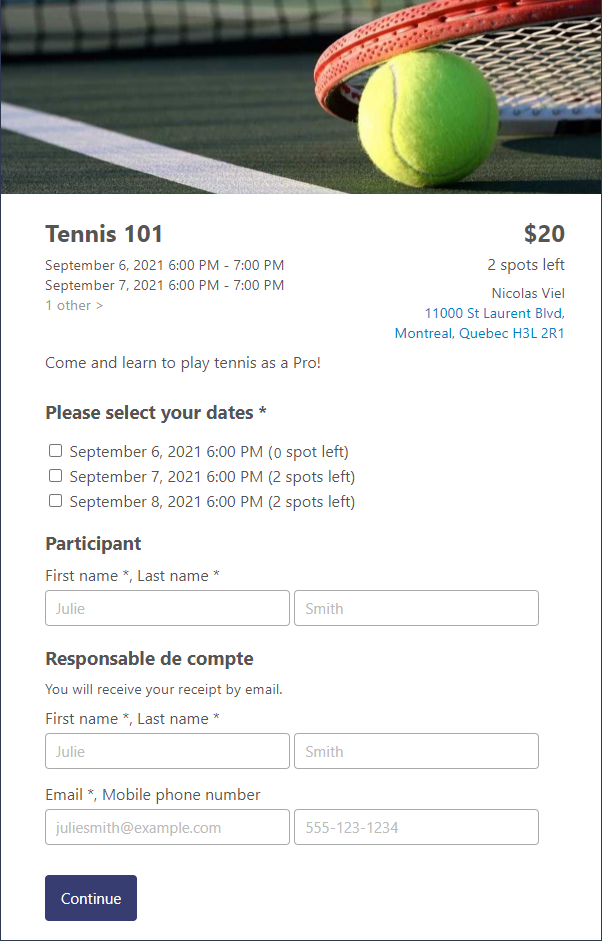
Selling a class either as a session or as drop-ins
Payment forms provide you with great flexibility when selling your classes. You can set up multiple forms for the sale of the same class, each tailored for different contexts. This allows you to customize the registration process, pricing, and options based on your specific needs or target audiences.
For example, a class can be offered as a session while reserving a few spots for registrations. Thus, the same class can appear on two separate forms, each with its own registration rules, while still respecting the class's maximum capacity.
Save and test the form
Save the form once all options have been added.
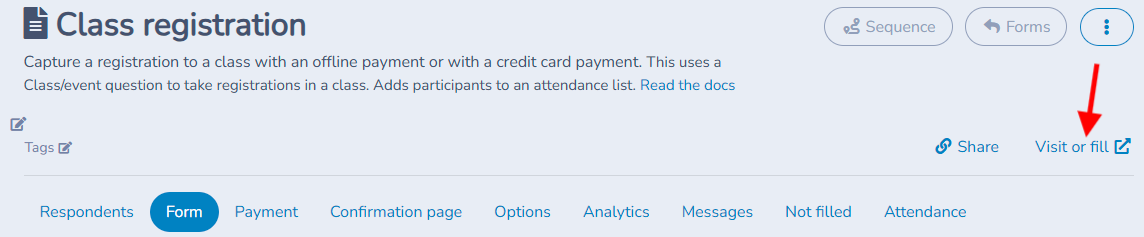
Test the form by clicking on "Visit or Fill."
Configuring payment options
Go to the payment options and log in to Stripe if you haven’t done so already.
Choose the accepted payment methods (online, credit card, gift card, multiple payments, etc.).
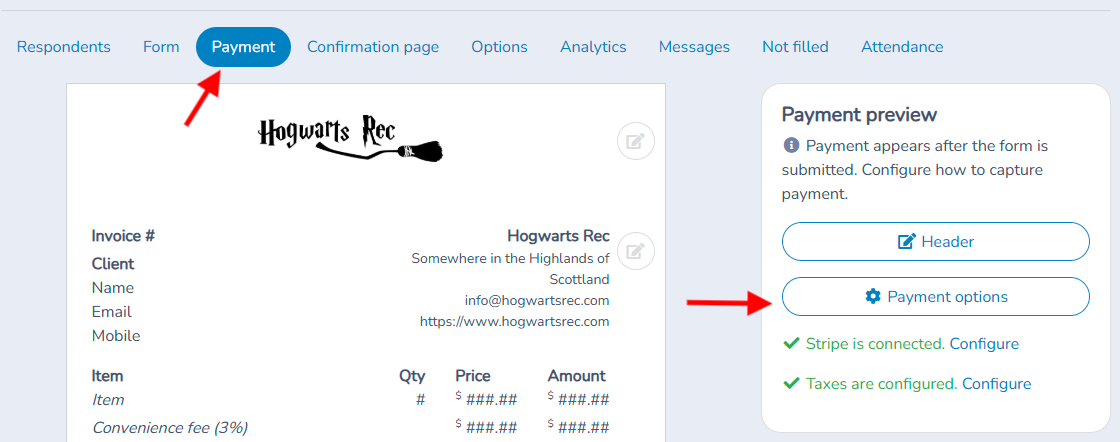
Share the form
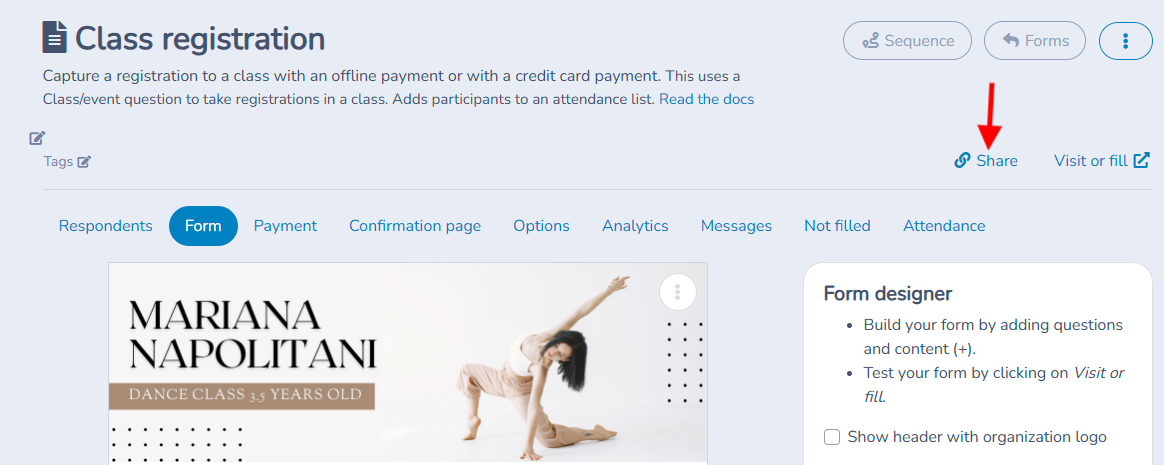
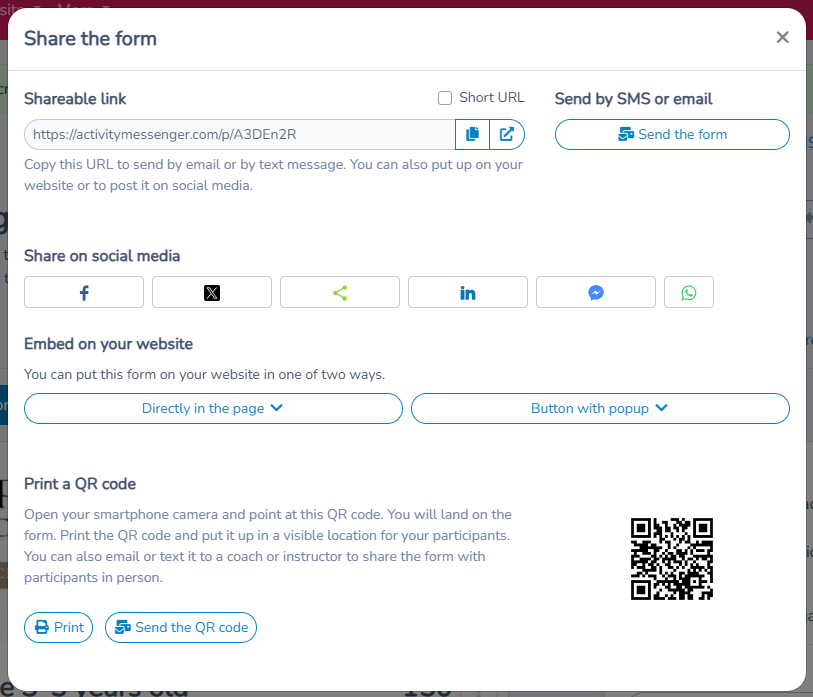
Once the form is created and connected to Stripe, share it via a unique link.
You can integrate the link into a website, use a QR code, or send it via text/SMS.
Configure registration rules and booking windows
Registration rules belong to the Class/Event question in the form. This means the same class can use different rules in different forms. For example, one form can register a participant for a complete five-occurrence session while another form offers one or more drop-in dates.
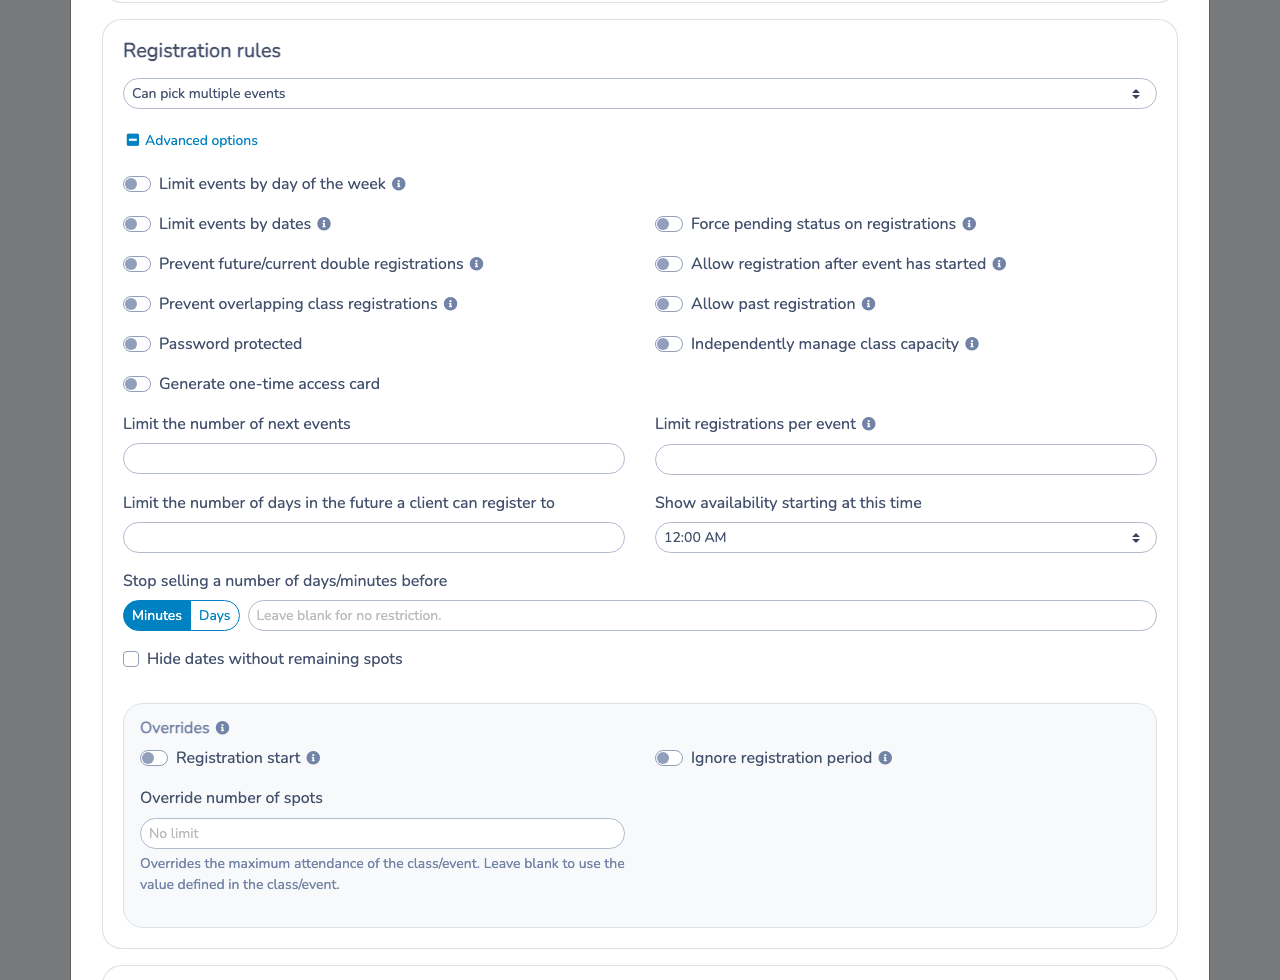
Open the payment form, select the Form tab, edit the Class/Event question, and expand Advanced options under Registration rules. Every option of this question is listed under Class in Form question reference.
Before you begin
- Use a payment form that contains a Class/Event question and a class with more than one scheduled occurrence.
- To sell a complete session and drop-ins separately, add the same class to one Class/Event question in each form. Configure the registration rule independently in each question.
Let clients cancel their own class registration
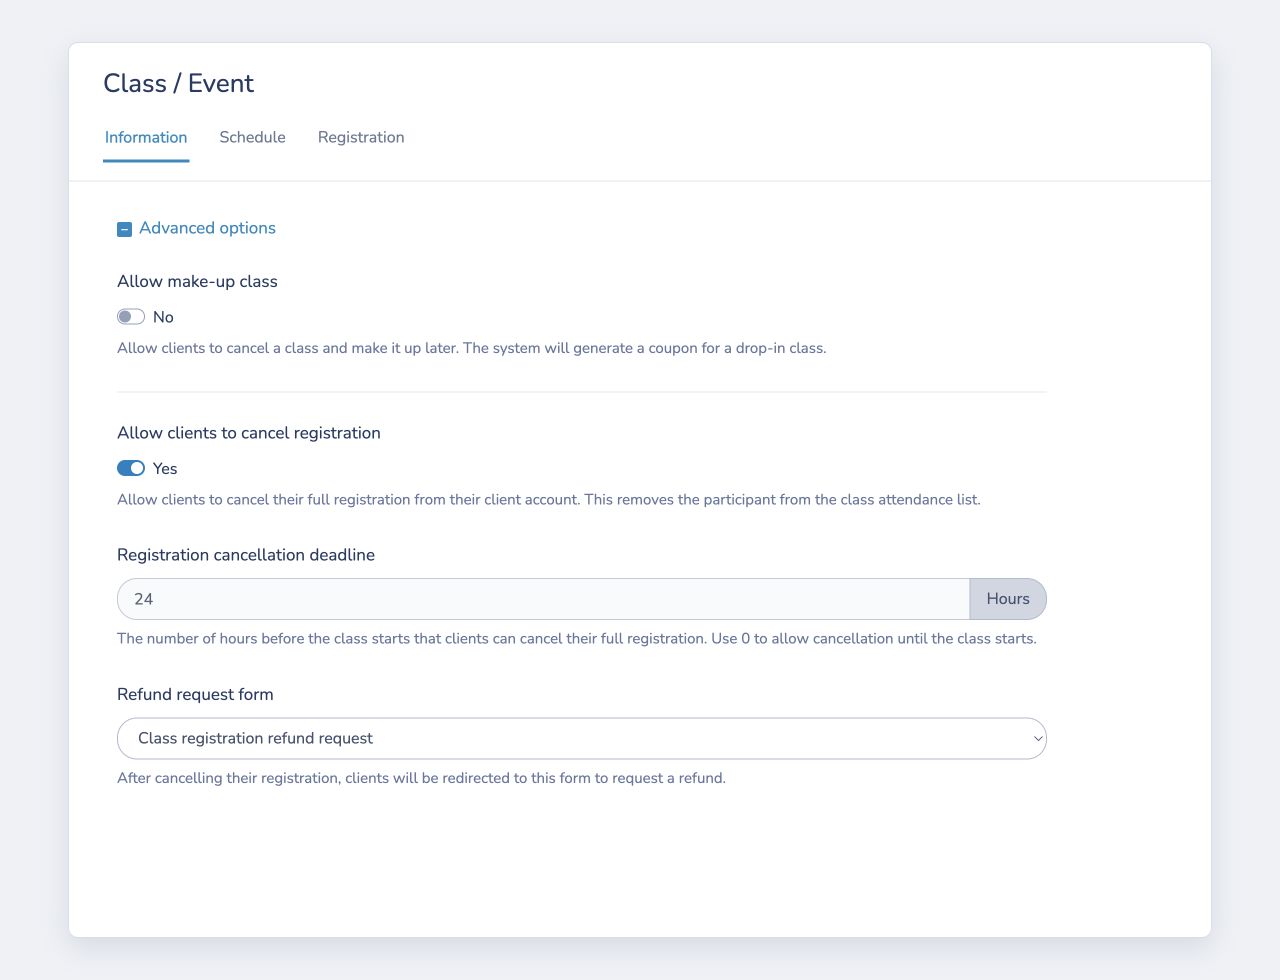
Client self-cancellation is a setting on the class, not an advanced registration rule on the form question. Enable it when a client should be able to cancel an eligible registration from My Account without first contacting an administrator.
- Go to Classes > All classes and events.
- Open the class, select the Information tab, and expand Advanced options.
- Turn on Allow clients to cancel registration.
- Enter the Registration cancellation deadline in hours. Enter
0to allow cancellation until the relevant class starts. - Optional: select a Refund request form. After cancelling, the client is redirected to this form to request a refund.
- Select Save.
The client signs in to My Account, opens Classes/events, finds the registration, opens Action, and selects Cancel registration. The confirmation shows the deadline and explains that no payment refund is issued automatically.
Important behavior:
- For a full-session registration, the deadline is calculated from the participant's next upcoming occurrence. Cancelling removes the participant from the remaining class registration while keeping past attendance.
- For a drop-in registration, the deadline is calculated from the selected occurrence and cancellation applies to that occurrence.
- If there is no upcoming occurrence, or the deadline has passed, the action remains unavailable and tells the client to contact the organization.
- Cancelling an invoiced registration creates the applicable cancellation or credit on the invoice. It does not return money automatically to the original payment method; an administrator must handle any refund separately.
- A selected refund request form collects the client's request after cancellation. It does not issue the refund.
- Allow make-up class is a separate option. It cancels one occurrence and can issue a coupon for a drop-in class; use Allow clients to cancel registration when clients must cancel the registration itself.
For example, to accept cancellations until 24 hours before the next class, enter 24 as the deadline. Select a refund request form if clients should provide a reason or the information your team needs to review a refund.
See Client account for more information about how clients access My Account.
Classify and register multiple participants in one submission
Use the participant settings in the existing Class/Event question. Do not add one Class/Event question for every person.
- Edit the Class/Event question.
- Under Participant rules, enable Different participant. This separates the participant from the respondent or account owner.
- Leave Save as an occasional participant off for a person who should be saved as an account member permanently linked to the account owner, such as their child. Enable it only for someone added for an activity, such as a player, teammate, colleague or guest. The occasional participant is saved separately so they can be selected again without becoming an account member.
- Enable Multiple directly beside Different participant when the client can register several people.
- Customize the participant title, description, and add-button text when helpful, choose the participant fields to collect, then save the question.
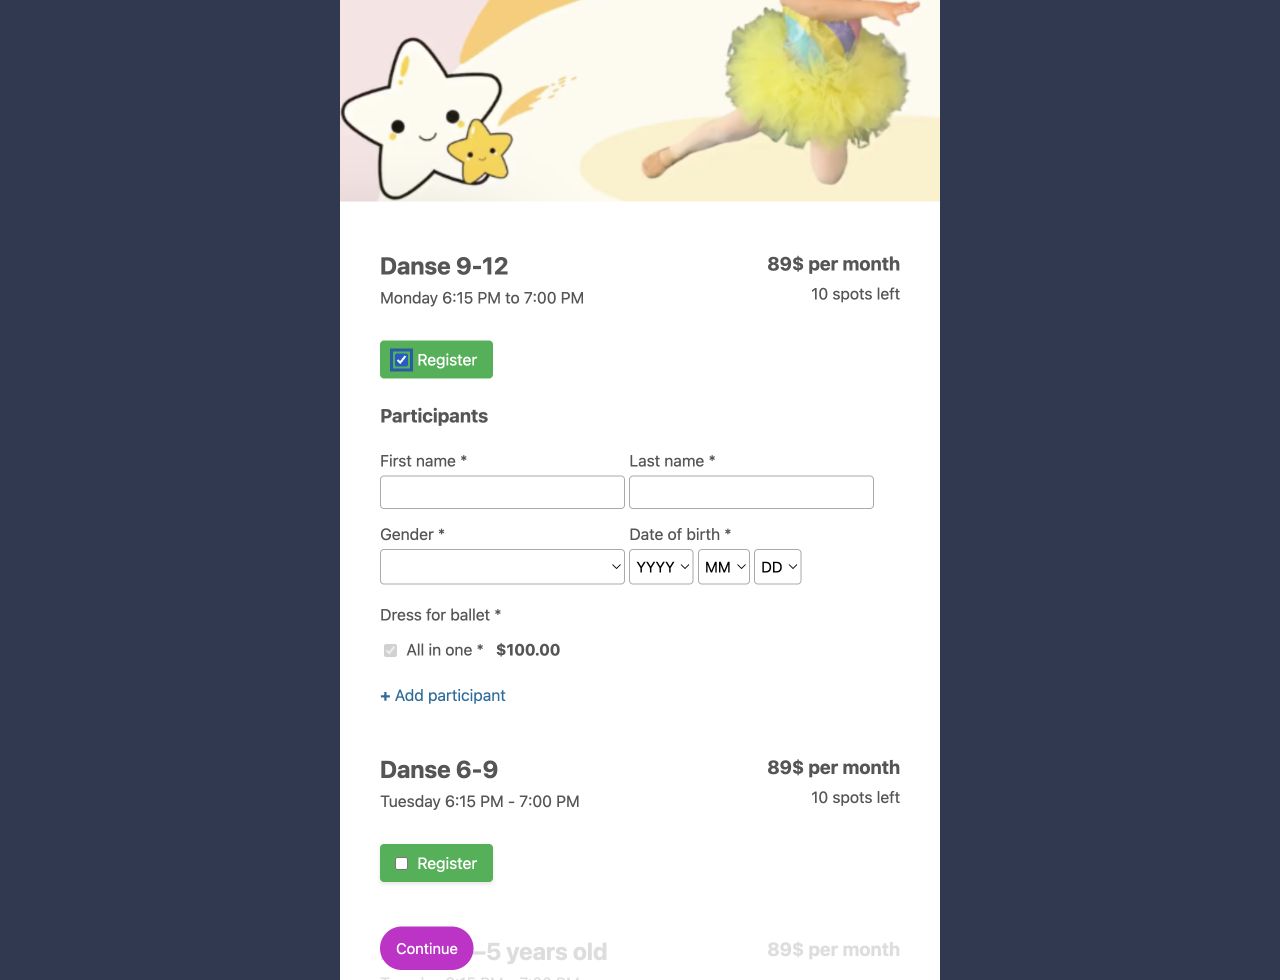
On the public form, the client can use Add participant to enter each additional person. If the account owner is also attending, they must add or select themselves as one of the participants. The submission creates registrations only for the people entered in that Class/Event block. Capacity, eligibility, duplicate-registration, and schedule-conflict rules still apply to each participant and selected occurrence.
An email address is required for every occasional participant. Administrators can see saved occasional participants in the CRM. If Show occasional participants in the client profile is enabled under the organization's client-profile settings, clients also receive a separate tab in My Account. Removing someone from the saved occasional-participant list does not remove their past registrations, bookings, or attendance.
Let occasional participants pay their own portions
When Save as an occasional participant is enabled, the question also displays Participant payments and the Participant payment email template. At checkout, the client can either use the form's normal payment methods to pay the invoice or choose Let each participant pay their portion.
If the client chooses participant payments:
- no payment is charged at checkout;
- each participant receives a private email link for their portion, so a card does not need to be on file beforehand;
- the payment email identifies who submitted the registration, all registered players, the course, its date and time, and the recipient's amount;
- the account owner receives the complete invoice with a notice that payment was split;
- if the account owner was also added as a player, they receive their own portion-payment email as well as the complete invoice.
The client sees each participant and amount before confirming and sending the links. The selected email template can be customized from the Class/Event question. This payment choice is available when Save as an occasional participant is enabled; account members continue through the form's regular payment flow.
Can pick multiple events is a different setting. It lets a participant choose more than one occurrence of the class; it does not allow the client to add multiple participants.
If the form contains several Class/Event questions and the same participant information should be reused between them, add a Participant/member/student question. The organization’s default participant fields are not imported just by adding this question. Open the question editor, use Apply default fields, choose Participants as the source, click Apply, then save the question. Enable Multiple separately if clients should be able to add more than one participant. When that separate participant question is present, leave Different participant off in the Class/Event questions.
Choose how clients register
- Register to all events: one registration includes every occurrence in the class schedule. Use this for a complete session.
- Must pick only one event: the person chooses one occurrence. Use this for a single drop-in purchase.
- Can pick multiple events: the person chooses one or more occurrences and can purchase several drop-ins in one submission.
- Can pick 1st block, 2nd block or both blocks: splits a day into two schedule blocks and lets the person choose the first block, the second block, or both. Every class covered by a multi-class rule must have a compatible two-block schedule.
- Must pick only one day of the week (recurring): the person chooses one weekday and is registered for the future occurrences on that weekday.
- Can pick multiple days of the week (recurring): the person chooses several weekdays and is registered for the future occurrences on those weekdays.
Some advanced options are shown only for compatible rules. Date-selection and booking-window controls generally require Must pick only one event or Can pick multiple events.
Control which occurrences are offered
- Limit events by day of the week: display only occurrences on the selected weekdays. Merge into a single selection combines the matching displayed dates into one checkbox so the person selects them together.
- Limit events by dates: display only occurrences inside the selected inclusive date range.
- Limit the number of next events: display only the specified number of earliest upcoming occurrences. Leave it blank to avoid this limit.
- Limit the number of days in the future a client can register to: define how many calendar days ahead can be selected. Enter
1to make tomorrow the furthest eligible date. - Show availability starting at this time: use this with the future-day limit to choose the daily release time. At that time, the next eligible calendar date becomes selectable. Release times are offered in 30-minute increments.
- Stop selling a number of days/minutes before: close each occurrence when it enters the specified lead time before its start. Choose days or minutes, then enter the amount.
- Hide dates without remaining spots: remove full occurrences instead of leaving them visible as unavailable.
Control who can register and how registrations are handled
- Force pending status on registrations: keep the participant pending after submission. An administrator must officially register the participant from the attendance list or respondents table.
- Prevent future/current double registrations: prevent the same participant from being registered for the same class or occurrence again, including twice in the current transaction.
- Prevent overlapping class registrations: reject a registration when the participant is already registered for another class whose date and time overlap.
- Allow registration after event has started: keep an occurrence available after it starts, until it ends. This option does not calculate a pro-rata price.
- Allow past registration: allow selection of occurrences that have already ended. Use it only when backdated registration is intentional.
- Password protected: require the question password before the person can register. If an expiration is added, the password protection ends at that time; registration does not close automatically.
- Generate one-time access card: include an occurrence-specific barcode access card for an eligible drop-in registration. The card is delivered with the participant's registration documents by email.
- Offer a spot: for a session sold for one price, start the registration at a future occurrence that has room. If the participant should pay only for the remaining portion, also configure pro rata.
Adjust the price for late registrations
To have new registrations pay only for the remaining classes in a session, edit the existing form's Class/Event question and enable Pro rata. Open Edit / preview to set the reduction for each completed class as a fixed amount or percentage, and set the minimum price. Review the displayed price preview before saving. The pro-rata setting affects registrations made through that form; it does not automatically change invoices for people already registered. For a late-start option, configure Offer a spot as well so registration can begin at a future occurrence with space available.
Refund a participant while keeping the registration active
If the participant remains registered but should receive a partial refund, use Credit rather than Cancel. A credit keeps the registration active; cancelling an item removes the participant from the class attendance list. For a paid invoice, first credit the item, then make a refund from the associated payment receipt. A credit alone does not return money.
For an agreed 10% administration fee calculated on the value of the remaining classes, calculate the credit from that remaining value less the fee. For example, if the remaining classes are worth $80, the fee is $8 and the credit is $72 before applicable taxes. In E-Commerce → Invoices, open the invoice, choose Credit, select the relevant item, enter the credit as a negative amount before exclusive taxes, and apply it. Then choose Create a refund beside the payment receipt and enter the amount to return for that item, following the displayed tax breakdown and the amount still refundable on the receipt. Do not subtract the fee again from the refund: it is already reflected in the smaller credit. Confirm the participant and invoice-item scope before applying a credit, especially if an item covers multiple participants. The required permissions are Can credit invoices and Can refund. See Refunds, credits and cancellations.
Understand capacity and purchase limits
- Independently manage class capacity: count only participants registered through this Class/Event question. Enter a value under Override number of spots to define that independent pool. Leave this off to count all participants in the class, including people registered through another form.
- Limit registrations per event: limit how many times the same client or participant can purchase a particular occurrence. For example,
1prevents a second purchase for that occurrence. This is not the event's attendance capacity. - Override number of spots: replace the class maximum for this form question. When independent capacity is off, existing participants from the class still count against this ceiling. When independent capacity is on, only registrations made through this question count.
Class settings can also define a Maximum attendance per session and a Maximum attendance per event. Those values create separate, additive pools. Their sum is the possible combined attendance; unused places do not move automatically between the pools.
To keep two choices of the same participant custom field within a maximum difference, and still close the class at its total Maximum attendance, configure Dynamic attendance on the class. Follow Balance registration categories within class capacity.
Share capacity between courses
Use Shared capacity when several activities must stay within one participant limit, with no quota per course. Registrations and active cart reservations use this common limit; each course keeps its own attendance list and tickets.
- Open a course, then Information → Advanced options.
- At the bottom of the options, enable Shared capacity.
- Select at least two courses, enter the Total participant capacity, and save.
Each course can have at most one upcoming or ongoing occurrence; past occurrences are preserved. Courses with teams, resource capacities or separate limits cannot be grouped. The common limit replaces individual course and form capacities. Original values remain visible for reference. To adjust the group later, click Edit capacity in the course summary.
Example — running event: the 14 km and 22 km routes share 700 places. You can accept 500 runners for the 14 km route and 200 for the 22 km route, even if each course originally displayed 350 places.
Allow clients to change course
In the Shared capacity window, enable Allow clients to change course in "My Account". You can set a deadline and customize the button text in English and French, such as Change distance. With no custom text, the button displays Change course; with no deadline, changes are allowed until the course starts.
Clients can change eligible registrations in My courses, with or without a ticket, or in My tickets. Courses must belong to the same capacity group, be offered in the same form and take place on the same day. Their current prices, taxes and general ledger codes must match. The place and original payment are kept, even when the group is full; the ticket is updated when applicable. No extra charge or refund is processed. If no eligible course is offered, the client must contact the organizer.
Override the class registration period
- Registration start: set a registration opening date for this form question instead of using the class opening date.
- Ignore registration period: allow registration despite the registration start and end configured on the class.
The form's own opening and closing window still applies. Ignoring the class registration period does not reopen a form that is closed to submissions.
A waitlist offer uses a different option. In Waitlist automation, Ignore the class registration closing date lets a customer with a valid waitlist offer password register after the class registration closing date, until the offer expires. Other registration restrictions still apply.
Example: open drop-ins 24 hours before a fixed-time occurrence
Suppose the same Wednesday 6:00 p.m. class is used in two forms:
- In the session form, choose Register to all events.
- In the drop-in form, choose Must pick only one event or Can pick multiple events.
- In the drop-in rule's advanced options, enter
1under Limit the number of days in the future a client can register to. - Select
6:00 p.m.under Show availability starting at this time. - Leave Independently manage class capacity off and leave Override number of spots blank when drop-ins should use only the places remaining in the shared class capacity.
The Wednesday occurrence becomes selectable in the drop-in form on Tuesday at 6:00 p.m. The session form is unaffected, and participants already registered for the full session continue to occupy a place in every occurrence.
This is a calendar-day window with one daily release time, not a separate rolling offset calculated from every occurrence. It is exactly 24 hours when the occurrences start at the same selected release time. If occurrences start at different times, configure separate class rules when possible; one rule cannot release each varying start time exactly 24 hours beforehand.
Settings reference
Question settings are in Forms › form › Form tab › Class/Event question › three-dot menu › Edit (written "Class/Event question" below). Class settings are in Classes › All classes and events › class.
| Setting | Where | Default | Effect |
|---|---|---|---|
| Different participant | Class/Event question › Participant rules | Off | Collects the participant separately from the respondent or account owner, such as a child, colleague, player or guest. |
| Multiple | Class/Event question › Participant rules (next to Different participant, shown when it is on) | Off | Lets one submission register several people. The public form then shows Add participant. |
| Participant heading, Description, Add button text | Class/Event question › Participant rules (Add button text needs Multiple) | Empty | Customizes the heading, the instructions under it and the text of the add button on the public form. |
| Save as an occasional participant | Class/Event question › Participant rules | Off (participant saved as an account member) | Saves the person as an occasional player, teammate or guest, separate from account members. An email is required for each one. |
| Participant payment email | Class/Event question › Participant payments (shown when Save as an occasional participant is on) | The default participant payment request template | Email sent to each participant with a private link to pay their portion. |
| Let each participant pay their portion | Public checkout (shown to the client when Save as an occasional participant is on) | Not chosen; the form's normal payment methods are used | When the client picks it, nothing is charged at checkout and each participant receives a link to pay. |
| Show calendar | Class/Event question › Display | Off | Shows the dates in a calendar. Disabled for some registration options. |
| Hide times (all day) | Class/Event question › Display | Off | Hides the start and end times of the occurrences. |
| Registration options | Class/Event question › Registration rules (dropdown) | Register to all events | Chooses how clients register: Register to all events, Must pick only one event, Can pick multiple events, Can pick 1st block, 2nd block or both blocks, Must pick only one day of the week (recurring) or Can pick multiple days of the week (recurring). Disabled when the class has one occurrence; the recurring and block options need compatible schedules. |
| Limit events by day of the week | Registration rules › Advanced options | Off | Shows only occurrences on the days you choose (single and multiple event options only). |
| Merge into a single selection | Registration rules › Advanced options, under Limit events by day of the week | Off | Combines the matching dates into one checkbox. |
| Limit events by dates | Registration rules › Advanced options | Off | Shows only occurrences inside the date range you pick. |
| Force pending status on registrations | Registration rules › Advanced options | Off | Keeps each participant pending until an administrator registers them from the attendance list or the respondents table. |
| Prevent future/current double registrations | Registration rules › Advanced options | Off | Blocks registering the same participant twice for the same class or occurrence. |
| Allow registration after event has started | Registration rules › Advanced options | Off | Keeps an occurrence open until it ends. No pro-rata price is calculated. |
| Prevent overlapping class registrations | Registration rules › Advanced options | Off | Rejects a registration when the participant is already registered for a class at the same time. |
| Allow past registration | Registration rules › Advanced options | Off | Lets clients pick occurrences that have already ended. |
| Password protected | Registration rules › Advanced options | Off | Requires the password you set before a person can register. |
| Add expiration date to the password | Registration rules › Advanced options, under Password protected | Off | Ends the password requirement at the date and time you choose. Registration does not close. |
| Independently manage class capacity | Registration rules › Advanced options | Off | Counts only people registered through this question. Off counts everyone in the class. |
| Generate one-time access card | Registration rules › Advanced options (single and multiple event options) | Off | Adds an occurrence-specific barcode access card for drop-in registrations. |
| Offer a spot | Registration rules › Advanced options (class with several occurrences, price for all events) | Off | Starts the registration at a future occurrence that has room. Turn on Pro rata to charge only the remainder. |
| Limit the number of next events | Registration rules › Advanced options (single and multiple event options) | Empty (no limit) | Shows only the earliest upcoming occurrences. |
| Limit registrations per event | Registration rules › Advanced options (single and multiple event options) | Empty (no limit) | How many times the same person can buy a given occurrence. 1 blocks a second purchase. Not the attendance capacity. |
| Limit the number of days in the future a client can register to | Registration rules › Advanced options (single and multiple event options) | Empty (no limit) | How many calendar days ahead can be selected. 1 makes tomorrow the furthest date. |
| Show availability starting at this time | Registration rules › Advanced options (single and multiple event options) | Not set | The daily time, in 30-minute steps, at which the next eligible date becomes selectable. |
| Stop selling a number of days/minutes before | Registration rules › Advanced options (single and multiple event options) | Empty, unit Minutes | Closes each occurrence that long before it starts. Choose Minutes or Days. |
| Hide dates without remaining spots | Registration rules › Advanced options (single and multiple event options) | Off | Removes full occurrences instead of showing them as unavailable. |
| Registration start | Registration rules › Advanced options › Overrides | Off | Sets an opening date for this question instead of the class opening date. |
| Ignore registration period | Registration rules › Advanced options › Overrides | Off | Allows registration despite the registration start and end set on the class. The form's own opening and closing window still applies. |
| Override number of spots | Registration rules › Advanced options › Overrides | Empty (uses the class maximum) | Replaces the class maximum for this question. |
| Price (price rule) | Class/Event question › Price rules | Price is for all events | Choose Price is for all events, Price is for one event (one price per date) or, for recurring days, Price is per day of the week. |
| Allow clients to cancel registration | Class › Information tab › Advanced options | Off | Lets clients cancel an eligible registration from My Account. |
| Registration cancellation deadline | Class › Information tab › Advanced options (shown when cancellation is on) | 0 hours | Hours before the next occurrence after which cancelling is no longer offered. 0 allows it until the class starts. |
| Refund request form | Class › Information tab › Advanced options (shown when cancellation is on) | None | Form the client is sent to after cancelling, to request a refund. It does not issue the refund. |
| Allow make-up class | Class › Information tab › Advanced options | Off | A separate option: cancels one occurrence so the client can make it up later; can issue a coupon for drop-ins. |
| Maximum attendance | Class › Information tab | Empty (No limit) | Total capacity of the class. It cannot be edited while a maximum per session or per event is set. |
| Maximum attendance per session, Maximum attendance per event | Class › Information tab | Empty | Separate, additive pools. Unused places do not move between them. |
| Show occasional participants in the client profile | Organization client-profile settings | Off | Adds a tab for saved occasional participants in My Account. Administrators always see them in the CRM. |
| Button (colour) | Form tab › Color options | The organization's button colour | Colours the submit button. It does not change the Reserve or Register control of a Class/Event question. |
Common questions
Can I sell the same class as a full session and as drop-ins? Yes. Put the class in a Class/Event question on two forms and set Registration options separately in each: Register to all events for the session, Must pick only one event or Can pick multiple events for drop-ins. Both forms respect the class capacity unless you turn on Independently manage class capacity. See Selling a class either as a session or as drop-ins.
Why does the Reserve button not change colour when I change the form's button colour? The Button colour under Color options only affects the regular form buttons such as submit. The Reserve or Register control inside a Class/Event or Ticket question uses fixed styling, and there is no setting to change it. See Can I change the colour of the Reserve button?.
Can clients cancel their own registration? Yes, if you turn on Allow clients to cancel registration on the class and set the deadline in hours. The client cancels from My Account. Activity Messenger does not refund the payment automatically; an administrator handles any refund. See Let clients cancel their own class registration and Refunds, credits and cancellations.
How do I register several children in one submission? Edit the Class/Event question, turn on Different participant under Participant rules, then Multiple. Clients use Add participant for each child. Do not add one Class/Event question per child. See Classify and register multiple participants in one submission.
Can I open drop-ins a day before each class? Yes, with Limit the number of days in the future a client can register to and Show availability starting at this time. The window is calendar-day based, so it is exactly 24 hours before only when occurrences share the same start time. See Example: open drop-ins 24 hours before a fixed-time occurrence.
Does the form capacity have to match the class capacity? No. Override number of spots replaces the class maximum for one question. Independently manage class capacity counts only people registered through that question. See Understand capacity and purchase limits.
Can I approve registrations before they count? Yes. Turn on Force pending status on registrations; the participant stays pending until an administrator registers them from the attendance list or the respondents table. See Control who can register and how registrations are handled and Approve pending class registrations in bulk.
What happens when the class is full? Registration closes for that class unless Waitlist is on for the Class/Event question. Turn on Hide dates without remaining spots to hide full occurrences instead. See Waitlist.