Activity Messenger Help Center
Build and share your first form
Build a form around one outcome: collect a request, register a participant or obtain information you need before an activity. This guide takes you from a sample or blank form to a checked, shareable link. For checkout and invoicing, follow Payment forms.
Before you begin
TipDecide who will complete the form, whose information you need, and who on your team will review submissions. Prepare any instructions, consent text and required questions. Start with a short form; add optional refinements after the main path works.
1. Create the form
Open Forms > Create. Choose a sample that matches your workflow or select Create from scratch. Select the appropriate type, enter a name and create the form. Samples provide a starting layout; review their questions, recipients and confirmation content before sharing.
Do you need a payment form?
Use a payment form when the form must produce an invoice: a paid class, add-ons such as before or after care, a membership sold on the form, products, a deposit or scheduled payments. Under Create from scratch, Payment form is described as “Online form to sell items and take a payment.” and Form as “Online form with customizable questions to capture consent, run a survey, etc.” The Create a registration form tab asks Does this form generate an invoice and capture payment?: Yes creates a payment form that already contains the selected class; No creates a form without payment.
A form without payment is enough when nothing is charged: a free class or event, registrations you invoice separately, consent, surveys and information requests. Its block picker still offers the Class, Multiple classes, Event with tickets and Membership blocks under Classes/memberships, but nothing is charged, and the Add-ons section of the Class block is only offered on a payment form.
2. Build the questions
Open the Form tab. The respondent or account-owner question identifies the person completing the form. Edit that block to select the information to collect. Add a separate participant or child question when someone is registering another person.
To add a block, click + in the form editor. The Add a new block picker opens with available block types organized in tabs. Choose a block type, then configure it in the editor that opens. Available blocks depend on the form type and organization settings. You do not need to choose a separate Create or Save action in the picker: selecting a block opens its configuration. When it is configured, it is added to the form.
You can also use a question’s three-dot menu to choose Add a question > Before or Add a question > After, then select the block type and configure it. Use this to place a new block relative to that question. Reorder blocks so the form follows the respondent’s decisions. Use Required only for answers needed to complete your workflow.
Choose the right question or content block
The table below groups the blocks by need. For every option of every block, see Form question reference.
| Need | Available blocks and uses |
|---|---|
| Short answers and choices | Yes/No, text input, dropdown, radio buttons for one choice, checkboxes for several choices |
| Quantities and calculations | Number with minimum/maximum, administrator-preset number, formula using supported numeric/expense questions and arithmetic operators |
| Comparison and feedback | Star rating, radio grid, checkbox grid, number grid, ranking |
| Layout and instructions | Text, image, spacer, video, page break, several inputs on the same line |
| Conditional paths | Conditional branching shows the relevant follow-up questions |
| People | Participant, additional child, second parent, emergency contact, age category or company |
| Scheduled activities | Class or Multiple Classes, connected to activities you created |
| Dates and staff time | Date/time, time range, time selection, date selection, date ranges, check in/out, time tracking and weekly availability |
| Documents and consent | Image/video uploads, respondent signature, administrator signature and acceptance checkbox. For a complete waiver form, see Waivers |
| Internal processing | Administrator-only hidden questions and notification recipients based on an answer |
| Confidential information | Dedicated encrypted question types; use the correct type and verify staff access |
| Purchases | E-commerce blocks in a payment form; see the payment-form guide |
| Expenses | Expense claim blocks on eligible forms that do not collect payment |
| Reusable questions | Save a frequently used custom question as a sample |
| Mailing subscriptions | A newsletter subscription question linked to the appropriate marketing form |
Time-tracking settings can include rounding and a break deduction. An administrator-preset number is useful for a value the respondent should not change, such as a rate in a contract. An upload question collects a file from the respondent; a content image or video displays material you supplied. Check the upload control for the applicable file limit instead of assuming a video’s duration determines its size.
For branching, follow Using conditional branching. For sensitive data, use the appropriate encrypted field, such as the dedicated U.S. SSN question. The waitlist is a setting of the Class question (3 dots › Waitlist), not of the form. See Waitlist.
Build a registration form end to end
The steps below add the blocks a typical class registration needs: the class, the participant, add-ons, memberships and the payment options.
- Add the Class question. Click +, then E-Commerce › Class on a payment form or Classes/memberships › Class on a form without payment. The editor opens on Choose a class or event (or create a new one). Pick an existing class in the list, or click Create to create the class without leaving the form; Modify edits the selected class and Manage classes and events opens the Classes page in a new tab. Required controls whether the form can be submitted without registering (“The respondent will be able to submit the form without registering.”). Review the Display, Participant rules, Registration rules and Price rules sections, then click Create at the bottom of the window. Every option is listed under Class in the reference.
- Decide who the participant is. By default the person in the Account owner block is registered. To register a child or another person, enable Different participant under Participant rules and choose the participant fields, or add a People › Participant/member/student question before the class and leave Different participant off.
- Add a fixed-price add-on. In the Class question, scroll to Add-ons and switch on Class (“Charge for add-ons like before or after care. Also capture options you can track in the attendance list.”). Switch on Include form add-ons: the form starts with a Before care and an After care row at 10 and an Authorized to leave alone row without price. In a row, type the Add-on name and its Price ($ / %); leave Per date off and the amount is charged once per registration. Click + Item for another row. Include class add-ons instead reuses the add-ons defined in the class's Add-ons tab (“Use either source or both. Matching names use the class add-on. Form add-ons stay saved when switched off.”). This section only appears on a payment form.
- Add a per-day add-on. Add or edit a row the same way, then switch on Per date: “When enabled, customers choose the dates for the add-on. It is charged per selected date and shown on attendance for those dates.” Enter the price for one date. See Offer class add-ons for specific dates.
- Add one Membership question per standalone membership. Click +, then E-Commerce › Membership (or Classes/memberships › Membership on a form without payment). The editor opens on Choose a membership (or create a new one) with Modify, Create and Manage memberships beside the list; a Membership question holds one membership, so repeat for each membership you sell on the form. Required is on by default; switch it off when the membership is optional. When a membership is only required to register for the class, configure it under the Class question's Participant rules › Membership instead; see Membership.
- Set the payment options. On a payment form, open the Payment tab and click Payment options (“Decide how you want to collect payment”); the same window opens from the forms table. A new form starts on Offline (“Clients can reserve online without paying. Collect the payment offline.”). Choose Credit card (“Take the payment online by credit card with Stripe.”) to charge at purchase; Interac e-Transfer, pre-authorized debit and gift card options appear when they are enabled for your organization. Optionally enter a Deposit (“Take a deposit. Collect the balance offline. Note that the amount collected includes taxes.”) or switch on Schedule payments with a Number of payments, an Interval type and a Start date (“Leave empty to start payments at the time of purchase.”). Scheduled payments need an online method and no deposit: “To use scheduled payments, choose Credit card (Stripe), Stripe bank transfer, or Interac e-Transfer, and leave the Deposit option blank.” Details are in Payment forms.
Reuse answers in messages
When editing a question, assign a custom merge field if you need its answer in a message. The field then appears in the form-related fields offered by the message or template editor. Choose a field from the form that supplies the recipient context; preview it with a representative response.
3. Set access and confirmation
Use the form’s access settings when only particular clients, members or lists should be allowed to respond. Configure saving, sign-in, submission limits or opening/closing dates as needed. See Form access for the conditions each rule checks.
To open and close the form automatically, switch on Force start date and Force end date in the Form tab's side panel and pick a date and time: “Before the start date, the form will be visible for viewing but will not be available for submission.” and “After the end date, the form will be visible for viewing but will not be available for submission.” Modify message replaces the text shown while the form cannot be submitted. The opening and closing moment is checked by Activity Messenger, not by the visitor's device. Before the opening, the form displays “This form is closed. We will accept submissions starting …” with the date and time in your organization's timezone. The date picker in the editor and the “Registration opens on … at …” note under the submit button follow the timezone of the device showing them, so check the public form when your computer is not set to the organization's timezone. Close the form stops submissions immediately: “When the form is closed, it remains visible but can no longer be submitted.”
On Confirmation, edit the message shown after submission. You can include next steps and links to another form or a document. On Options, configure PDF generation, the confirmation email, the form language and staff notifications. Receiving a PDF or notification depends on these settings; do not assume every form sends both automatically.
If bilingual forms are enabled for your organization, translate questions and confirmation content within the form. Follow Translate a form; creating two separate forms is not a requirement for a bilingual form.
4. Check the respondent experience
Use Visit or Fill to open the form. Review every required answer, conditional branch and confirmation. Administrator entry can expose extra controls; also check the ordinary client experience before launch. A submitted form can create a real response and trigger configured notifications, and a payment form can charge in live mode.
In Respondents, refresh and locate the response. Open it to check the saved answers and the PDF when generated. Confirm the intended staff received their notification and the respondent received the appropriate confirmation.
5. Share the form
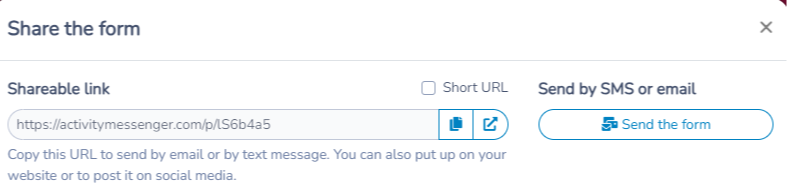
Select Share and choose the channel your audience will use:
- Copy the shareable link for an email, SMS, website button or social post.
- Send the form through Activity Messenger.
- Print the QR code for access from a phone camera.
- Copy the iframe or popup-button embed code for your website.
A tracked QR code from this window keeps one link for the printed image and records opens. See Track and manage QR codes.
For website embedding, configure the organization’s secure website address and use the generated code. Popup buttons require JavaScript support on the host website; use the iframe option when appropriate. Updating the form changes what the shared link opens.
After launch
Use Manage forms and submitted responses to find responses, correct answers and export results. You can export selected question columns to Excel and download generated PDFs for selected respondents as a ZIP file. For a focused emergency or medical handout, review the available question selection before downloading and printing.
Settings reference
| Setting | Where | Default | Effect |
|---|---|---|---|
| Does this form generate an invoice and capture payment? | Forms › Create › Create a registration form | — | Yes creates a payment form containing the chosen class; No creates a form without payment. |
| Required (Class question) | Form tab › Class question | Varies by block | Off lets the respondent submit the form without registering. |
| Show price | Form tab › Class question › Display | Off on a new block; switched on automatically at save when the class or form price is above 0 on a payment form | Shows the computed price, or Free when it is 0. Off hides both. |
| Custom price | Form tab › Class question › Display | Empty | Text shown instead of the computed price and the Free label. |
| Class (add-ons) | Form tab › Class question › Add-ons | Off | Enables add-ons for this class question. Payment forms only. |
| Include form add-ons / Include class add-ons | Form tab › Class question › Add-ons | Off | Form add-ons are edited in the question; class add-ons come from the class's Add-ons tab. Both can be on. |
| Per date | Form tab › Class question › Add-ons › add-on row | Off | The client chooses the dates; the price is charged per selected date and the add-on appears on attendance for those dates. Off charges the price once. |
| Required (Membership question) | Form tab › Membership question | On | Off lets the form be submitted without the membership. |
| Payment method | Payment tab › Payment options | Offline | Offline takes nothing at purchase and the button reads Confirm and pay later; Credit card charges at purchase and the button reads Pay now. |
| Deposit | Payment tab › Payment options | Empty | Collects part of the invoice online and the balance offline. Blocks scheduled payments. |
| Schedule payments | Payment tab › Payment options | Off | Splits the invoice into a Number of payments at an Interval type, starting at purchase or on Start date. |
| Button text | Payment tab › Payment options | Empty | Replaces the checkout button label. |
| Force start date / Force end date | Form tab › side panel | Off | The form is visible but cannot be submitted before the start or after the end. |
| Close the form | Form tab › side panel | Off | The form stays visible and no longer accepts submissions. |
Common questions
How do I hide the Free label? The class card shows Free when the price is 0 and Show price is on. Edit the Class question, open Display and switch Show price off, or type your own text in Custom price, which replaces the computed price. On a payment form, Show price is switched back on at save when the class or form price is above 0, so it only stays off for a free class. See Build a registration form end to end.
How do I remove Pay now and start payments on a date? The checkout button reads Pay now whenever a payment is due at purchase. In Payment › Payment options, choose Offline to take nothing at purchase: the button becomes Confirm and pay later and the page reads “No payment required. We will contact you before the event to collect the balance.” To collect online later, keep Credit card, leave Deposit blank, switch on Schedule payments, set the Number of payments and Interval type, and enter a Start date in the future; the first At purchase option then reads “Pre-authorize the client's credit card for future payments.” and nothing is charged until that date. Use Button text in the same window to change the button label.
How do I add a membership question to a payment form? Click + in the Form tab, open E-Commerce and choose Membership, then pick the membership under Choose a membership (or create a new one). One question holds one membership: add a Membership question for each standalone membership you sell. Required is on by default. Use the Class question's Participant rules › Membership instead when the membership is only required to register for that class.
How do I add an aftercare option for only some weeks? Edit the Class question, open Add-ons, switch on Class and Include form add-ons, keep or rename the After care row, enter the price for one date and switch on Per date. The parent picks the dates they need among the class dates they registered for, and each date is charged and shown on attendance. There is no setting to offer the add-on on only some of the class dates; the parent's selection decides which dates are charged. See Offer class add-ons for specific dates.