Activity Messenger Help Center
Waivers: collect consent and electronic signatures with a form
A waiver in Activity Messenger is a regular form that contains consent and electronic signature blocks. You build it in the same form editor as any other form: add your terms, an acceptance checkbox and a signature box, then share the link. Every signed response is kept as a timestamped PDF, and you can find it again by name, email or mobile number.
This guide covers waivers for adults and for children, signing on behalf of a minor, sharing and embedding the form, sending it in a message, tracking who has not signed, and keeping the PDF records.
When to use a waiver form
Use a waiver form when people must agree to terms and sign before an activity: a liability waiver, a parental consent, a media release or a code of conduct. Choose where the waiver lives:
- On its own form, shared by link, QR code, email or text message. This guide covers that case.
- Inside a registration or payment form. Add the Acceptance and Electronic signature blocks to that form so the signature is part of the registration.
- On the client account, when each client signs once and sees the waiver in My Account. See Client waivers.
Create the waiver form
- Open Forms › Create.
- To start from an example, stay on the Create from a sample tab and select a waiver or consent sample. Samples are grouped by category. Select Full screen to preview one, then click Create.
- To start empty, open the Create from scratch tab, choose Form as the Type, enter a Name and click Create.
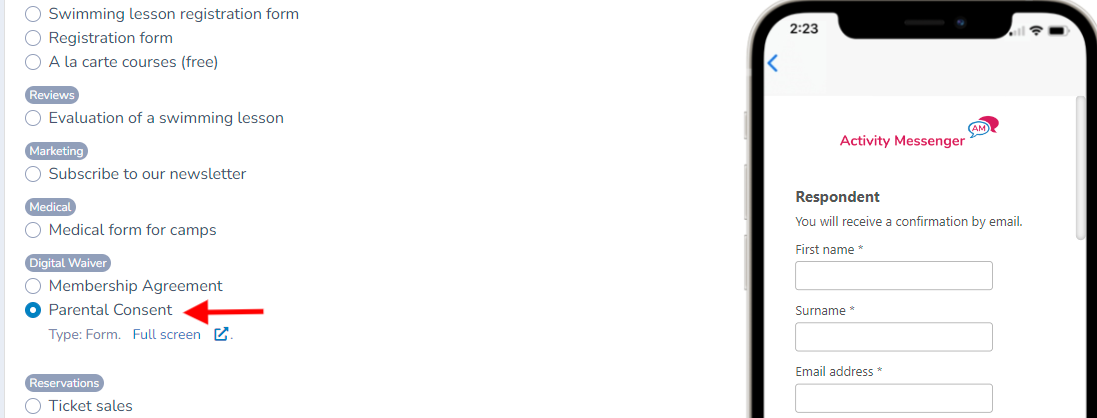
A blank form contains only the Account owner block, shown as Respondent. The form opens on the Respondents tab. Depending on your permissions you also see Form, Confirmation page, Options, Analytics, Messages, Not filled and Log. Open the Form tab to build the waiver.
Add the blocks that make a waiver
In the Form tab, click + between two blocks, or open a block's three-dot menu and choose Add a question › Before or Add a question › After. The Add a new block window opens with one tab per block family. Select a block, set its options and click Create. Every option of every block is listed in the Form question reference.
A waiver usually combines these blocks.
| Block | Picker tab | Use it for |
|---|---|---|
| Account owner | Fixed first block | The person filling the form: Name and Email are required, Mobile is optional. |
| Participant/member/student or Children | People | The person or the children covered by the waiver. |
| Text block | Content | An introduction, rules, or any text that is not the terms to accept. |
| Acceptance | Electronic signature | The terms and the "I have read and accept" checkbox. |
| Electronic signature | Electronic signature | The signature box. |
| Administrator signature | Electronic signature | A signature from your organization, printed with each response. |
Terms and acceptance
Add an Acceptance block. Write or paste your terms in Terms: the rich-text editor keeps the formatting of text pasted from Word. The respondent ticks the Checkbox, which reads "I have read and accept" until you change it. Required is on by default, so the form cannot be submitted without it. Switch on Limit length to show long terms in a scrolling box: the respondent sees "Please read and scroll to the bottom to accept." Hidden for logged-in members hides the block from members who are logged in. The Terms editor also has a merge field button, {P}, to insert placeholders.
The terms of an Acceptance block are printed in the PDF with the answer. A Text block is shown on the form but is printed in the PDF only if you switch on Include in confirmation PDF.
Electronic signature
Add an Electronic signature block. The respondent draws the signature with a mouse or a finger, or types their name. Description is the instruction shown above the box ("Please sign your name inside the box or type your name below." by default). Required is off by default: switch it on for a waiver. Activity Messenger stores the date, time and IP address of the respondent with the signature.
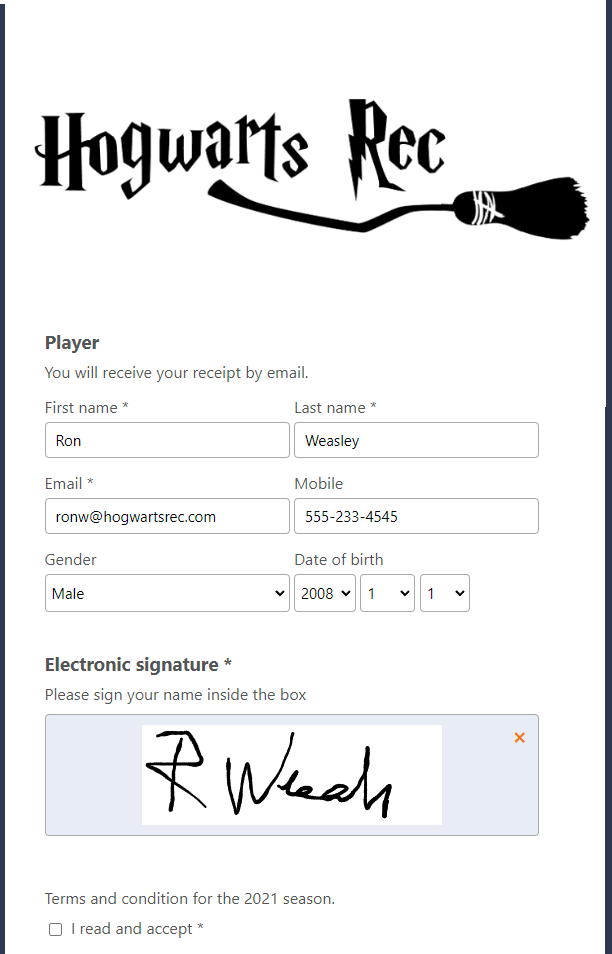
An Administrator signature block holds a signature that an administrator draws or types once in the editor. It is printed with every response, for example to countersign for your organization.
People blocks: adult and youth waivers
For an adult waiver, the Account owner block is the signer. Turn on only the fields you need and set each one to Optional or Required. Keep Email required: it identifies the signer and receives the PDF copy.
For a youth waiver, the parent or guardian is the Account owner and signs. Add a Participant/member/student block (turn on Multiple for several children) or a Children block to collect each child's name, gender and date of birth. Add Other parent or Contacts when you need a second guardian or emergency contacts. Field details are in Form questions: People blocks.
Required fields and optional extras
- Each person field has an Optional or Required setting, and each block has a Required switch. The respondent cannot submit until every required answer is given.

- To ask for a photo or a document, add an Upload block such as Upload an image or PDF or Upload a video. See Form questions: Upload and Electronic signature blocks.
- To ask your own questions, add standard blocks such as Yes/No, Dropdown or Checkboxes. See Form questions: Standard blocks.

Sign on behalf of a minor
The person who fills the form is the signer. For a child, build the form so that the parent or guardian is the Account owner and collect the child in a Participant/member/student or Children block. Write the terms in the first person ("I am the parent or legal guardian of the participant and I accept...") so the signature clearly covers the child.
To have a second person sign, such as a teenager co-signing or the other parent, add a second Electronic signature block. You can add a Relay block as well: the form is saved and sent by email to the second person, and a signature block with Only show to the relayed person switched on appears only once the form has been relayed.
Expiry and signing again each season
The Acceptance and Electronic signature blocks have no expiry setting, so a signed waiver does not expire on its own. To collect waivers again each season:
- In the Not filled tab, set Filter by date to the new season. People who have not signed within those dates are listed, and you can message them.
- When you attach the form to a message, switch on Only send to people who have NEVER filled this form, or start from the Not filled tab with its date range, so only people who still need to sign receive the message.
- Optionally add an Expiration date block (Date/Time tab) that calculates a date, for example one year after Today, and shows it as "Expires on". In Respondents › Advanced filters you can then filter responses by that date to find the waivers that have lapsed. See Form questions: Content and Date/Time blocks.
Confirmation, PDF records and where signed forms are stored
Open the Confirmation page tab to edit the message shown after the form is submitted. Open the Options tab for the records and the confirmation email:
- PDF: Generate a PDF document with form answers. It is attached to the confirmation email and saved for your records. It is on in a blank form. Include respondent and signature page adds a first page with the respondent, the submission time, the IP address and the electronic signature.
- Confirmation: Send a confirmation message to the respondent uses a template that Activity Messenger creates for you. Edit it, or leave it blank to send no confirmation. Send by chooses email, SMS or both. Do not include PDF in the confirmation email keeps the PDF out of the message.
- Notify admins after a form is filled: the colleagues who receive a message for each response, with Send by to choose email, SMS or both.
You find the signed records in two places:
- Respondents tab: a PDF icon sits next to each name. Select a row to open the response, then download the PDF or email it again. Select several rows and choose Download to get the PDFs: one file for a single response, a ZIP file for several.
- Forms › Forms filled: every response from every form. Search by name, email or mobile number, or filter by date, then select a row.
If your organization is still pending approval, PDF generation and confirmation messages are not active; the Options tab says so and gives the support link.
Test the form
Click Visit or fill at the top right of the form. It opens in another tab. Fill it in as a respondent and sign. Go to the Respondents tab, click Refresh, and open your response to check the answers and the PDF. A test submission is a real response and sends the configured messages. Open the form on a phone as well as a computer, especially to check long terms and the signature box.
Bilingual waivers
When bilingual forms are enabled for your organization, translate the questions and the confirmation in the same form: see Translate a form. In Options, Language sets the language of the form. If you keep one form per language, add the second form under Include another form in the Not filled tab so that a person who signed either one counts as signed.
Share and embed the form
Click Share at the top right of the form. The Share the form window offers:
- Shareable link, to copy for an email, text message, your website or social media. Enter a Custom URL slug for a friendlier link (letters, numbers and hyphens only).
- Send the form, to send it by email or SMS.
- Share on social media.
- QR code, to copy, download, print or send, for example to post on a wall for people to fill in on site.
- Embed on your website, either Directly in the page or as a Button with popup. Copy the code into your site. Set your organization's website address first; it must start with https. Some website builders do not allow the popup button because it needs JavaScript: use Directly in the page there.
To limit who can fill the form, see Saving, pre-filling, gating and closing a form.
Attach a waiver to a message
When you write a message, open Attachment and choose Attach a form (waiver). Under Choose a form, pick the waiver. The message includes a link to it, or a button if you fill in Button text. Switch on Only send to people who have NEVER filled this form to skip the people who already signed. The filter is applied when the message is sent, including a message scheduled for later.
To send reminders, click Schedule, then Add schedule to add more send times, or + 1 Day and + 1 Week. With the filter on, a reminder goes only to people who still have not filled the form.
Track who has not signed
Open the Not filled tab.
- Select the list of recipients who need to fill the form, for example a class roster.
- Optionally set Filter by date to look only at responses within a date range.
- Optionally use Include another form to check two forms at once, which is useful for a waiver that exists in two languages.
Activity Messenger compares the email addresses of the list with those of the respondents, including the other parent's email, and shows how many people have not filled the form. From there you can:
- Click Send to people who have not filled the form to message them.
- Click Send the list to a colleague, for example to give a coach the names before an event.
- Click Download to Excel.
- Select people and use Message, or click the envelope icon on a row to message one person.
Client waivers
A client waiver is a waiver that belongs to the client account instead of one registration. It is a form of the Client waiver type, built with the same Acceptance and Electronic signature blocks described above. Use it when:
- each client should sign once, not at every registration;
- the client should see the waiver in My Account and, if you allow it, sign it again from there;
- you want to track who has signed from the client list, or require the waiver before a client can submit another form.
Create one with Forms › Create › Create from scratch and choose Client waiver as the Type. You can also convert an existing form: in Forms › Manage forms, open the three-dot menu of a form and choose Convert to client waiver. The option is not available when the form contains blocks a client waiver cannot hold. See Manage client waivers for the settings, the client list filter and the required-waiver rule.
Waivers created with the former waiver feature
Forms created earlier with the former waiver feature appear in your forms list as Adult waiver or Youth waiver and keep working. They open with a Configuration tab and a Not signed tab instead of the Form and Not filled tabs. To use the blocks described in this guide, create a new form.
Settings reference
| Setting | Where | Default | Effect |
|---|---|---|---|
| Create from a sample / Create from scratch | Forms › Create | Create from a sample | Starts from a sample, or from a blank form of the chosen Type. |
| Type | Forms › Create › Create from scratch | None selected | Form for a waiver on its own; Client waiver for a waiver on the client account. |
| Name, Email | Form tab › Account owner | Required | Identify the signer. The email receives the PDF copy. |
| Mobile | Form tab › Account owner | Optional | Asks for a mobile number. |
| Terms | Form tab › Acceptance | Empty | The terms the respondent accepts. Printed in the PDF. |
| Checkbox | Form tab › Acceptance | I have read and accept | Label of the acceptance checkbox, 200 characters maximum. |
| Required | Form tab › Acceptance | Yes | The form cannot be submitted without ticking the box. |
| Limit length | Form tab › Acceptance | No | Shows long terms in a scrolling box and asks the respondent to scroll to the bottom. |
| Hidden for logged-in members | Form tab › Acceptance | No | Logged-in members do not see the block. |
| Description | Form tab › Electronic signature | Please sign your name inside the box or type your name below. | Instruction shown above the signature box. |
| Required | Form tab › Electronic signature | No | Switch on to refuse a submission without a signature. |
| Hidden | Form tab › Electronic signature | No | Shows the block to administrators only. |
| Only show to the relayed person | Form tab › Electronic signature | No | The signature appears only after the form has been relayed to another person. |
| Label | Form tab › Administrator signature | Administrator signature | Label of a signature drawn or typed once in the editor and printed with each response. |
| Include in confirmation PDF | Form tab › Text block | No | Prints the text block in the PDF. |
| Multiple | Form tab › Participant/member/student | No | Lets the respondent add several participants. |
| Allow multiple | Form tab › Children | On | Lets the respondent add several children. |
| Expiration date | Form tab › Expiration date block | Not added | Calculates and shows a date, such as one year from today, that you can filter on. |
| Generate a PDF document | Options › PDF | On in a blank form | Creates a PDF of the answers, attached to the confirmation email and saved for your records. |
| Include respondent and signature page | Options › PDF | On | Adds a first page with the respondent, submission time, IP address and signature. |
| Language | Options | The organization's language | Language in which the form is shown. |
| Send a confirmation message to the respondent | Options › Confirmation | The default filled-form confirmation template | Message sent after submission. Leave it blank to send none. |
| Send by | Options › Confirmation | Email, SMS or both for the confirmation. | |
| Do not include PDF in the confirmation email | Options › Confirmation | Off | Keeps the PDF out of the confirmation message. |
| Notify admins after a form is filled | Options › Confirmation | No users selected | Colleagues who receive a message for each response. |
| Exclude this form from search engine indexing | Options, bottom | Off | Asks search engines not to list the form. Anyone with the link can still open it. |
| Custom URL slug | Share › Shareable link | Empty | A friendlier ending for the shareable link. |
| Filter by date | Not filled tab | No date filter | Counts only responses within the dates chosen. |
| Include another form | Not filled tab | None | Checks two forms at once. |
| Attach a form (waiver) | Message › Attachment | Off | Adds the waiver link or button to the message. |
| Only send to people who have NEVER filled this form | Message › Attachment › Attach a form (waiver) | Off | Skips people who already filled the form. |
Common questions
Is a waiver a separate kind of form? No. A waiver is a regular form with an Acceptance block and an Electronic signature block. Only the client waiver is a form type of its own; see Client waivers.
Can I make the electronic signature optional? Yes. Required is off by default on the Electronic signature block. For a waiver, switch it on so the form cannot be submitted without a signature; see Electronic signature.
Can I make people read the terms before accepting? Switch on Limit length in the Acceptance block. The terms scroll in a box and the respondent is asked to read and scroll to the bottom; see Terms and acceptance.
Does a waiver expire? Not on its own. To collect it again each season, use Filter by date in the Not filled tab, or an Expiration date block that you filter on; see Expiry and signing again each season.
How do I see who has not signed yet? Open the Not filled tab, select the list of people who should sign and read the count. You can message them or download the list; see Track who has not signed.
Can a parent sign for a child? Yes. The parent is the Account owner and signs; the child goes in a Participant/member/student or Children block. See Sign on behalf of a minor.
Where is the signed copy? In the Respondents tab, where a PDF icon sits next to the name, and in Forms › Forms filled. The respondent also receives the PDF when the confirmation message is on; see Confirmation, PDF records and where signed forms are stored.
Why did the respondent not receive a PDF? Check Options: Generate a PDF document and Send a confirmation message to the respondent must be on, and Do not include PDF in the confirmation email must be off. An organization that is pending approval cannot send PDFs or confirmations yet.
Can I require a waiver before someone registers or pays? Yes, in two ways. Add the Acceptance and Electronic signature blocks to the registration form itself, or create a client waiver and select it under Requires client waiver on the other form. See Manage client waivers.