Activity Messenger Help Center
Company billing
Company billing lets an employer, school, club or other organization pay for purchases made by its members. A member books or registers as usual and chooses Bill my company at checkout. The purchase stays linked to the member, and the company owes the balance. You then send the company itemized statements, record its payments and track everything in a dedicated report.
Personal purchases are not affected. A member can still pay for their own purchases, and those invoices stay in their regular invoices.
Before you begin
- The Company billing module must be enabled for your organization.
- Owners and administrators can convert accounts into company accounts, link members, edit company details and statement settings, and change who an invoice is billed to.
- Owners, administrators and attendants with permission to view client invoice details can open the company overview, billed purchases and statements, issue statements and record statement payments.
- The Company billing report also requires access to financial reports, invoices, client information and other users' payment and sales reports.
How company billing works
Company billing uses three roles:
- Company account: a regular client account converted into a company account. It keeps its sign-in email, contact details and existing invoices.
- Members: client accounts linked to the company. A client can belong to only one company.
- Purchaser: the member who made the purchase. Registrations, memberships and bookings remain on the purchaser's account.
When a purchase is billed to the company, the company account owns the invoice and owes its balance. The invoice shows Bill to with the company name and Purchased by with the member's name.
A company account can also bill its own purchases to itself.
Create a company account
- Open Lists → Client accounts and open the account of the employer or organization.
- Click Actions → Convert to company account.
- Read the summary, then click Convert to company account.
The account now shows a Company badge and a Company tab.
To list your company accounts, set Account category to Company in the client accounts list.
You cannot convert:
- a client who is already a member of another company (remove the link first);
- a staff account;
- deleted, anonymized and guest accounts.
Add the company details
- In the company account, open Company → Settings.
- Under Company details, click Company information.
- Enter the company name, email, phone and address, then save.
These details appear on invoices and statements. Statements are emailed to the company email. If no company email is entered, the email of the company account is used.
Link members
- Open Company → Members.
- Click Link a client account.
- Search for the client and select them.
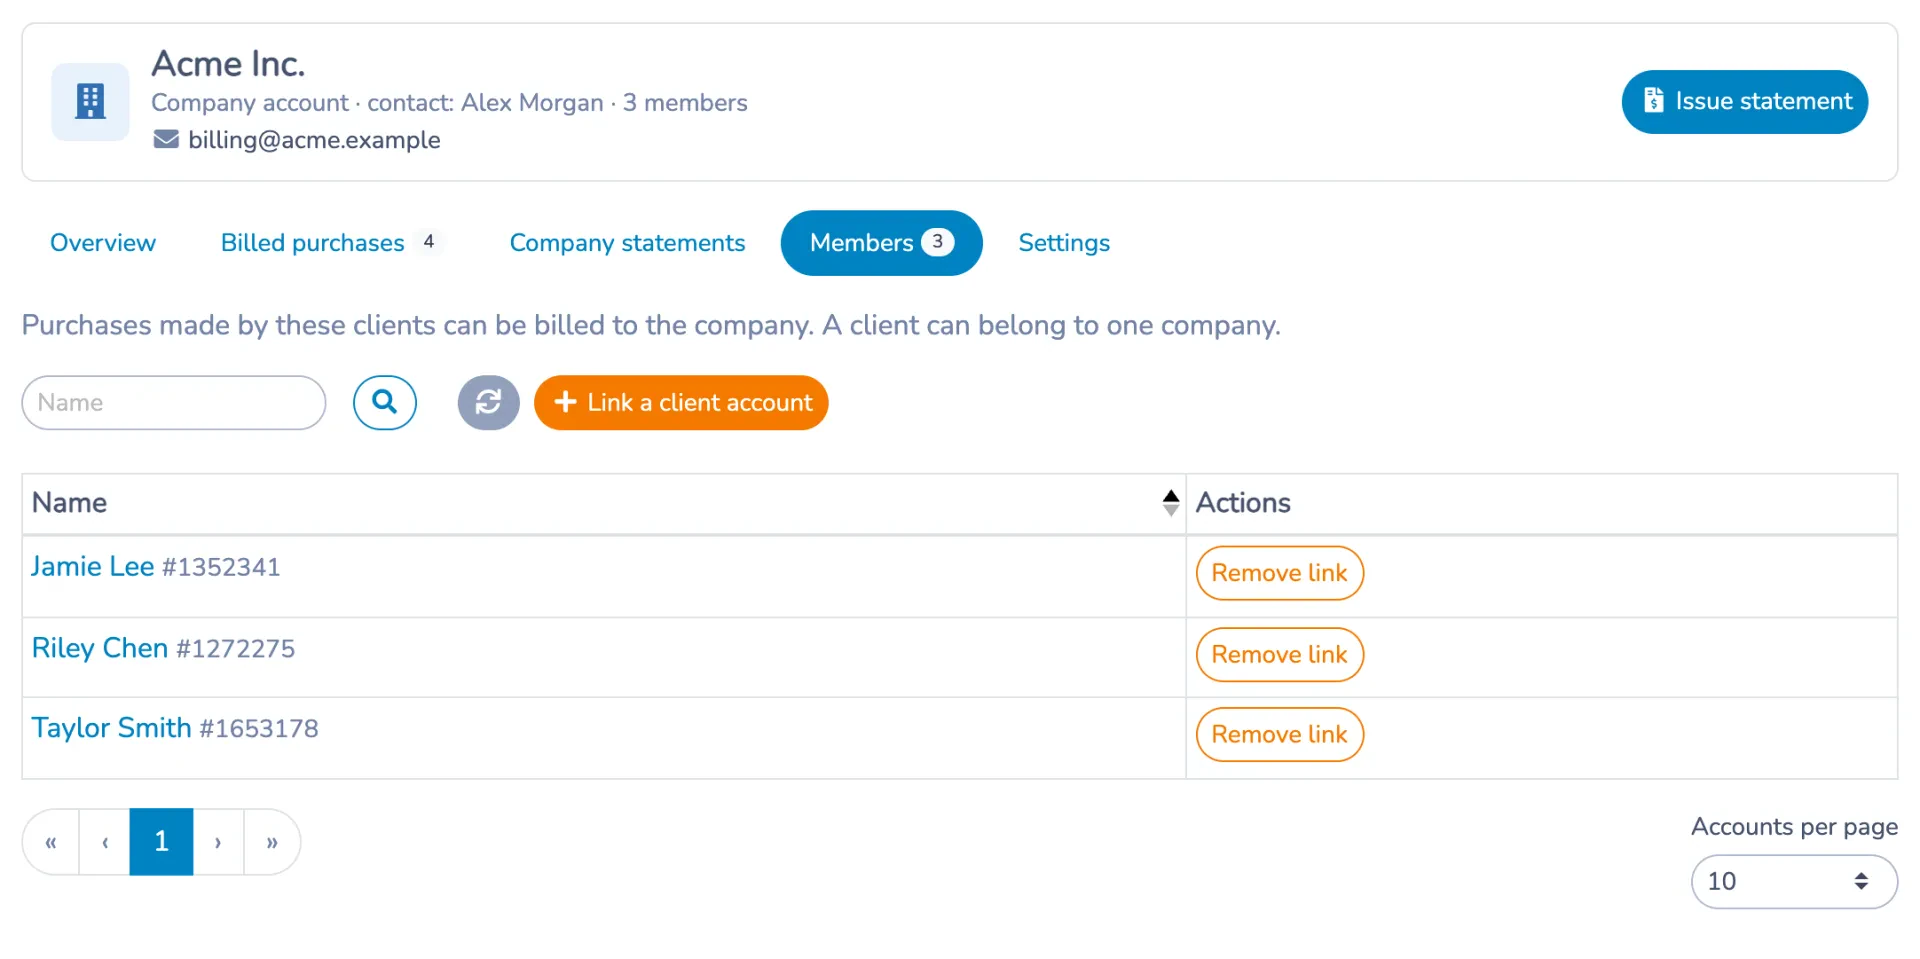
Linked members show Member of with the company name on their own account. Click it to open the company account.
To remove a member, click Remove link beside their name. Invoices already billed to the company stay billed to the company.
Linking rules:
- A client can belong to only one company.
- A company account cannot be a member of another company.
- Deleted, anonymized and guest accounts cannot be linked.
- Staff accounts are listed only for users who can see staff accounts.
Use the Company tab
The Company tab groups the company tools. Its header shows the company name, contact, member count and billing email, and an Issue statement button.
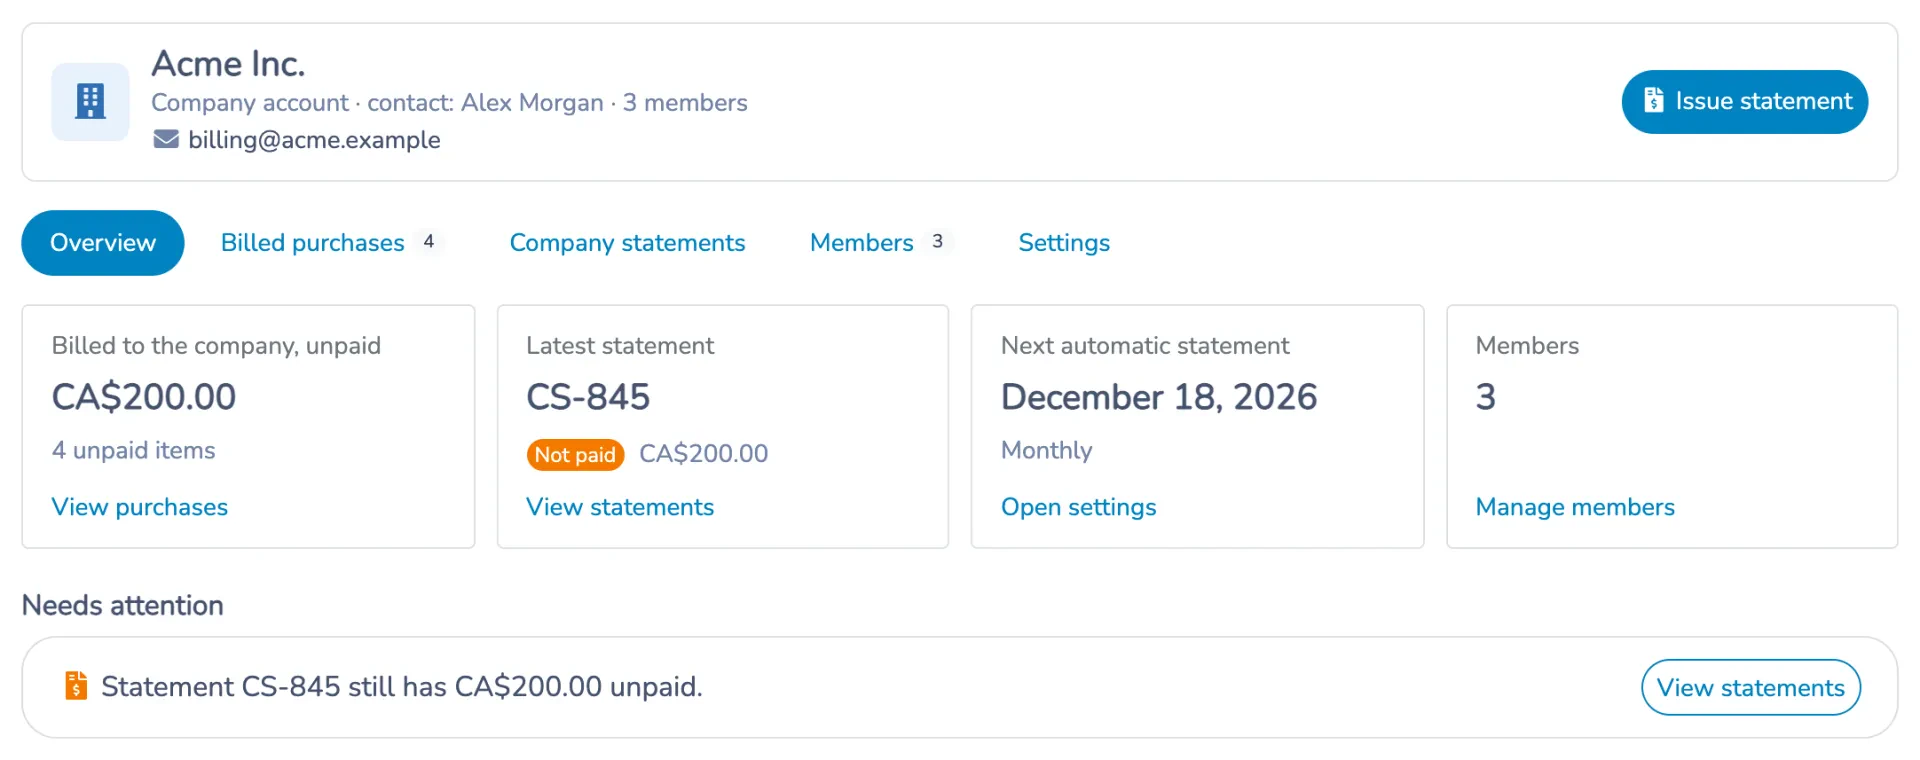
| Section | What you can do |
|---|---|
| Overview | See the unpaid amount billed to the company, the latest statement, the next automatic statement and items that need attention. |
| Billed purchases | Review invoices billed to the company. Open an invoice to see its items or record a payment. |
| Company statements | Issue statements and review, send or mark issued statements as paid. |
| Members | Link and unlink members. |
| Settings | Edit company details, statement settings and the account type. |
Needs attention tells you when, for example:
- a statement still has an unpaid balance;
- some billed items cannot go on a statement yet;
- the company has no valid billing email;
- unpaid items are waiting but automatic statements are off;
- no members are linked yet.
The company's regular Invoices tab continues to show its personal purchases.
Bill a purchase to a company
At online checkout
When a linked member is signed in to their client account and reaches the payment step of an eligible purchase, they see Who should be billed?:
- Pay myself keeps the purchase on their own account, with the usual payment.
- Bill my company bills the purchase to the company. The member pays nothing at checkout.
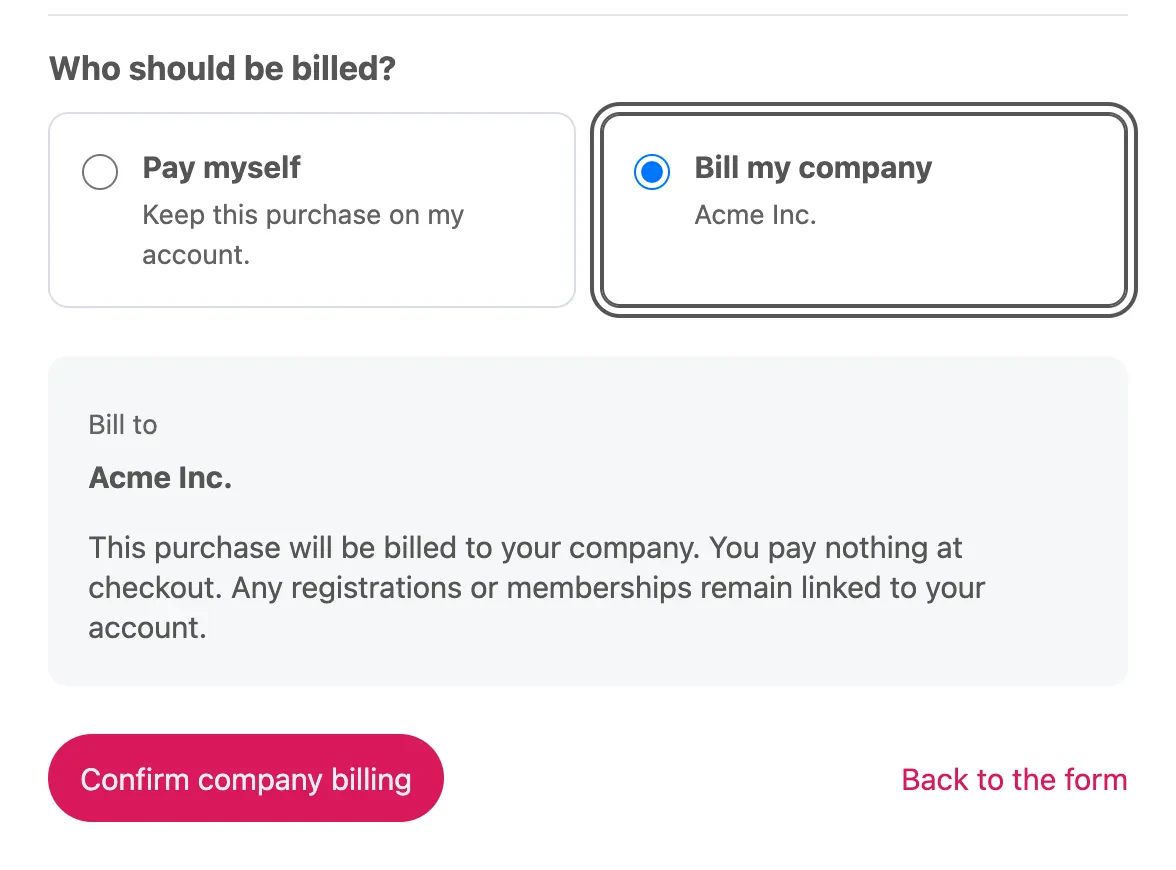
The member clicks Confirm company billing. The purchase is confirmed and its invoice remains unpaid, billed to the company. Card processing fees are not added to a company-billed purchase.
When an administrator creates a booking
When an owner or administrator creates a booking for a client who is linked to a company, a Bill to field appears. Choose Bill the purchasing client or Use linked company. With the company selected, the invoice stays unpaid and the company owes the balance; the client remains the purchaser.
Change who an existing invoice is billed to
Owners and administrators can transfer a finalized invoice between the purchaser and their company:
- Open the invoice.
- Beside Bill to, click the edit icon.
- Choose the purchasing client or the linked company, then save and confirm.
Existing payments and registrations are preserved. The selected account owns the invoice and owes the remaining balance.
Purchases that cannot be billed to a company
Company billing is for one-time purchases. It is not offered when the purchase includes, for example:
- recurring payments, subscriptions with forced recurring billing, installments or payment plans;
- scheduled payments or a deposit;
- split payments between players or payment after approval;
- invoice contributions;
- point of sale purchases;
- a total of zero.
An existing invoice also cannot be transferred when it is cancelled, has a credit balance, has pending or scheduled collections, has linked credits, or is already included in a statement payment. Resolve these first, or keep the invoice on the purchaser's account.
What the purchaser and the company receive
- The company receives the invoice by email.
- The purchaser receives a copy for their records. It says that the purchase is billed to the company and that no payment is required from them.
- The purchaser keeps their registrations, memberships and bookings and can view the purchase in their account.
Company statements
A company statement lists the unpaid company-billed items for a period. Its number starts with CS-. Issuing a statement saves the document and emails it to the company. It does not collect a payment and does not change the original invoices.
Configure statement settings
Open Company → Settings → Statement settings:
- Choose Include items by:
- Purchase date;
- Booking / service date: the first booking date or the membership start date. Items without a service date use their purchase date. An item covering several dates is included in full in its first period.
- Choose the Frequency: Monthly or Weekly.
- Choose Issue on day of month or Issue every (a weekday). For days 29 to 31, shorter months use their last day.
- Optionally choose a Statement email template. Otherwise, the default email includes the company, the statement period, the balance and the payment link. The statement PDF and the view and pay button are always included.
- To send statements automatically, select Issue statements automatically.
- Click Save.
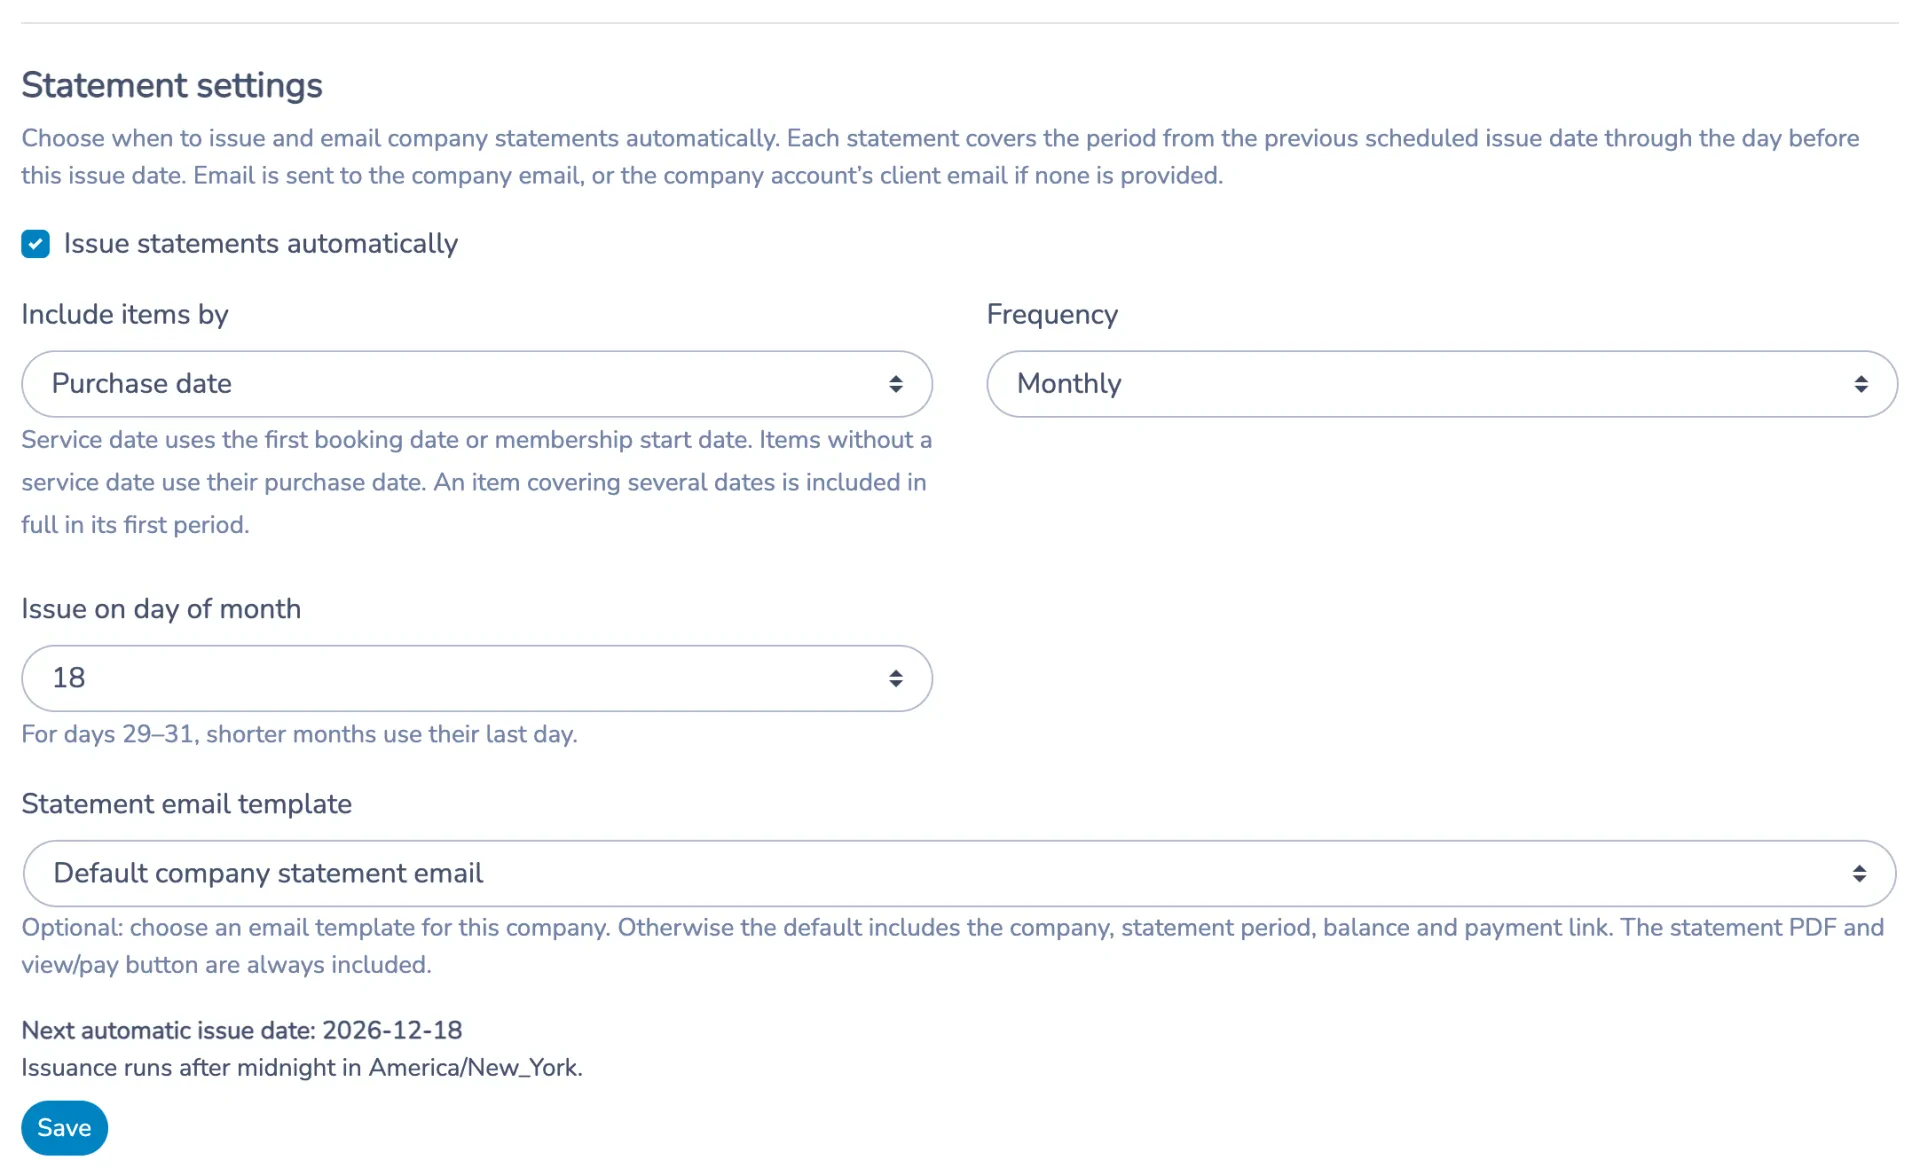
The page shows the Next automatic issue date. Automatic statements are issued after midnight in your organization's timezone. Each statement covers the period from the previous scheduled issue date through the day before the issue date. If the company has no unpaid items for that period, no statement is issued.
Save any changes before you preview or issue a statement.
Issue a statement manually
- In the company account, click Issue statement (in the header or in Company → Company statements).
- Review the period. The From date and Through date are prefilled with the next period; both dates are included. To include everything unpaid, click Apply all outstanding.
- Review the items. Clear an item's Include checkbox to leave it out. Items already on a previous statement are marked Already on CS-….
- To see items that cannot be selected, turn on Show unselectable items. An item cannot be included while a payment is pending or in progress, or when it has a payment arrangement that must be handled separately.
- Choose the statement Language.
- Click Issue company statement, then confirm.
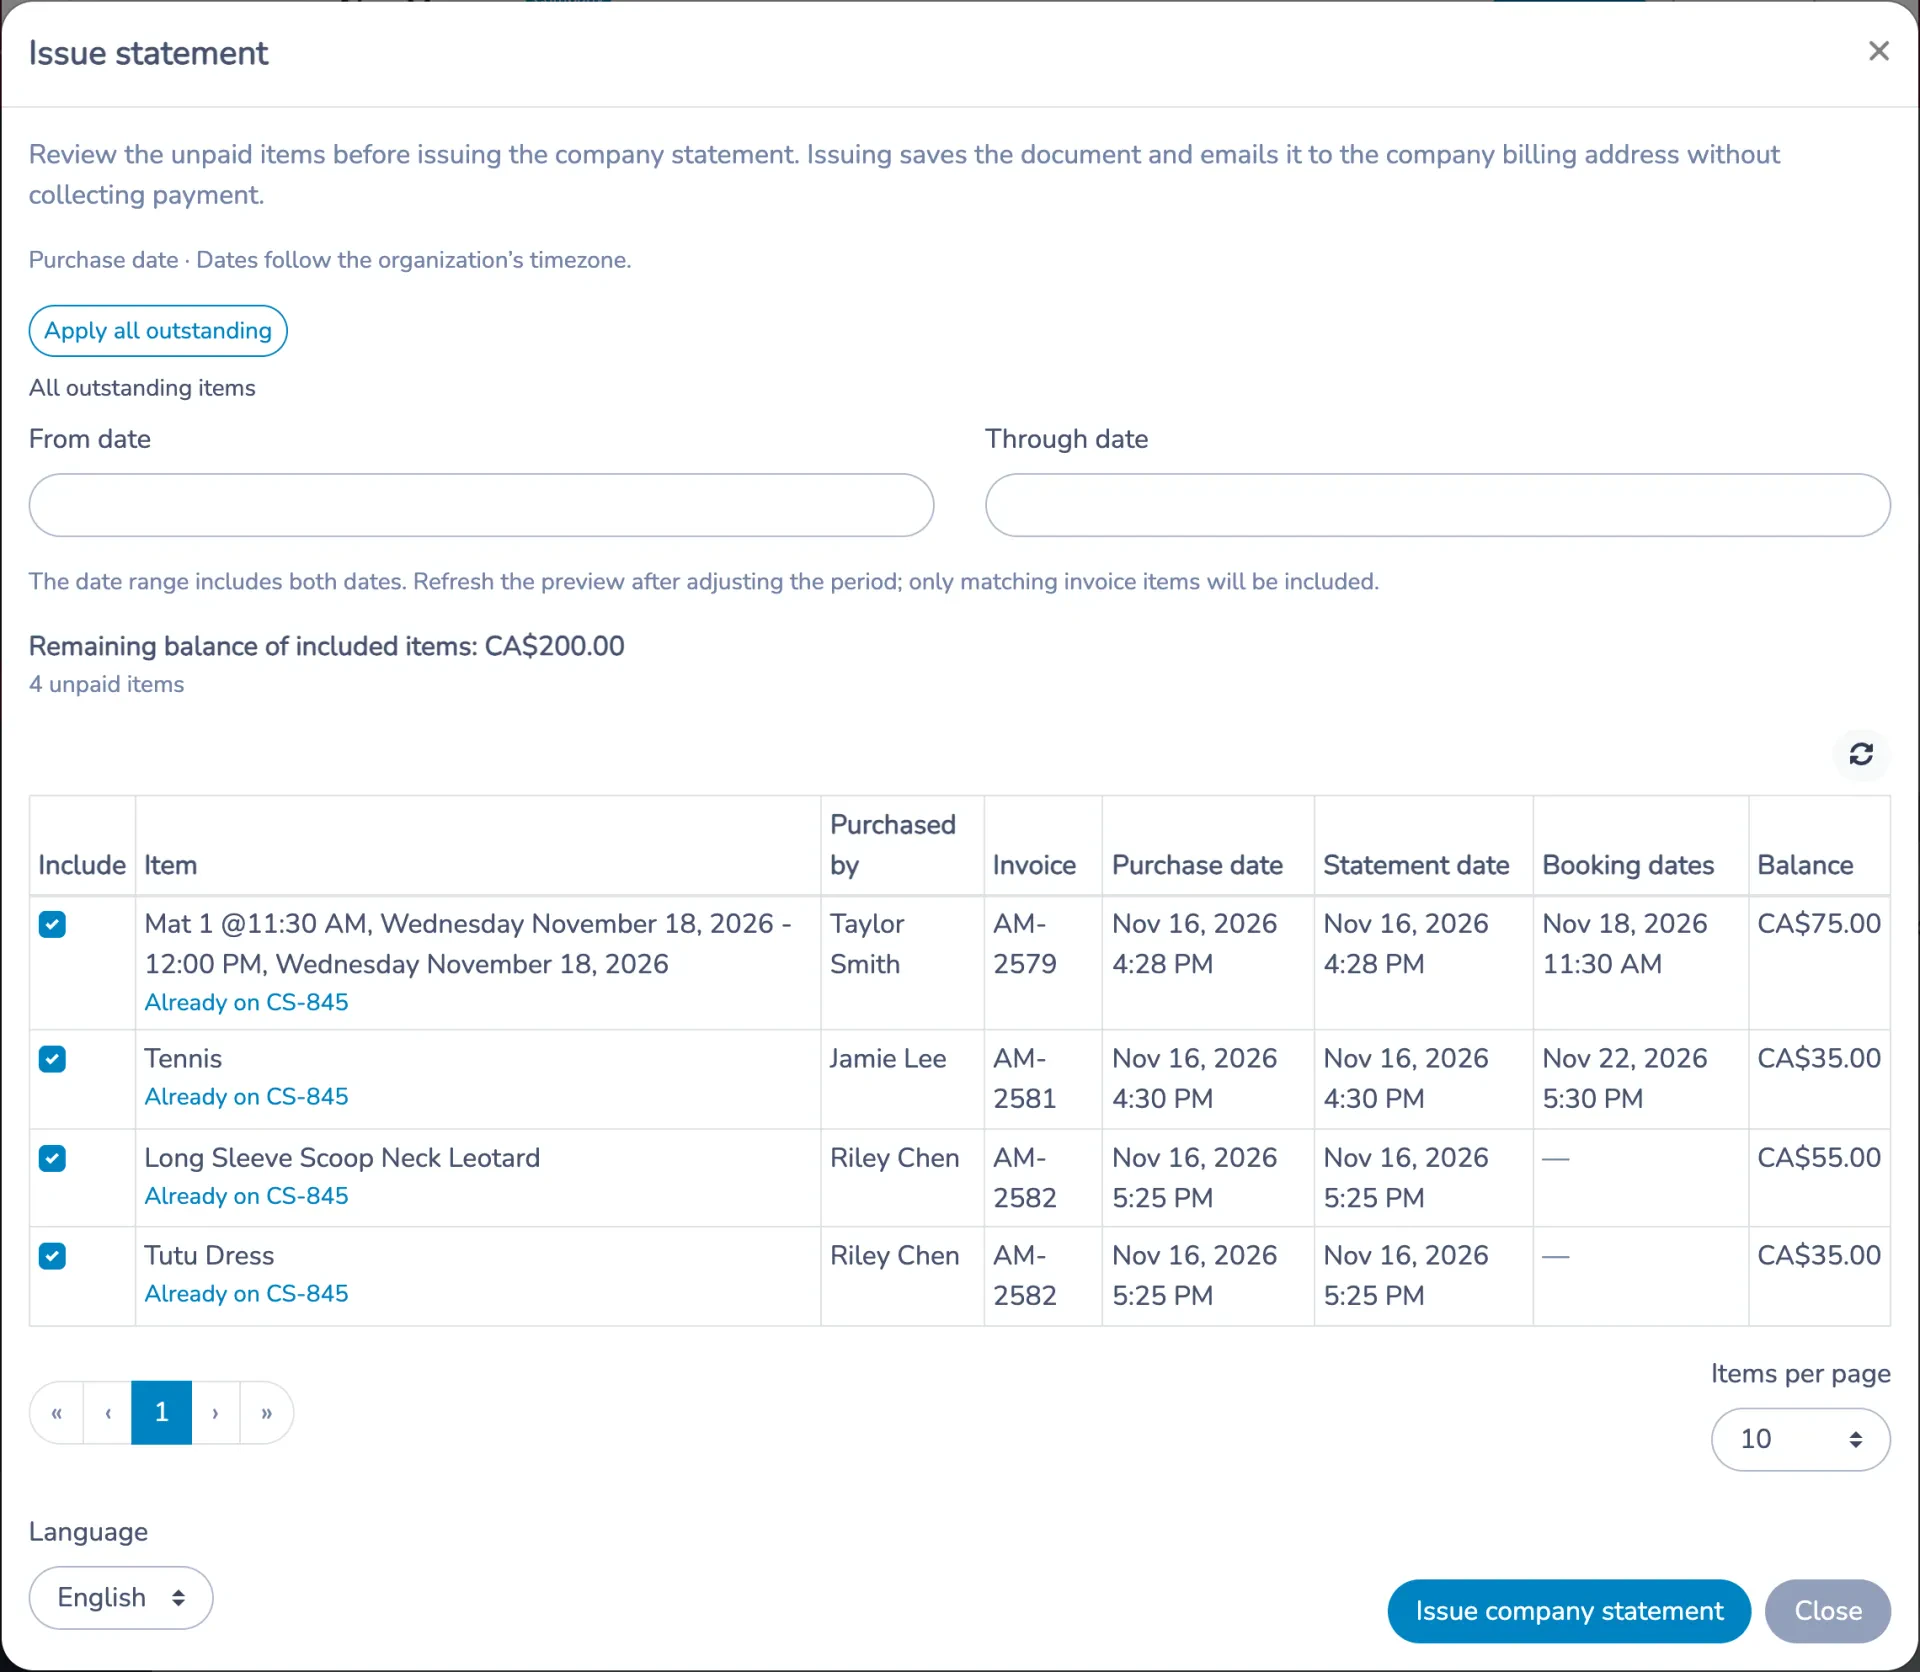
The statement is issued and its email is queued. Click View statement to open it.
Unapplied credit balances are shown in the preview but are not automatically deducted from the statement.
Review, send and resend statements
Company → Company statements lists every issued statement with its period, balance at issue, remaining balance, status and Email delivery status (for example Queued, Sent, Delivered or Failed).
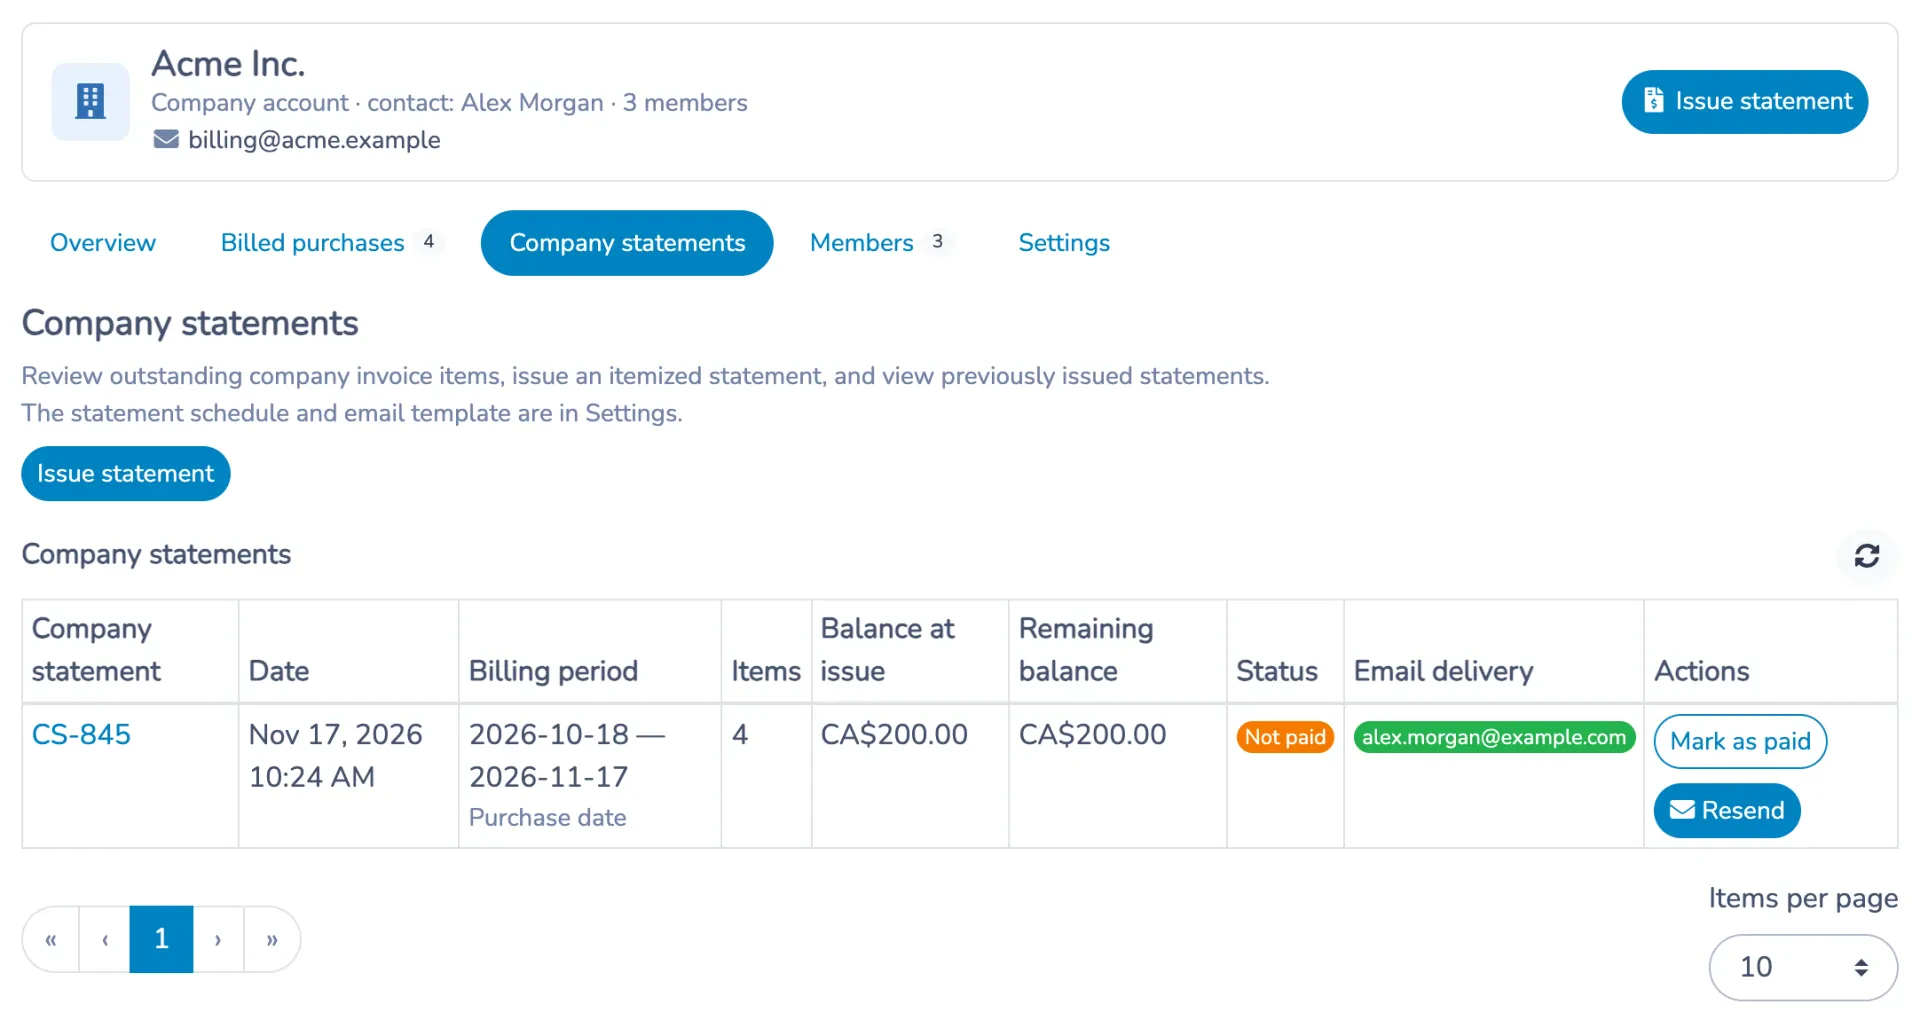
- Click the statement number to open it.
- Click Send or Resend to email it again. Confirm the recipient shown.
The items and amounts on an issued statement remain fixed. The online statement shows the current remaining balance: payments and cancellations on the original invoice items update it. Items purchased after issue are not added; they go on a later statement.
How the company pays
The company can pay in two ways:
- Online: from the View statement button in the statement email, or from Company billing in its client account. That area shows its statements and the purchases billed to it, and it can pay each invoice's outstanding balance.
- Outside Activity Messenger: for example by cheque or bank transfer. Record that payment as described below.
Each payment is applied to the original invoices, so the purchases show as paid on each invoice.
Record a payment received
- Open Company → Company statements.
- Beside the statement, click Mark as paid.
- Choose the Payment method: Cash, Check, Credit card (on your terminal), Debit (Interac on your terminal) or Other.
- Enter the Paid at date and an optional Admin note.
- Click Mark as paid.
The payment settles only the remaining items on that statement and updates the original invoices. No card is charged and no payment email is sent.
Company billing report
Open Reports → Financial reports, then select Company billing in the Payments category.
The report includes finalized company-billed purchases only; personal purchases are excluded. Balances are current, not historical. The report does not create any sale or payment.
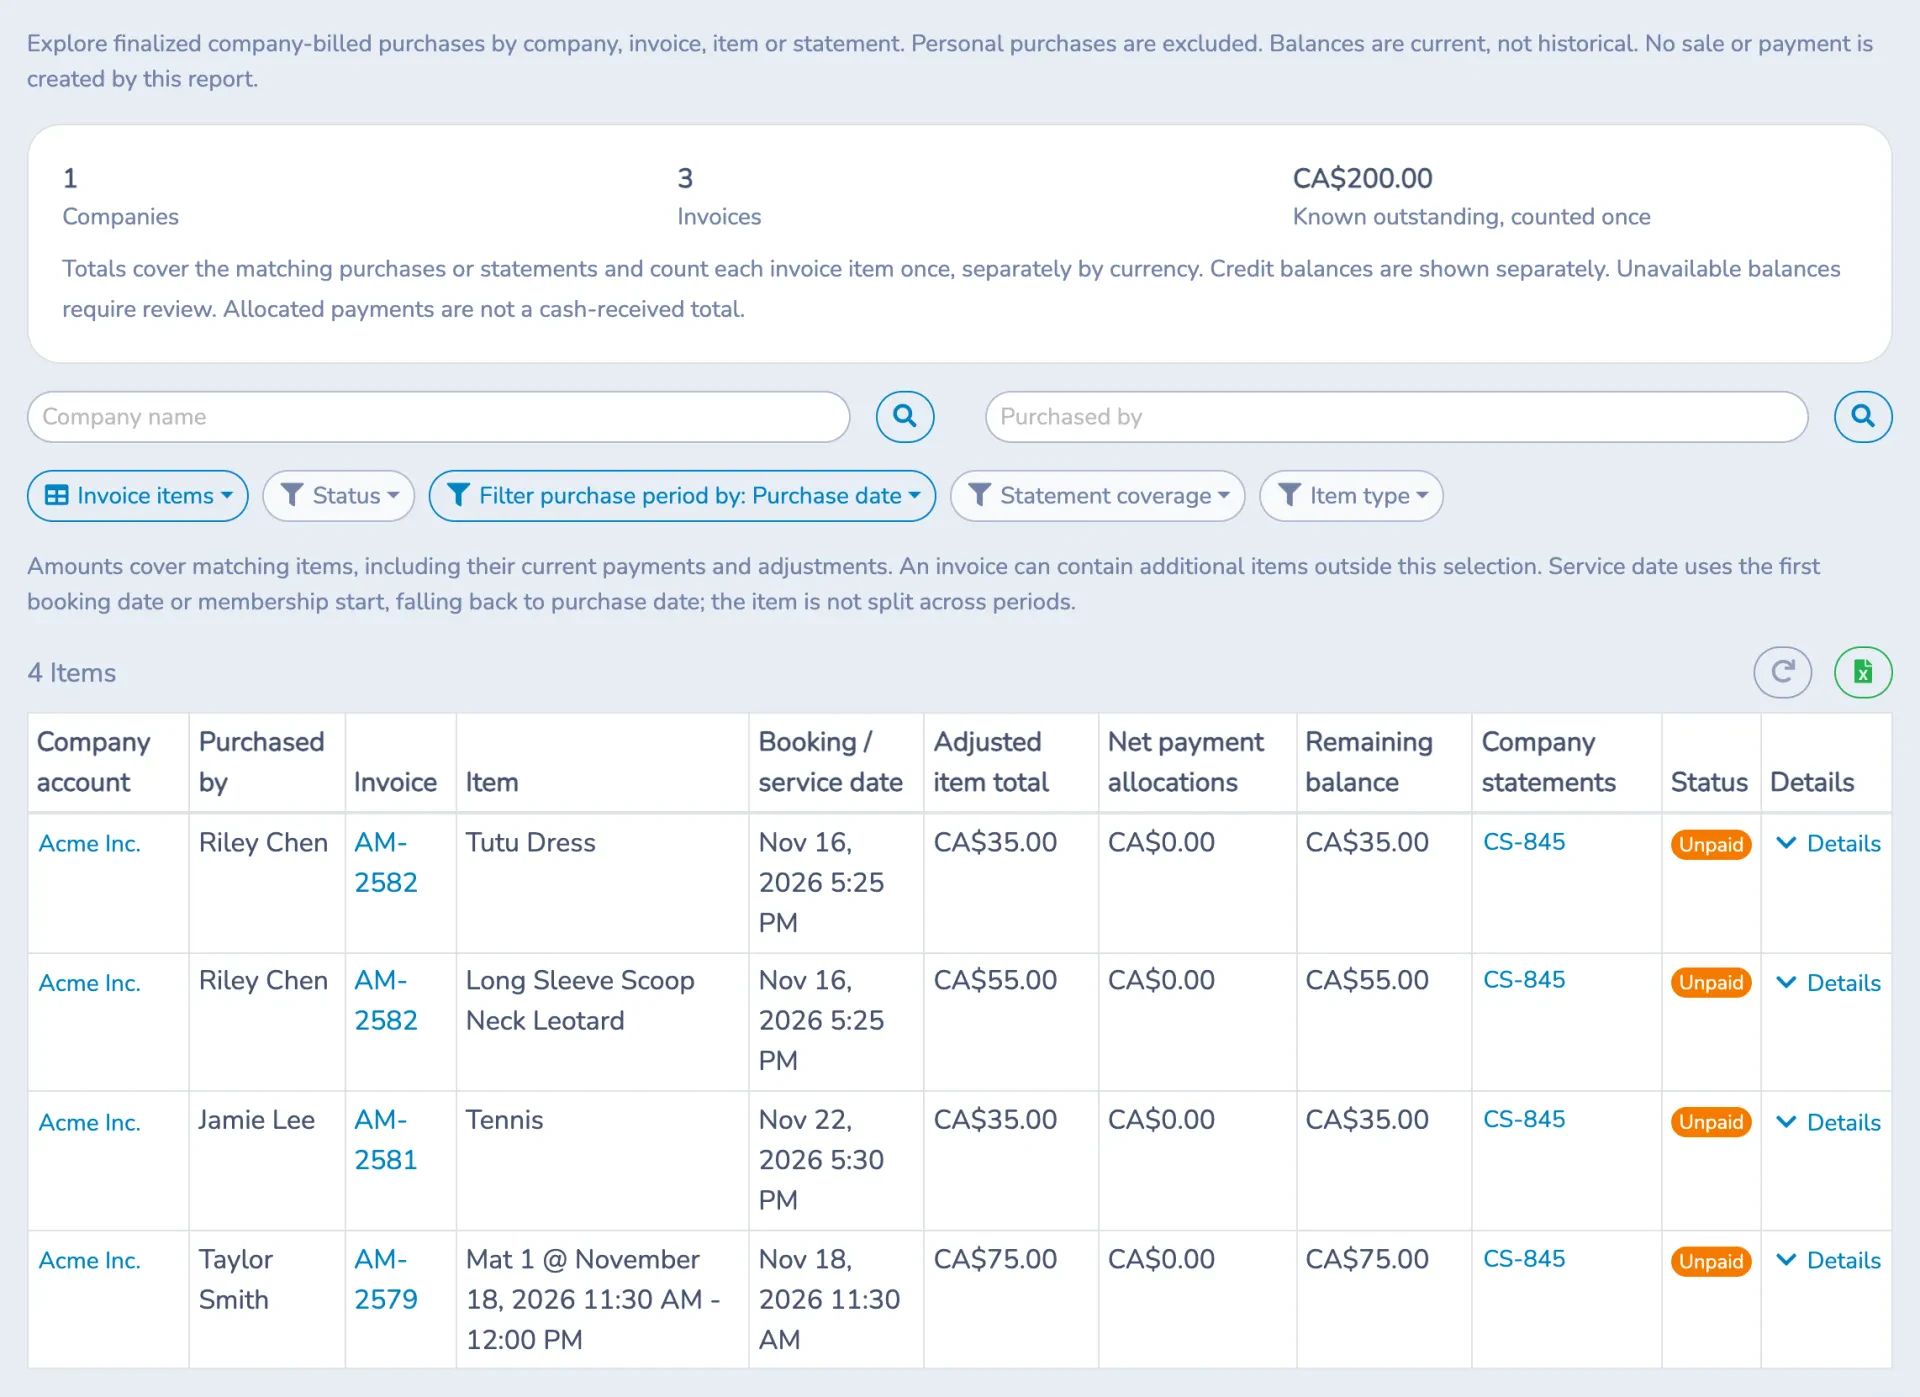
Choose a view
| View | Shows |
|---|---|
| Companies | One row per company: invoices, items, adjusted total, payments, remaining balance and items not yet on a statement. |
| Invoices | One row per company-billed invoice, with purchasers and the statements that include it. |
| Invoice items | One row per item, with purchaser, service date, amounts and statements. Open Details for quantity, price, discount, taxes, credits and cancellations, ledger code and booking dates. |
| Statements | One row per statement: issue date, period, items, balance at issue, remaining balance, status and email delivery. |
Filter the report
- Use the report date range to select the purchase period. In the Statements view, it selects statement issue dates.
- Search by Company name or by purchaser (Purchased by).
- Status: Unpaid, Partially settled, Settled, Cancelled, Credit balance or Review required.
- Filter purchase period by: Purchase date or Booking / service date.
- Statement coverage: Included on a statement or Not yet on a statement.
- Item type: Booking, Membership, Class, Product, Gift card or Other.
Click a company name to show only that company. In the Statements view, click Items to see everything included in a statement, regardless of purchase date.
Click the Excel icon to export the current view with its filters. The report settings are saved in the page URL, so you can bookmark or share the configured report.
Read the totals
- Totals count each invoice item once and are separated by currency.
- Credit balances are shown separately.
- Net payment allocations are payments applied to the matching items; they are not a cash-received total.
- An invoice can contain items outside your selection. Open Details for the full invoice total and balance.
- Rows marked Review required have a balance that cannot be calculated and need to be reviewed.
Convert a company back to a regular client
- Remove every member in Company → Members.
- Open Company → Settings and click Convert back to a regular client under Account type, then confirm.
Invoices and statements already issued are kept.
Example
Acme Inc. pays for its employees' court bookings.
- You convert Acme's client account into a company account, enter its billing email and link three employees.
- In Statement settings, you choose Booking / service date, Monthly, issue day 1, and turn on Issue statements automatically.
- During October, the employees book courts and choose Bill my company. Each receives a copy of their invoice; Acme receives each invoice.
- On November 1, Acme automatically receives statement CS-… for the October bookings, with the PDF and a payment link.
- Acme pays by cheque. You click Mark as paid, choose Check and enter the date. Each employee's October booking now shows as paid, and the Company billing report shows Acme as Settled.
Important behavior
- Disabling the Company billing module does not transfer existing company debts back to purchasers.
- Removing a member's link does not change invoices already billed to the company.
- Before merging two client accounts, remove company links and company designations from both, and resolve any company-billed invoices.
- A statement is a payment request and a dated snapshot. It does not replace the original invoices or your financial reports.