Activity Messenger Help Center
Stripe Terminal
Connect a compatible reader to collect card payments in person, then choose the payment from the invoice or checkout interface. Keep reader setup, the client’s convenience fee and your own provider/service fees separate. The payment dialog determines which fee controls are available.
Can I charge a credit card convenience fee with a Stripe Terminal reader?
Yes. You can charge your client a credit card convenience fee when collecting a payment with a Stripe Terminal reader, using the invoice payment dialog. The administrator checkout also offers a fee opt-in when the organization has configured a convenience fee. The reader does not automatically add a convenience fee simply because a card is used. Check the fee and total in Activity Messenger before sending the payment to the reader.
From an invoice
- Open the client’s invoice and choose Make a payment.
- Select Stripe Terminal as the payment method.
- Select Add Credit card convenience fee (or your organization’s custom fee label), when offered.
- Review the fee, any applicable taxes and the total, then proceed with the reader payment.
The applicable label and percentage can come from the invoice’s payment form or the organization’s fee settings. If convenience fees are disabled, the option is hidden. If a checkout convenience fee is already included in the outstanding invoice items, Activity Messenger indicates that it is already included instead of offering to add it again. Booking packages exempt from convenience fees are excluded from the fee calculation.
At the point of sale
The administrator checkout offers an Include Credit card convenience fee checkbox when a convenience fee is configured. The current dedicated POS payment dialog does not offer this checkbox and does not automatically add the configured percentage. To opt in through the invoice payment dialog, open the invoice from Invoices and follow the steps above. Always review the fee and total before payment.
Which fee does this mean?
The credit card convenience fee is the fee your organization charges the client. It is separate from Stripe’s processing fees and Activity Messenger’s service fee charged to your organization. Activity Messenger’s service fee for card-present payments depends on your organization’s configuration and may be waived. An AM service-fee waiver does not by itself add or remove the client’s convenience fee.
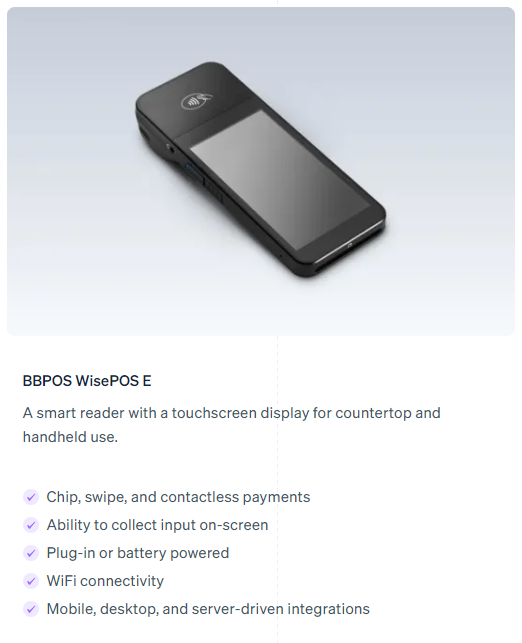
Activity Messenger allows you to take payments in person using the Stripe BBPOS WisePOS E terminal reader. Accepts credit cards, VISA debit and Interac in Canada.
Terminal readers can be purchased directly from Stripe. In the Stripe portal, click on the Payments menu and then choose Reader or click HERE to go to the page directly.
For Stripe processing rates, consult Stripe Terminal pricing. Activity Messenger’s own service fee depends on your organization’s card-present configuration and may be waived.
Supported readers
Activity Messenger connects to Stripe Terminal in two different ways. Whether a reader works depends on how it connects, not only on its model.
| Reader | How it connects | Where you can take payments |
|---|---|---|
| BBPOS WisePOS E (Stripe internet reader) | Registered to a Location from Activity Messenger with a Pairing code. Activity Messenger sends each payment to the reader through Stripe and follows its status until the client has tapped or inserted the card. | Stripe terminal in the point-of-sale payment dialog, in the invoice Make a payment dialog (including invoices opened from Bookings › Today) and in the administrator checkout of the online store. |
| Stripe Reader M2 and other Bluetooth or USB readers | No connection path. The web application only registers readers with a pairing code and drives them over the internet. | Not available in Activity Messenger. |
- The reader form under Readers accepts exactly three values: Name, Location and Pairing code. Any Stripe reader that provides a pairing code is registered the same way; the Reader splashscreen setting applies to the WisePOS E only.
- The Readers list shows each reader’s Type and Status (Online or Offline) as reported by Stripe. During a payment, only online readers can be selected; if none is online, turn a reader on and use the refresh button in the payment dialog.
- The pairing steps below (Settings button, admin PIN, Generate pairing code) are the WisePOS E procedure. They do not apply to the Stripe Reader M2.
Configuring your Stripe Readers
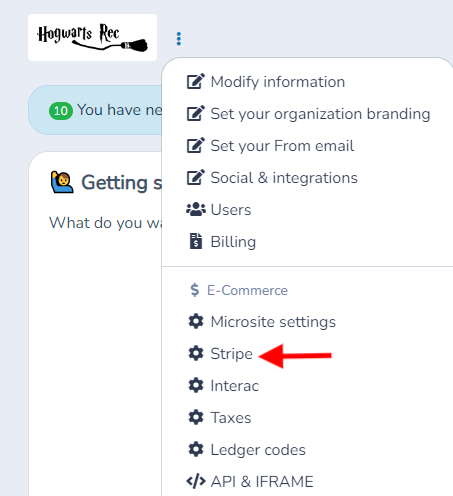
Access the Stripe Section in Your Account:
Click on the menu to the right of your logo in your dashboard and choose the Stripe option.
Make sure your Stripe account is connected. You can enable test mode if necessary.
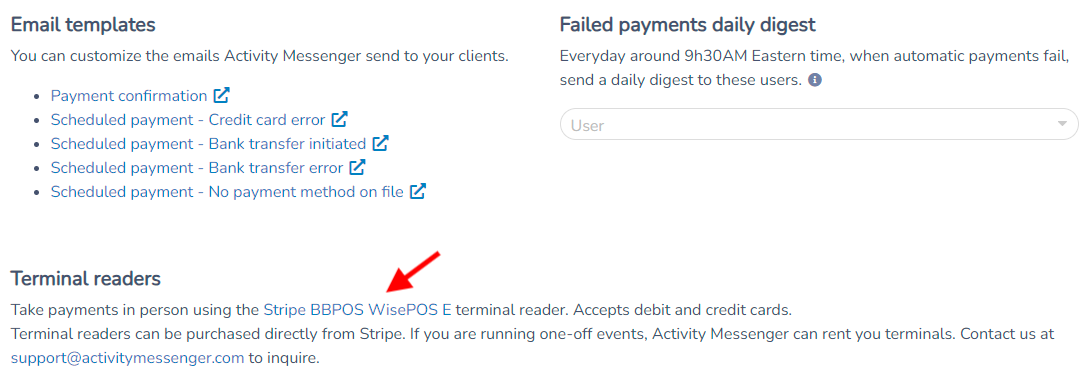
Access Card Reader Management:
Scroll to the bottom of the page to find the Card Readers option.
If you haven't purchased a reader yet, you can click the link to directly buy the reader recommended by Stripe.
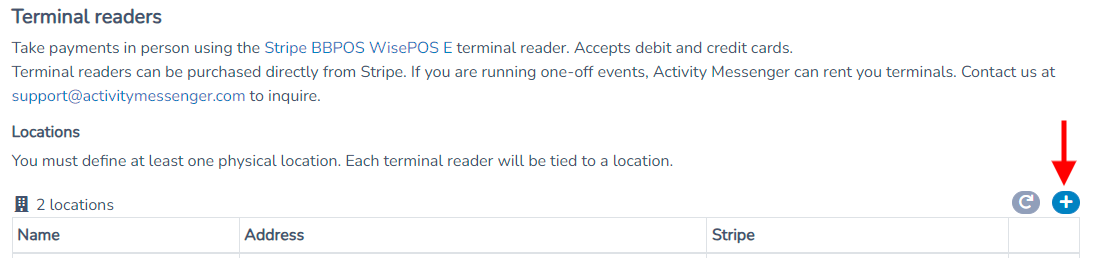
Add a Location of Use:
First, you need to set a physical location for your terminal.
Press the + to add a location.
Enter the location information (name, address, city, postal code) where you will use the Stripe reader.
Link Your Stripe Reader:
Once you have your reader in hand, click on + to link the reader to your account.
At this stage, please start the synchronization process for your Stripe reader.
Then, in the Readers section, click the button (+) to connect a reader.

Go to your reader and swipe right from the left edge of the screen to reveal a Settings button. Tap the Settings button and enter the admin PIN 07139. Choose the menu option Generate a pairing code.
Back on the Activity Messenger screen, give you reader a name, choose a location and enter the pairing code displayed on your device.
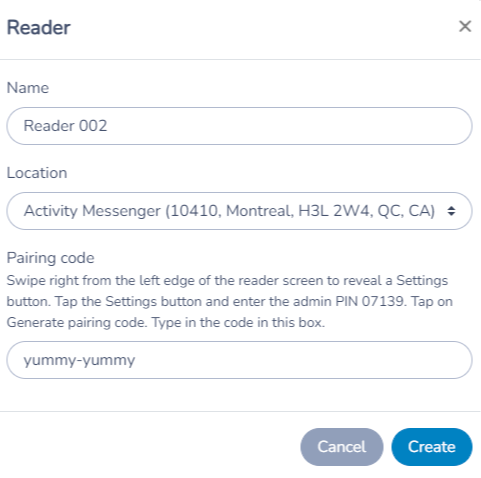
Press save to complete the connection.
Once your reader is added it will be displayed online. You are ready to accept in-person credit and debit card payment. Check the Point of Sale help page for more information.
Set Up Your Online Store
Go to the "Items" tab in the Ecommerce section.
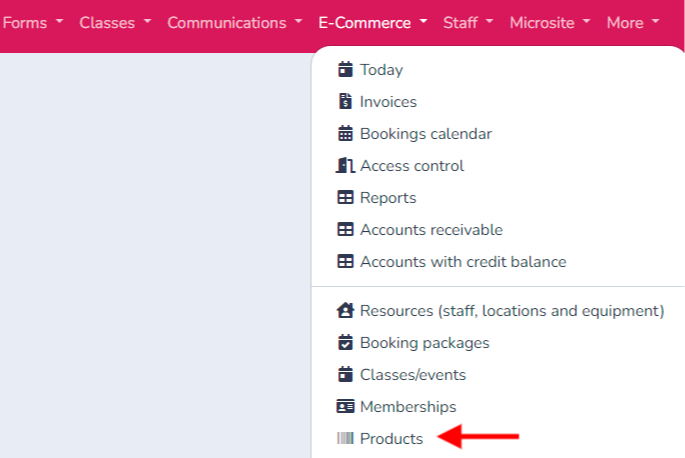
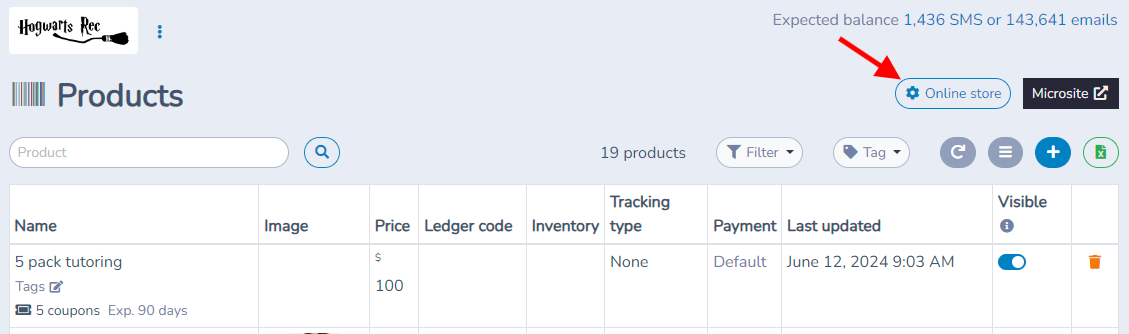
Select the option "Online store".
Ensure that the Stripe reader is properly connected to your online store.
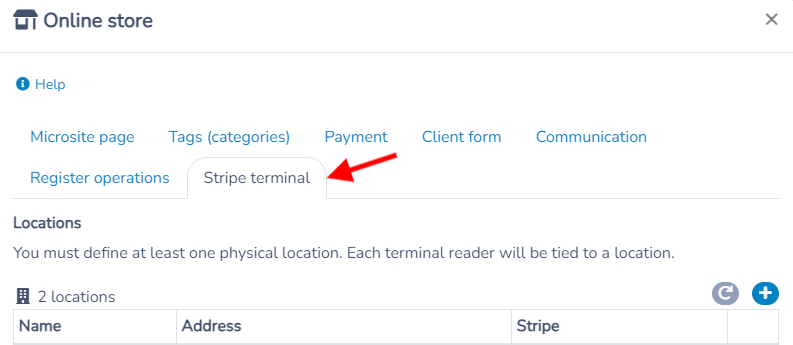
This will allow you to accept card payments through the Stripe reader. Cash is recorded separately in the point of sale.
Watch the payment demonstration

Reader appearance and optional tipping
In the reader configuration, review Tipping if clients should be offered a tip on the terminal. Configure the choices before using the reader. The Reader splashscreen setting changes the image shown on the reader; updates can take several minutes. Reader tips are a separate choice from a convenience fee.
The organization’s Stripe settings also control whether Stripe Terminal appears on administrator payment pages and whether payments recorded with other terminals are hidden. Save those controls after reviewing them. A POS can have its own terminal option, so confirm the payment interface staff will actually use.
A reader must be connected and available before processing an in-person payment. Its configured location and status help you choose the correct device. These controls concern reader payments; they do not enable tipping on every online checkout.
Next steps
Take payments at the Point of Sale · Review Stripe payments and payouts
Settings reference
| Setting | Where | Default | Effect |
|---|---|---|---|
| Show Stripe Terminal on the payment page for administrators | Dashboard menu › Stripe › Terminal readers; also Point of sale › a point of sale › Stripe terminal tab | Off | Adds Stripe terminal to the administrator payment dialogs (invoice, point of sale, administrator checkout). |
| Do not allow payments using other payment terminals | Dashboard menu › Stripe › Terminal readers | Off | Removes Credit card (terminal) and Debit (on your terminal) from the administrator payment options so only the Stripe reader is used for in-person cards. |
| Locations | Dashboard menu › Stripe › Terminal readers › Locations | None | At least one physical location is required. Every reader is tied to a location. |
| Readers (Name, Location, Pairing code) | Dashboard menu › Stripe › Terminal readers › Readers › + | None | Registers an internet reader such as the WisePOS E to your Stripe account. |
| Disable tips on this reader | Readers › edit a reader | Off | Skips the tipping screen on that reader only. |
| Tipping | Dashboard menu › Stripe › Terminal readers › Tipping | No percentages | Tip percentages offered on the reader screen. A reader can use a different ledger code. |
| Reader splashscreen | Dashboard menu › Stripe › Terminal readers | Activity Messenger image | Changes the idle image on the BBPOS WisePOS E only. Updates can take several minutes. |
| Show payment methods | Point of sale › a point of sale › settings | All methods, with Stripe terminal first when Stripe is connected | Chooses which payment buttons that point of sale shows. Remove Stripe terminal here to hide it on one point of sale only. |
Common questions
How do I set up the Stripe Reader M2? You cannot pair a Stripe Reader M2 with Activity Messenger. The web application only registers internet readers with a pairing code and sends payments to them over the internet.
Do the WisePOS E pairing steps apply to other readers? No. The Settings button, admin PIN and Generate pairing code steps are the WisePOS E procedure. The Stripe Reader M2 cannot be connected to Activity Messenger.
Which readers appear in the Readers list? Only internet readers registered to your Stripe account with a pairing code, with their Type and Status from Stripe.
Why can I not select my reader during a payment? Readers with the status Offline are disabled in the payment dialog. Turn the reader on, wait for it to connect, then use the refresh button in the dialog. If no reader is registered, the dialog says that no Stripe terminal reader is connected.
Where do I take a Stripe reader payment? From the point of sale, from an invoice (Make a payment › Stripe terminal), from the administrator checkout of the online store, or from an invoice opened on Bookings › Today. See Point of Sale, Payment methods and Online store.