Activity Messenger Help Center
Send your first email or SMS
Start by sending a short message to yourself. Check the result in your inbox or on your phone, then prepare a separate message for your intended audience. This helps you confirm the channel, wording and reply settings before contacting clients.
Before you begin
You need permission to send messages in the organization. Check that your own account has the email address and mobile number needed for your test. An SMS test is a real send and can use your SMS balance.
For a client send, first identify the relevant list, class, form or client records. See Choose an audience if you are unsure where to start.
1. Open a new message
Open Communications > New message. You can also open All messages and use its new-message action.
Choose Email, SMS and email, or SMS. If your organization enables Client preferences, that option follows the client’s chosen channel, with email as the default when no preference is set. For a first test of a specific channel, select that channel explicitly.
Choose Marketing for a promotion or Non-marketing for an operational message. An internal test of a class-update message can use Non-marketing; a promotional campaign should remain Marketing when prepared for its real audience.
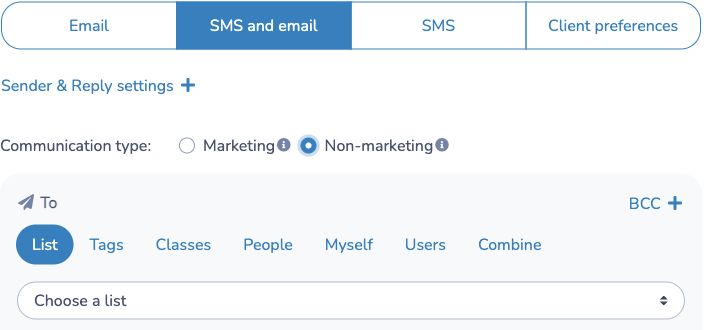
2. Choose Myself
In To, select Myself. Confirm that you have not selected a client list or added users in BCC.
This is a useful first delivery check, but it does not reproduce every client’s registration or participant context. A placeholder that depends on a class or form still needs to be checked in that context before a client send.
3. Write a short message
For email, enter a clear Email subject. Write the message in the editor. For example:
Reminder: Saturday’s swim lesson starts at 9 a.m. Please arrive ten minutes early.
Keep essential details in the SMS text. Longer SMS content can use several billable segments or be shortened with a link to the complete message, depending on the organization’s long-message setting. The displayed count is an estimate; see SMS, images and message length.
Use Use an HTML Template for a designed message. A template can appear in full in email, while the SMS includes text and a link to its hosted content. You can also use Quick messages or insert placeholders; review the selected content after doing so.
4. Preview and check reply settings
Use Preview to inspect the message. If you selected both channels, inspect the email and SMS versions. Open Sender & Reply settings to check where replies will go.
If you are not ready to send or schedule the message, click Save draft. Saving does not send or schedule it. To continue later, open Communications > All messages, choose Drafts from the filter, and select the draft to reopen it in New message. Other authorized admins can edit a draft; only its owner can delete it.
Before sending, confirm:
- The audience is still Myself, with no unintended BCC users.
- The subject, text and links are correct.
- Any placeholders have appropriate values for the selected context.
- The displayed counts and estimated cost are reasonable.
The preview is a check of the prepared message, not a guarantee that every email client or phone will display it identically. For an image or document sent by SMS, expect a link rather than an MMS attachment.
5. Send the test and inspect it
Click Send when you are ready for the real test message. Check your email inbox and/or phone for the selected channels. Open any links and confirm that the content is readable.
Use All messages to find the send and review its status. If it does not arrive, inspect delivery results before sending repeatedly. A resend is another send, and another SMS can use additional balance.
6. Prepare the client send
Create a separate message for the intended audience, or start from the relevant list, form or class. Recheck the audience, communication type, placeholders, reply settings and estimate before sending.
Do not assume a test to yourself proves that a registration-based audience or its placeholders are correct. Review the actual client context. Use Recipients and sending options for both-parent delivery, BCC and contextual entry points.
To send later, follow Scheduling messages. After sending, use Tracking messages to review results.